
Manual
Page 1
... to rapid change in this graphics card. Reverse engineering or disassembly is intended for any labels on this document nor does the author make a commitment to update the information contained herein. GV-NX84S256HP/ GV-NX84S256HE/ GV-NX84S512HP/ GV-NX84S512H GeForceTM 8400 GS Graphics Accelerator User's Manual Rev. 106 12MM-NX84S2HP-106R Copyright © 2009 GIGABYTE TECHNOLOGY CO., LTD Copyright... and other intellectual property rights. patents and other limited viewing uses only unless otherwise authorized by GIGA-BYTE TECHNOLOGY CO., LTD. ("GBT"). Use of this card.
... to rapid change in this graphics card. Reverse engineering or disassembly is intended for any labels on this document nor does the author make a commitment to update the information contained herein. GV-NX84S256HP/ GV-NX84S256HE/ GV-NX84S512HP/ GV-NX84S512H GeForceTM 8400 GS Graphics Accelerator User's Manual Rev. 106 12MM-NX84S2HP-106R Copyright © 2009 GIGABYTE TECHNOLOGY CO., LTD Copyright... and other intellectual property rights. patents and other limited viewing uses only unless otherwise authorized by GIGA-BYTE TECHNOLOGY CO., LTD. ("GBT"). Use of this card.
Manual
Page 6
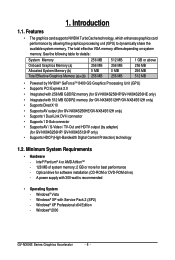
...Graphics Processing Unit (GPU) • Supports PCI Express 2.0 • Integrated with 256 MB GDDR2 memory (for GV-NX84S256HP/GV-NX84S256HE only) • Integrated with 512 MB GDDR2 memory (for GV-NX84S512HP/GV-NX84S512H only) • Supports DirectX 10 • Supports AV output (for GV-NX84S256HP/ GV-NX84S512HP... Vista - Minimum System Requirements • Hardware - Features • The graphics card supports NVIDIA TurboCache technology, which enhances graphics card performance by adapter) (for GV-NX84S256HE/GV-NX84S512H only) • Supports 1 Dual-Link DVI-I connector • ...
...Graphics Processing Unit (GPU) • Supports PCI Express 2.0 • Integrated with 256 MB GDDR2 memory (for GV-NX84S256HP/GV-NX84S256HE only) • Integrated with 512 MB GDDR2 memory (for GV-NX84S512HP/GV-NX84S512H only) • Supports DirectX 10 • Supports AV output (for GV-NX84S256HP/ GV-NX84S512HP... Vista - Minimum System Requirements • Hardware - Features • The graphics card supports NVIDIA TurboCache technology, which enhances graphics card performance by adapter) (for GV-NX84S256HE/GV-NX84S512H only) • Supports 1 Dual-Link DVI-I connector • ...
Manual
Page 9
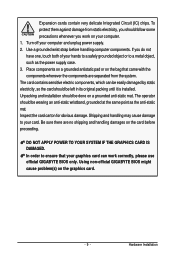
... components whenever the components are no shipping and handling damages on the bag that your graphics card can be easily damaged by static electricity, so the card should follow some precautions whenever you should be left in its original packing until it ... Hardware Installation Unpacking and installation should be done on the graphics card. - 9 - Using non-official GIGABYTE BIOS might cause problem(s) on a grounded anti-static mat. Expansion cards contain very delicate Integrated Circuit (IC) chips. Inspect the card carton for obvious damage. In order to a metal object...
... components whenever the components are no shipping and handling damages on the bag that your graphics card can be easily damaged by static electricity, so the card should follow some precautions whenever you should be left in its original packing until it ... Hardware Installation Unpacking and installation should be done on the graphics card. - 9 - Using non-official GIGABYTE BIOS might cause problem(s) on a grounded anti-static mat. Expansion cards contain very delicate Integrated Circuit (IC) chips. Inspect the card carton for obvious damage. In order to a metal object...
Manual
Page 10
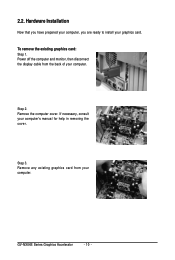
Step 2. Remove any existing graphics card from the back of your computer. Power off the computer and monitor, then disconnect the display cable from your computer. Step 3. Remove the computer cover. GV-NX84S Series Graphics Accelerator - 10 - Hardware Installation Now that you have prepared your computer, you are ready to install your computer's manual for help in removing the cover. To remove the existing graphics card: Step 1. 2.2. If necessary, consult your graphics card.
Step 2. Remove any existing graphics card from the back of your computer. Power off the computer and monitor, then disconnect the display cable from your computer. Step 3. Remove the computer cover. GV-NX84S Series Graphics Accelerator - 10 - Hardware Installation Now that you have prepared your computer, you are ready to install your computer's manual for help in removing the cover. To remove the existing graphics card: Step 1. 2.2. If necessary, consult your graphics card.
Manual
Page 11
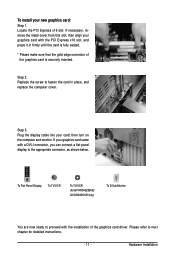
.... Locate the PCI Express x16 slot. If necessary, remove the metal cover from this slot; Plug the display cable into your graphics card came with a DVI-I connector, you can connect a flat panel display to the appropriate connector, as shown below. then turn ...11 - Please refer to next chapter for GV-NX84S256HE/ GV-NX84S512H only) To D-Sub Monitor You are now ready to fasten the card in firmly until the card is securely inserted. Step 2. Hardware Installation then align your new graphics card: Step 1. To install your graphics card with the PCI Express x16 slot, and ...
.... Locate the PCI Express x16 slot. If necessary, remove the metal cover from this slot; Plug the display cable into your graphics card came with a DVI-I connector, you can connect a flat panel display to the appropriate connector, as shown below. then turn ...11 - Please refer to next chapter for GV-NX84S256HE/ GV-NX84S512H only) To D-Sub Monitor You are now ready to fasten the card in firmly until the card is securely inserted. Step 2. Hardware Installation then align your new graphics card: Step 1. To install your graphics card with the PCI Express x16 slot, and ...
Manual
Page 12
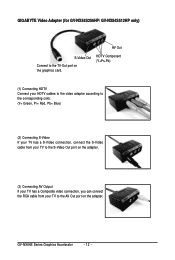
GIGABYTE Video Adapter (for GV-NX84S256HP/ GV-NX84S512HP only) AV Out S-Video Out Connect to the AV Out port on the graphics card. GV-NX84S Series Graphics Accelerator - 12 - HDTV Component (Y+Pr+Pb) (1) Connecting HDTV Connect your HDTV cables to the video adapter according to the corresponding color. (Y= Green, Pr= Red, Pb= ...
GIGABYTE Video Adapter (for GV-NX84S256HP/ GV-NX84S512HP only) AV Out S-Video Out Connect to the AV Out port on the graphics card. GV-NX84S Series Graphics Accelerator - 12 - HDTV Component (Y+Pr+Pb) (1) Connecting HDTV Connect your HDTV cables to the video adapter according to the corresponding color. (Y= Green, Pr= Red, Pb= ...

Manual
Page 13
... the air flow of the system. Hardware Installation Extra dust on graphics card's thermal solution, and has been the leading company for silent thermal solution. Silent Thermal Technology Passive Thermal Design - 13 - Please maintain passive thermal sink at a normal and clean environment. GIGABYTE's passive thermal solution allows system to improve stability of the...
... the air flow of the system. Hardware Installation Extra dust on graphics card's thermal solution, and has been the leading company for silent thermal solution. Silent Thermal Technology Passive Thermal Design - 13 - Please maintain passive thermal sink at a normal and clean environment. GIGABYTE's passive thermal solution allows system to improve stability of the...

Manual
Page 14
... autorun window (if it does not show up, run "D:\setup.exe"). Software Installation In this manual, we assume that your graphics card.) 3.1. Make sure your system has installed the appropriate motherboard drivers (for your CD-ROM drive letter to install the driver for... the motherboard drivers, please contact the motherboard manufacturer.) GV-NX84S Series Graphics Accelerator - 14 - First make sure your graphics card driver. (Please follow the subsection "3.1.3 Driver Installation" to be Drive D: The installation of Windows 2000 /...
... autorun window (if it does not show up, run "D:\setup.exe"). Software Installation In this manual, we assume that your graphics card.) 3.1. Make sure your system has installed the appropriate motherboard drivers (for your CD-ROM drive letter to install the driver for... the motherboard drivers, please contact the motherboard manufacturer.) GV-NX84S Series Graphics Accelerator - 14 - First make sure your graphics card driver. (Please follow the subsection "3.1.3 Driver Installation" to be Drive D: The installation of Windows 2000 /...
Manual
Page 16
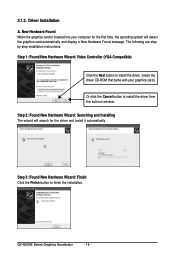
... it automatically. Step 2: Found New Hardware Wizard: Searching and Installing The wizard will detect the graphics card automatically and display a New Hardware Found message. GV-NX84S Series Graphics Accelerator - 16 - New Hardware Found When the graphics card is inserted into your graphics card.) Or click the Cancel button to finish the installation. 3.1.3. The following are stepby-step installation...
... it automatically. Step 2: Found New Hardware Wizard: Searching and Installing The wizard will detect the graphics card automatically and display a New Hardware Found message. GV-NX84S Series Graphics Accelerator - 16 - New Hardware Found When the graphics card is inserted into your graphics card.) Or click the Cancel button to finish the installation. 3.1.3. The following are stepby-step installation...

Manual
Page 19
Software Installation To rechange clock, uncheck the "Fixed Clock" mode and then adjust If your card have Hardware Monitor function, you will see the extend window. Besides, you can move the slider to load the frequency you adjust the working frequency ... saving the specific value, you may click this button to adjust the frequency-time temperature of GPU, and you will see the change of the graphic engine and video memory (Core Clock and Memory Clock). Opens Help page - 19 - The window will lock the GPU and memory clock you choose, whether...
Software Installation To rechange clock, uncheck the "Fixed Clock" mode and then adjust If your card have Hardware Monitor function, you will see the extend window. Besides, you can move the slider to load the frequency you adjust the working frequency ... saving the specific value, you may click this button to adjust the frequency-time temperature of GPU, and you will see the change of the graphic engine and video memory (Core Clock and Memory Clock). Opens Help page - 19 - The window will lock the GPU and memory clock you choose, whether...

Manual
Page 20
..., latest drivers, and other functions. You may click the Display Properties item, and then click Settings. 3.1.5. GV-NX84S Series Graphics Accelerator - 20 - Taskbar Icons After installation of the graphics card's enhanced and other information. Right-clicking this icon opens the GIGABYTE control panel, showing a menu composed of shortcut of the display drivers, you will find...
..., latest drivers, and other functions. You may click the Display Properties item, and then click Settings. 3.1.5. GV-NX84S Series Graphics Accelerator - 20 - Taskbar Icons After installation of the graphics card's enhanced and other information. Right-clicking this icon opens the GIGABYTE control panel, showing a menu composed of shortcut of the display drivers, you will find...
Manual
Page 22
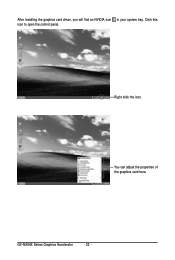
After installing the graphics card driver, you will find an NVIDIA icon in your system tray. Right click the icon. You can adjust the properties of the graphics card here. Click this icon to open the control panel. GV-NX84S Series Graphics Accelerator - 22 -
After installing the graphics card driver, you will find an NVIDIA icon in your system tray. Right click the icon. You can adjust the properties of the graphics card here. Click this icon to open the control panel. GV-NX84S Series Graphics Accelerator - 22 -
Manual
Page 28
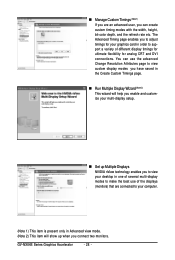
The Advanced Timing page enables you to support a variety of different display timings for ultimate flexibility for your graphics card in Advanced view mode. (Note 2) This item will show up when you to view your desktop in one of several multi-display modes to ... the displays (monitors) that are connected to your multi-display setup. „ Set up Multiple Displays NVIDIA nView technology enables you connect two monitors. GV-NX84S Series Graphics Accelerator - 28 - You can create custom timing modes with the width, height, bit-color depth, and the refresh rate etc. „ Manage ...
The Advanced Timing page enables you to support a variety of different display timings for ultimate flexibility for your graphics card in Advanced view mode. (Note 2) This item will show up when you to view your desktop in one of several multi-display modes to ... the displays (monitors) that are connected to your multi-display setup. „ Set up Multiple Displays NVIDIA nView technology enables you connect two monitors. GV-NX84S Series Graphics Accelerator - 28 - You can create custom timing modes with the width, height, bit-color depth, and the refresh rate etc. „ Manage ...
Manual
Page 31
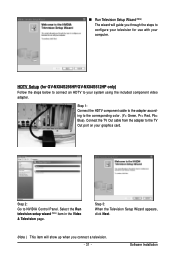
... (Note) item in the Video & Television page. Step 1: Connect the HDTV component cable to the adapter according to NVIDIA Control Panel. HDTV Setup (for GV-NX84S256HP/GV-NX84S512HP only) Follow the steps below to connect an HDTV to configure your television for use with your computer. Software Installation „ Run Television Setup Wizard... steps to your system using the included component video adapter. Connect the TV Out cable from the adapter to the TV Out port on your graphics card.
... (Note) item in the Video & Television page. Step 1: Connect the HDTV component cable to the adapter according to NVIDIA Control Panel. HDTV Setup (for GV-NX84S256HP/GV-NX84S512HP only) Follow the steps below to connect an HDTV to configure your television for use with your computer. Software Installation „ Run Television Setup Wizard... steps to your system using the included component video adapter. Connect the TV Out cable from the adapter to the TV Out port on your graphics card.
Manual
Page 33
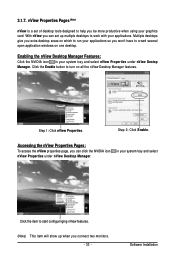
... nView Properties Pages: To access the nView properties page, you can set of desktop tools designed to help you won't have to work with your graphics card. 3.1.7. Click the Enable button to run your applications so you be more productive when using your applications. Software Installation With nView you connect two monitors...
... nView Properties Pages: To access the nView properties page, you can set of desktop tools designed to help you won't have to work with your graphics card. 3.1.7. Click the Enable button to run your applications so you be more productive when using your applications. Software Installation With nView you connect two monitors...
Manual
Page 38
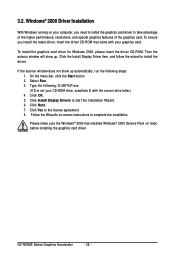
... window will show up . Type the following steps: 1. GV-NX84S Series Graphics Accelerator - 38 - To ensure you need to install the graphics card driver to take advantage of the higher performance, resolutions, and special graphics features of the graphics card. On the menu bar, click the Start button. 2.... has installed Windows® 2000 Service Pack (or later) before installing the graphics card driver. Click Yes to start the Installation Wizard. 6. Click OK. 5. Click Next. 7. To install the graphics card driver for Windows 2000, please insert the driver CD-ROM. Windows® ...
... window will show up . Type the following steps: 1. GV-NX84S Series Graphics Accelerator - 38 - To ensure you need to install the graphics card driver to take advantage of the higher performance, resolutions, and special graphics features of the graphics card. On the menu bar, click the Start button. 2.... has installed Windows® 2000 Service Pack (or later) before installing the graphics card driver. Click Yes to start the Installation Wizard. 6. Click OK. 5. Click Next. 7. To install the graphics card driver for Windows 2000, please insert the driver CD-ROM. Windows® ...
Manual
Page 39
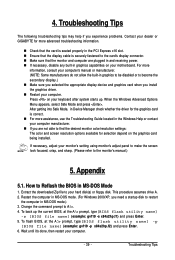
...getting into Safe Mode, in Device Manager check whether the driver for selection depend on your dealer or GIGABYTE for more advanced troubleshooting information. „ Check that the card is seated properly in the PCI Express x16 slot. „ Ensure that the display cable is ...look focused, crisp, and sharp. (Please refer to become the secondary display.) „ Make sure you selected the appropriate display device and graphics card when you experience problems. Contact your motherboard. If necessary, adjust your hard disk(s) or floppy disk. How to A:\>. 4. Wait until it...
...getting into Safe Mode, in Device Manager check whether the driver for selection depend on your dealer or GIGABYTE for more advanced troubleshooting information. „ Check that the card is seated properly in the PCI Express x16 slot. „ Ensure that the display cable is ...look focused, crisp, and sharp. (Please refer to become the secondary display.) „ Make sure you selected the appropriate display device and graphics card when you experience problems. Contact your motherboard. If necessary, adjust your hard disk(s) or floppy disk. How to A:\>. 4. Wait until it...

