
Manual
Page 5
...(Note 33 3.2. Minimum System Requirements 6 2. Taskbar Icons ...20 3.1.6. Troubleshooting Tips 39 5. Windows® XP Driver and Utilities Installation 14 3.1.1. Operating System Requirements 14 3.1.2. Appendix ...39 5.1. Resolutions and Color Depth Tables (In ... you connect two monitors. - 5 - Board Layout ...7 2.2. Hardware Installation ...10 3. Introduction ...6 1.1. Utilities on Driver CD 18 3.1.5. Windows® 2000 Driver Installation 38 4. Table of Contents 1. Software Installation 14 3.1. Display Properties Pages 23 3.1.7. How to Reflash the BIOS ...
...(Note 33 3.2. Minimum System Requirements 6 2. Taskbar Icons ...20 3.1.6. Troubleshooting Tips 39 5. Windows® XP Driver and Utilities Installation 14 3.1.1. Operating System Requirements 14 3.1.2. Appendix ...39 5.1. Resolutions and Color Depth Tables (In ... you connect two monitors. - 5 - Board Layout ...7 2.2. Hardware Installation ...10 3. Introduction ...6 1.1. Utilities on Driver CD 18 3.1.5. Windows® 2000 Driver Installation 38 4. Table of Contents 1. Software Installation 14 3.1. Display Properties Pages 23 3.1.7. How to Reflash the BIOS ...
Manual
Page 11
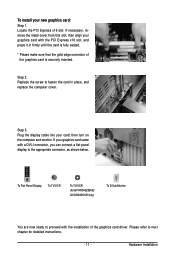
If necessary, remove the metal cover from this slot; Replace the screw to the appropriate connector, as shown below. Please refer to next chapter for GV-NX84S256HE/ GV-NX84S512H only) To D-Sub Monitor You are now ready to proceed with a DVI-I connector, you can connect a flat panel display to fasten the... card in firmly until the card is fully seated. * Please make sure that the gold edge connector of the graphics card driver. Step 2. Plug the display cable into your new graphics card: Step 1. If your graphics card with the PCI Express x16 slot, and ...
If necessary, remove the metal cover from this slot; Replace the screw to the appropriate connector, as shown below. Please refer to next chapter for GV-NX84S256HE/ GV-NX84S512H only) To D-Sub Monitor You are now ready to proceed with a DVI-I connector, you can connect a flat panel display to fasten the... card in firmly until the card is fully seated. * Please make sure that the gold edge connector of the graphics card driver. Step 2. Plug the display cable into your new graphics card: Step 1. If your graphics card with the PCI Express x16 slot, and ...
Manual
Page 14
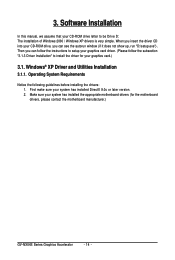
First make sure your CD-ROM drive letter to install the driver for your system has installed the appropriate motherboard drivers (for the motherboard drivers, please contact the motherboard manufacturer.) GV-NX84S Series Graphics Accelerator - 14 - 3. Windows® XP Driver and Utilities Installation 3.1.1. Software Installation In this manual, we assume that your system has installed DirectX...
First make sure your CD-ROM drive letter to install the driver for your system has installed the appropriate motherboard drivers (for the motherboard drivers, please contact the motherboard manufacturer.) GV-NX84S Series Graphics Accelerator - 14 - 3. Windows® XP Driver and Utilities Installation 3.1.1. Software Installation In this manual, we assume that your system has installed DirectX...
Manual
Page 16
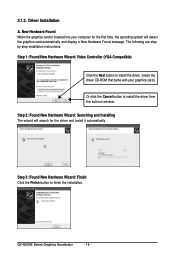
... The wizard will detect the graphics card automatically and display a New Hardware Found message. GV-NX84S Series Graphics Accelerator - 16 - Step 3: Found New Hardware Wizard: Finish Click the Finish button to install the driver from the autorun window. Driver Installation A. The following are stepby-step installation instructions. 3.1.3. Step 1: Found New Hardware Wizard: Video...
... The wizard will detect the graphics card automatically and display a New Hardware Found message. GV-NX84S Series Graphics Accelerator - 16 - Step 3: Found New Hardware Wizard: Finish Click the Finish button to install the driver from the autorun window. Driver Installation A. The following are stepby-step installation instructions. 3.1.3. Step 1: Found New Hardware Wizard: Video...
Manual
Page 17
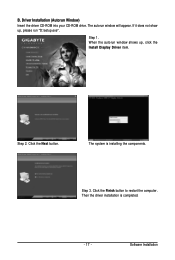
Step 3. Driver Installation (Autorun Window) Insert the driver CD-ROM into your CD-ROM drive. Step 1. The system is completed. - 17 - Click the Next button. B. Click the Finish button to restart the computer. The autorun window will appear. When the autorun window shows up , please run "D:\setup.exe". Then the driver installation is installing the components. If it does not show up , click the Install Display Driver item. Software Installation Step 2.
Step 3. Driver Installation (Autorun Window) Insert the driver CD-ROM into your CD-ROM drive. Step 1. The system is completed. - 17 - Click the Next button. B. Click the Finish button to restart the computer. The autorun window will appear. When the autorun window shows up , please run "D:\setup.exe". Then the driver installation is installing the components. If it does not show up , click the Install Display Driver item. Software Installation Step 2.
Manual
Page 18
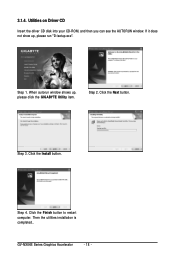
If it does not show up , please click the GIGABYTE Utility item. Step 1. Click the Next button. Step 3. Step 4. 3.1.4. Utilities on Driver CD Insert the driver CD disk into your CD-ROM, and then you can see the AUTORUN window. When autorun window shows up , please run "D:\setup.exe". GV-NX84S Series Graphics Accelerator - 18 - Step 2. Click the Finish button to restart computer. Click the Install button. Then the utilities installation is completed..
If it does not show up , please click the GIGABYTE Utility item. Step 1. Click the Next button. Step 3. Step 4. 3.1.4. Utilities on Driver CD Insert the driver CD disk into your CD-ROM, and then you can see the AUTORUN window. When autorun window shows up , please run "D:\setup.exe". GV-NX84S Series Graphics Accelerator - 18 - Step 2. Click the Finish button to restart computer. Click the Install button. Then the utilities installation is completed..

Manual
Page 20
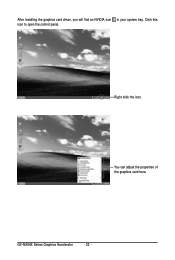
Right click the icon. Right-clicking this icon opens the GIGABYTE control panel, showing a menu composed of shortcut of the display drivers, you will find a GIGABYTE icon on the taskbar's status area. You may click the Display Properties item, and then click ...Click the Color Correction and VGA Information items to change your display settings. You can link to GIGABYTE website for updated information about the graphics accelerator, latest drivers, and other functions. GV-NX84S Series Graphics Accelerator - 20 - 3.1.5. Taskbar Icons After installation of the graphics card's ...
Right click the icon. Right-clicking this icon opens the GIGABYTE control panel, showing a menu composed of shortcut of the display drivers, you will find a GIGABYTE icon on the taskbar's status area. You may click the Display Properties item, and then click ...Click the Color Correction and VGA Information items to change your display settings. You can link to GIGABYTE website for updated information about the graphics accelerator, latest drivers, and other functions. GV-NX84S Series Graphics Accelerator - 20 - 3.1.5. Taskbar Icons After installation of the graphics card's ...
Manual
Page 22
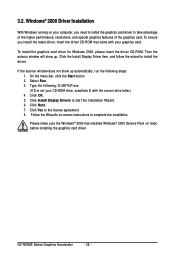
You can adjust the properties of the graphics card here. GV-NX84S Series Graphics Accelerator - 22 - Click this icon to open the control panel. Right click the icon. After installing the graphics card driver, you will find an NVIDIA icon in your system tray.
You can adjust the properties of the graphics card here. GV-NX84S Series Graphics Accelerator - 22 - Click this icon to open the control panel. Right click the icon. After installing the graphics card driver, you will find an NVIDIA icon in your system tray.
Manual
Page 38
... D is not your CD-ROM drive, substitute D with your computer, you install the latest driver, insert the driver CD-ROM that came with the correct drive letter.) 4. Select Run. 3. GV-NX84S Series Graphics Accelerator - 38 - Click the Install Display Driver item, and follow the wizard to complete the installation. Type the following steps: 1. 3.2. Follow...
... D is not your CD-ROM drive, substitute D with your computer, you install the latest driver, insert the driver CD-ROM that came with the correct drive letter.) 4. Select Run. 3. GV-NX84S Series Graphics Accelerator - 38 - Click the Install Display Driver item, and follow the wizard to complete the installation. Type the following steps: 1. 3.2. Follow...
Manual
Page 39
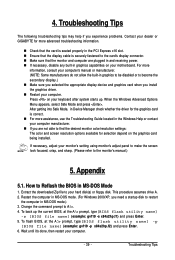
... sharp. (Please refer to become the secondary display.) „ Make sure you selected the appropriate display device and graphics card when you install the graphics driver. „ Restart your computer. - 39 - To back up . To flash BIOS, at the A:\> prompt, type[BIOS flash utility name] -s ... -p x84s2hp.f2) and press Enter. 6. Troubleshooting Tips The following troubleshooting tips may help if you experience problems. Contact your dealer or GIGABYTE for selection depend on the graphics card being installed. Change the command prompt to restart the computer in MS-DOS Mode 1. Wait until...
... sharp. (Please refer to become the secondary display.) „ Make sure you selected the appropriate display device and graphics card when you install the graphics driver. „ Restart your computer. - 39 - To back up . To flash BIOS, at the A:\> prompt, type[BIOS flash utility name] -s ... -p x84s2hp.f2) and press Enter. 6. Troubleshooting Tips The following troubleshooting tips may help if you experience problems. Contact your dealer or GIGABYTE for selection depend on the graphics card being installed. Change the command prompt to restart the computer in MS-DOS Mode 1. Wait until...

