Manual
Page 4
Minimum System Requirements 3 2. DirectX Installation ...11 3.1.3. nView Properties pages 26 3.2. Resolutions and Color Depth Table (In Windows® XP 34 GV-NX84G256H Graphics Accelerator - 2 - Driver Installation ...12 3.1.4. Display Properties Pages 15 3.1.6. Hardware Installation 6 3. Windows® XP Driver and Utilities Installation 10 3.1.1. Taskbar Icon ...14 3.1.5. Software Installation 10 3.1. Hardware Installation 4 2.1. Operating System Requirement 10 3.1.2. Features ...3 1.2. How...
Minimum System Requirements 3 2. DirectX Installation ...11 3.1.3. nView Properties pages 26 3.2. Resolutions and Color Depth Table (In Windows® XP 34 GV-NX84G256H Graphics Accelerator - 2 - Driver Installation ...12 3.1.4. Display Properties Pages 15 3.1.6. Hardware Installation 6 3. Windows® XP Driver and Utilities Installation 10 3.1.1. Taskbar Icon ...14 3.1.5. Software Installation 10 3.1. Hardware Installation 4 2.1. Operating System Requirement 10 3.1.2. Features ...3 1.2. How...

Manual
Page 5
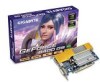
... PCI Express x16 • Integrated with 256 MB GDDR2 memory • Supports NVIDIA® SLITM (Scalable Link Interface) technology via the PCI Express bus, the GV-NX84G256H requires driver version 158.27 or later. - 3 - Graphics cards working in an SLI configuration must be of available disk space for details: System Memory Onboard Graphics...
... PCI Express x16 • Integrated with 256 MB GDDR2 memory • Supports NVIDIA® SLITM (Scalable Link Interface) technology via the PCI Express bus, the GV-NX84G256H requires driver version 158.27 or later. - 3 - Graphics cards working in an SLI configuration must be of available disk space for details: System Memory Onboard Graphics...
Manual
Page 9
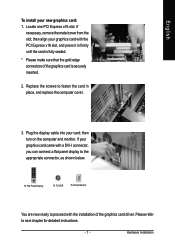
... screws to fasten the card in firmly until the card is fully seated. * Please make sure that the gold edge connectors of the graphics card driver. then turn on the computer and monitor. Hardware Installation To Flat Panel Display To TV/VCR To D-Sub Monitor You are now ready to proceed...
... screws to fasten the card in firmly until the card is fully seated. * Please make sure that the gold edge connectors of the graphics card driver. then turn on the computer and monitor. Hardware Installation To Flat Panel Display To TV/VCR To D-Sub Monitor You are now ready to proceed...

Manual
Page 10
... system supports SLI mode. Select Set SLI Configuration from the side menu and select the Enable SLI Technology check box (Figure 2) and click Apply. GV-NX84G256H Graphics Accelerator - 8 - Figure 1 Step 1: After installing the graphics card driver, right-click on an SLI motherboard (Figure 1), users can enable SLI mode simply through the graphics card...
... system supports SLI mode. Select Set SLI Configuration from the side menu and select the Enable SLI Technology check box (Figure 2) and click Apply. GV-NX84G256H Graphics Accelerator - 8 - Figure 1 Step 1: After installing the graphics card driver, right-click on an SLI motherboard (Figure 1), users can enable SLI mode simply through the graphics card...

Manual
Page 12
... dealer for the motherboard, which consist of Windows® 2000 / Windows® XP drivers is very simple. Then you can see the AUTORUN window (if it does not show up, run "D:\setup.exe"). GV-NX84G256H Graphics Accelerator - 10 - Windows® XP Driver and Utilities Installation 3.1.1. Software Installation In this manual, we assume that motherboard.
... dealer for the motherboard, which consist of Windows® 2000 / Windows® XP drivers is very simple. Then you can see the AUTORUN window (if it does not show up, run "D:\setup.exe"). GV-NX84G256H Graphics Accelerator - 10 - Windows® XP Driver and Utilities Installation 3.1.1. Software Installation In this manual, we assume that motherboard.

Manual
Page 14
... disk that came with your computer at the first time, the windows will search for the driver and install it now.) Or click the "Cancel" button to install the driver from AUTORUN window. GV-NX84G256H Graphics Accelerator - 12 - Step 2: Found new hardware wizard: Searching and installing The wizard will automatically detect a new hardware in...
... disk that came with your computer at the first time, the windows will search for the driver and install it now.) Or click the "Cancel" button to install the driver from AUTORUN window. GV-NX84G256H Graphics Accelerator - 12 - Step 2: Found new hardware wizard: Searching and installing The wizard will automatically detect a new hardware in...
Manual
Page 15
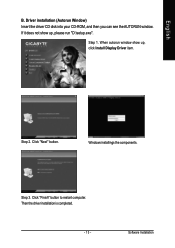
Step 3. Click "Finish" button to restart computer. Step 1. Step 2. Then the driver installation is completed. - 13 - When autorun window show up , click Install Display Driver item. Windows installings the components. Software Installation Driver installation (Autorun Window) Insert the driver CD disk into your CD-ROM, and then you can see the AUTORUN window. English B. If it does not show up , please run "D:\setup.exe". Click "Next" button.
Step 3. Click "Finish" button to restart computer. Step 1. Step 2. Then the driver installation is completed. - 13 - When autorun window show up , click Install Display Driver item. Windows installings the components. Software Installation Driver installation (Autorun Window) Insert the driver CD disk into your CD-ROM, and then you can see the AUTORUN window. English B. If it does not show up , please run "D:\setup.exe". Click "Next" button.

Manual
Page 16
You can adjust the properties of the display drivers, you will find a NVIDIA icon on the taskbar's status area. GV-NX84G256H Graphics Accelerator - 14 - Right click the icon. Taskbar Icon After installation of the graphics accelerator from here. Click this icon to open the control panel. English 3.1.4.
You can adjust the properties of the display drivers, you will find a NVIDIA icon on the taskbar's status area. GV-NX84G256H Graphics Accelerator - 14 - Right click the icon. Taskbar Icon After installation of the graphics accelerator from here. Click this icon to open the control panel. English 3.1.4.

Manual
Page 33
... Please make sure the Windows® 2000 have installed Windows® 2000 Service Pack (or later) before installing the graphics accelerator driver. - 31 - Windows® 2000 Driver Installation With Windows running on the control bar. 2. Click on -screen instructions to take advantage of the higher performance, resolutions,...English 3.2. If Windows® does not show up. Click the Start button on your computer, you install the latest driver, insert the Installation CD that shipped with your CD-ROM drive, substitute D with the correct drive letter.) 4. Click "Yes" to install ...
... Please make sure the Windows® 2000 have installed Windows® 2000 Service Pack (or later) before installing the graphics accelerator driver. - 31 - Windows® 2000 Driver Installation With Windows running on the control bar. 2. Click on -screen instructions to take advantage of the higher performance, resolutions,...English 3.2. If Windows® does not show up. Click the Start button on your computer, you install the latest driver, insert the Installation CD that shipped with your CD-ROM drive, substitute D with the correct drive letter.) 4. Click "Yes" to install ...

Manual
Page 34
...132; Make sure that the display cable is securely fastened to the monitor's manual.) GV-NX84G256H Graphics Accelerator - 32 - After getting into Safe Mode, in Device Manager check whether the driver for more assistance, use the Troubleshooting Guide located in the Windows® Help or ... your keyboard after system starts up. Troubleshooting Tips The following troubleshooting tips may help if you installed the graphics driver. „ Restart your dealer or GIGABYTE for the graphics card is correct. „ For more advanced troubleshooting information. „ Check that the card...
...132; Make sure that the display cable is securely fastened to the monitor's manual.) GV-NX84G256H Graphics Accelerator - 32 - After getting into Safe Mode, in Device Manager check whether the driver for more assistance, use the Troubleshooting Guide located in the Windows® Help or ... your keyboard after system starts up. Troubleshooting Tips The following troubleshooting tips may help if you installed the graphics driver. „ Restart your dealer or GIGABYTE for the graphics card is correct. „ For more advanced troubleshooting information. „ Check that the card...

