
Manual
Page 1
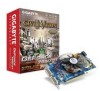
Copyright © 2006 GIGABYTE TECHNOLOGY CO., LTD Copyright by U.S. Macrovision corporation product notice: This product incorporates copyright protection technology that may be reproduced or transmitted in this document nor ... not be disposed of with user's other household waste and must be authorized by Macrovision, and is protected by GIGA-BYTE TECHNOLOGY CO., LTD. ("GBT"). GV-NX795T512H-RH GeForce™ 7950 GT Graphics Accelerator User's Manual Rev. 101 12MD-NX795THR-101R * The WEEE marking on VGA card, this may void the warranty of...
Copyright © 2006 GIGABYTE TECHNOLOGY CO., LTD Copyright by U.S. Macrovision corporation product notice: This product incorporates copyright protection technology that may be reproduced or transmitted in this document nor ... not be disposed of with user's other household waste and must be authorized by Macrovision, and is protected by GIGA-BYTE TECHNOLOGY CO., LTD. ("GBT"). GV-NX795T512H-RH GeForce™ 7950 GT Graphics Accelerator User's Manual Rev. 101 12MD-NX795THR-101R * The WEEE marking on VGA card, this may void the warranty of...
Manual
Page 2
... 30 5.3. Features ...3 1.2. DirectX Installation ...10 3.1.3. Windows® 2000 Driver Installation 27 4. Hardware Installation 6 3. Board Layout 4 2.2. Resolutions and Color Depth Table (In Windows® XP 31 GV-NX795T512H-RH Graphics Accelerator - 2 - Introduction 3 1.1. Windows® XP Driver and Utilities Installation 10 3.1.1. Hardware Installation 4 2.1. Appendix 29 5.1. Connecting to Reflash the BIOS in MS-DOS Mode 29...
... 30 5.3. Features ...3 1.2. DirectX Installation ...10 3.1.3. Windows® 2000 Driver Installation 27 4. Hardware Installation 6 3. Board Layout 4 2.2. Resolutions and Color Depth Table (In Windows® XP 31 GV-NX795T512H-RH Graphics Accelerator - 2 - Introduction 3 1.1. Windows® XP Driver and Utilities Installation 10 3.1.1. Hardware Installation 4 2.1. Appendix 29 5.1. Connecting to Reflash the BIOS in MS-DOS Mode 29...

Manual
Page 3
... • CD-ROM or DVD-ROM drive • Minimum power supply 350W (To set up an SLI system with the GV-NX795T512H-RH graphics cards, please use a power supply of 450W or above.) (Note): SLI technology requires a PCI Express motherboard with 512... (by adapter) • Supports 2 DVI-I connectors • Supports HDCP (High-bandwidth Digital Content Protection) technology 1.2. Introduction GV-NX795T512H-RH) and from the same vendor (e.g. Graphics cards working in an SLI configuration must be with the same model name (e.g. GIGABYTE TECHNOLOGY). - 3 - English 1. Introduction 1.1.
... • CD-ROM or DVD-ROM drive • Minimum power supply 350W (To set up an SLI system with the GV-NX795T512H-RH graphics cards, please use a power supply of 450W or above.) (Note): SLI technology requires a PCI Express motherboard with 512... (by adapter) • Supports 2 DVI-I connectors • Supports HDCP (High-bandwidth Digital Content Protection) technology 1.2. Introduction GV-NX795T512H-RH) and from the same vendor (e.g. Graphics cards working in an SLI configuration must be with the same model name (e.g. GIGABYTE TECHNOLOGY). - 3 - English 1. Introduction 1.1.

Manual
Page 4
English 2. Hardware Installation 2.1. TV-Out DVI-I Connector 1 DVI-I to D-Sub Adapter GV-NX795T512H-RH Graphics Accelerator - 4 - Board Layout SLI connector TV-out DVI-I Connector 1 DVI-I Connector 2 HDTV OR NTSC / PAL TV Projector OR NTSC / PAL TV Projector Y Pr Pb/AV Output S-Video Output DVI Output Digital LCD Monitor OR Analog LCD Monitor Analog Monitor VGA Output DVI-I Connector 2
English 2. Hardware Installation 2.1. TV-Out DVI-I Connector 1 DVI-I to D-Sub Adapter GV-NX795T512H-RH Graphics Accelerator - 4 - Board Layout SLI connector TV-out DVI-I Connector 1 DVI-I Connector 2 HDTV OR NTSC / PAL TV Projector OR NTSC / PAL TV Projector Y Pr Pb/AV Output S-Video Output DVI Output Digital LCD Monitor OR Analog LCD Monitor Analog Monitor VGA Output DVI-I Connector 2

Manual
Page 5
... on a grounded anti-static mat. Shipping and handling may cause damage to your computer and unplug power supply. 2. Use none official Gigabyte BIOS might cause problem on the card before handling computer components. Use a grounded wrist strap before proceeding. Be sure there are separated ... to ensure your computer. 1. Turn off your card. The operator should be done on your graphics card working correctly, please use official Gigabyte BIOS only. In order to a metal object, such as the anti-static mat. To protect them against damage from the system. Place...
... on a grounded anti-static mat. Shipping and handling may cause damage to your computer and unplug power supply. 2. Use none official Gigabyte BIOS might cause problem on the card before handling computer components. Use a grounded wrist strap before proceeding. Be sure there are separated ... to ensure your computer. 1. Turn off your card. The operator should be done on your graphics card working correctly, please use official Gigabyte BIOS only. In order to a metal object, such as the anti-static mat. To protect them against damage from the system. Place...

Manual
Page 6
..., then disconnect the display cable from your computer has any existing graphics card from the back of your graphics accelerator card. Or, if your computer. GV-NX795T512H-RH Graphics Accelerator - 6 - English 2.2. Remove the computer cover. Remove any on the motherboard. Now that you have prepared your computer, you may need to disable it...
..., then disconnect the display cable from your computer has any existing graphics card from the back of your graphics accelerator card. Or, if your computer. GV-NX795T512H-RH Graphics Accelerator - 6 - English 2.2. Remove the computer cover. Remove any on the motherboard. Now that you have prepared your computer, you may need to disable it...
Manual
Page 7
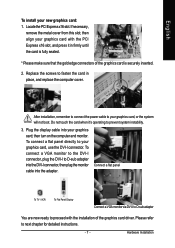
Replace the screws to fasten the card in firmly until the card is securely inserted. 2. To connect a VGA monitor to the DVI-I connector, plug the DVI-I to D-sub adapter into the DVI-I to D-sub adapter You are now ready to proceed with the PCI Express x16 slot, and press it 's operating to your new graphics card: 1. English To install your graphics card, or the system will not boot. After installation, remember to connect the power cable to prevent system instability. 3. Hardware Installation Please refer to your graphics card with the installation of the graphics card ...
Replace the screws to fasten the card in firmly until the card is securely inserted. 2. To connect a VGA monitor to the DVI-I connector, plug the DVI-I to D-sub adapter into the DVI-I to D-sub adapter You are now ready to proceed with the PCI Express x16 slot, and press it 's operating to your new graphics card: 1. English To install your graphics card, or the system will not boot. After installation, remember to connect the power cable to prevent system instability. 3. Hardware Installation Please refer to your graphics card with the installation of the graphics card ...
Manual
Page 8
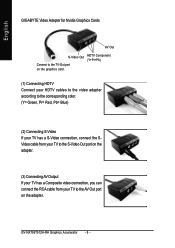
GV-NX795T512H-RH Graphics Accelerator - 8 - HDTV Component (Y+Pr+Pb) (1) Connecting HDTV Connect your HDTV cables to the video adapter according to the corresponding color. (Y= Green, Pr= Red, Pb= ... If your TV has a Composite video connection, you can connect the RCA cable from your TV to the TV-Out port on the adapter. English GIGABYTE Video Adapter for Nvidia Graphics Cards AV Out S-Video Out Connect to the AV Out port on the graphics card.
GV-NX795T512H-RH Graphics Accelerator - 8 - HDTV Component (Y+Pr+Pb) (1) Connecting HDTV Connect your HDTV cables to the video adapter according to the corresponding color. (Y= Green, Pr= Red, Pb= ... If your TV has a Composite video connection, you can connect the RCA cable from your TV to the TV-Out port on the adapter. English GIGABYTE Video Adapter for Nvidia Graphics Cards AV Out S-Video Out Connect to the AV Out port on the graphics card.

Manual
Page 9
English How NVIDIA® SLI™ (Scalable Link Interface) technology works: In an SLI configuration, two SLI-ready graphics cards of the same type. (Example: GV-NX795T512H-RH) - 9 - The picture below shows that two graphics cards are connected together via SLI bridge connector in an SLI configuration. Hardware Installation SLI bridge connector (provided by motherboard manufacturer) Two SLI-ready graphics cards of the same model and the same manufacturers are linked in parallel in a system that provides two x16 PCI Express slots to scale graphics performance.
English How NVIDIA® SLI™ (Scalable Link Interface) technology works: In an SLI configuration, two SLI-ready graphics cards of the same type. (Example: GV-NX795T512H-RH) - 9 - The picture below shows that two graphics cards are connected together via SLI bridge connector in an SLI configuration. Hardware Installation SLI bridge connector (provided by motherboard manufacturer) Two SLI-ready graphics cards of the same model and the same manufacturers are linked in parallel in a system that provides two x16 PCI Express slots to scale graphics performance.
Manual
Page 10
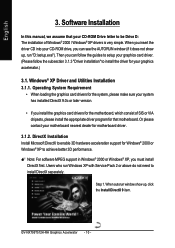
... Pack 2 or above do not need to enable 3D hardware acceleration support for that motherboard. DirectX Installation Install Microsoft DirectX to install DirectX separately. Step 1. GV-NX795T512H-RH Graphics Accelerator - 10 - Windows® XP Driver and Utilities Installation 3.1.1. Users who run "D:\setup.exe"). Then you must install DirectX first. Or please contact your...
... Pack 2 or above do not need to enable 3D hardware acceleration support for that motherboard. DirectX Installation Install Microsoft DirectX to install DirectX separately. Step 1. GV-NX795T512H-RH Graphics Accelerator - 10 - Windows® XP Driver and Utilities Installation 3.1.1. Users who run "D:\setup.exe"). Then you must install DirectX first. Or please contact your...

Manual
Page 11
Installing the components. Then the DirectX 9 installation is completed. - 11 - Software Installation Click the "Next" button. English Step 2. Click "Finish" to restart computer. Step 4. Step 3. Choose I accept the agreement and click the "Next" button.
Installing the components. Then the DirectX 9 installation is completed. - 11 - Software Installation Click the "Next" button. English Step 2. Click "Finish" to restart computer. Step 4. Step 3. Choose I accept the agreement and click the "Next" button.
Manual
Page 12
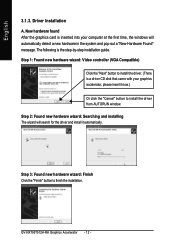
... and pop out a "New Hardware Found" message. Step 1: Found new hardware wizard: Video controller (VGA Compatible) Click the "Next" button to finish the installation. English 3.1.3. GV-NX795T512H-RH Graphics Accelerator - 12 - Driver Installation A. New hardware found After the graphics card is inserted into your graphics accelerator, please insert it automatically.
... and pop out a "New Hardware Found" message. Step 1: Found new hardware wizard: Video controller (VGA Compatible) Click the "Next" button to finish the installation. English 3.1.3. GV-NX795T512H-RH Graphics Accelerator - 12 - Driver Installation A. New hardware found After the graphics card is inserted into your graphics accelerator, please insert it automatically.
Manual
Page 13
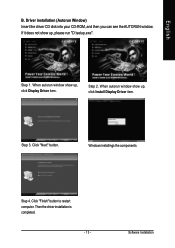
Click "Next" button. Then the driver installation is completed. - 13 - Driver installation (Autorun Window) Insert the driver CD disk into your CD-ROM, and then you can see the AUTORUN window. When autorun window show up , please run "D:\setup.exe". Step 2. Step 4. Software Installation English B. Click "Finish" button to restart computer. If it does not show up, click Install Display Driver item. Step 1. When autorun window show up , click Display Driver item. Windows installings the components. Step 3.
Click "Next" button. Then the driver installation is completed. - 13 - Driver installation (Autorun Window) Insert the driver CD disk into your CD-ROM, and then you can see the AUTORUN window. When autorun window show up , please run "D:\setup.exe". Step 2. Step 4. Software Installation English B. Click "Finish" button to restart computer. If it does not show up, click Install Display Driver item. Step 1. When autorun window show up , click Display Driver item. Windows installings the components. Step 3.
Manual
Page 14
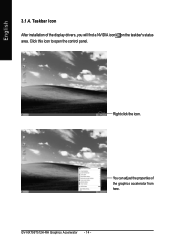
You can adjust the properties of the display drivers, you will find a NVIDIA icon on the taskbar's status area. GV-NX795T512H-RH Graphics Accelerator - 14 - Right click the icon. Click this icon to open the control panel. English 3.1.4. Taskbar Icon After installation of the graphics accelerator from here.
You can adjust the properties of the display drivers, you will find a NVIDIA icon on the taskbar's status area. GV-NX795T512H-RH Graphics Accelerator - 14 - Right click the icon. Click this icon to open the control panel. English 3.1.4. Taskbar Icon After installation of the graphics accelerator from here.

Manual
Page 15
... for adapter and setting. You can click the item to change the color quality. Display Properties Pages To access Display Properties pages, right-click the GIGABYTE icon on the taskbar and select Display Properties or right-click on Desktop and then select Properties. To access more advanced options, click the Advanced...
... for adapter and setting. You can click the item to change the color quality. Display Properties Pages To access Display Properties pages, right-click the GIGABYTE icon on the taskbar and select Display Properties or right-click on Desktop and then select Properties. To access more advanced options, click the Advanced...

Manual
Page 16
... GeForce 7950 GT tab page for the first time, you'll see the Plug and Play Monitor and NVIDIA GeForce 7950 GT Properties dialog box. GV-NX795T512H-RH Graphics Accelerator - 16 -
... GeForce 7950 GT tab page for the first time, you'll see the Plug and Play Monitor and NVIDIA GeForce 7950 GT Properties dialog box. GV-NX795T512H-RH Graphics Accelerator - 16 -

Manual
Page 17
.../ Horizontal Span/ Vertical Span/ Dual View • Primary/Secondary display: select a single display or display pair. Model CRT+TV CRT+DVI DVI+TV DVI+DVI GV-NX795T512H-RH Yes Yes Yes Yes - 17 - The selected display combination will appear in the graphical representation below. • Make this , click Device Settings followed by OK...
.../ Horizontal Span/ Vertical Span/ Dual View • Primary/Secondary display: select a single display or display pair. Model CRT+TV CRT+DVI DVI+TV DVI+DVI GV-NX795T512H-RH Yes Yes Yes Yes - 17 - The selected display combination will appear in the graphical representation below. • Make this , click Device Settings followed by OK...
Manual
Page 18
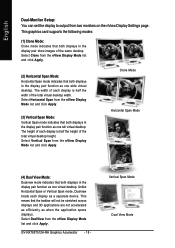
... Settings page. Unlike Horizontal Span or Vertical Span mode, Dualview treats each display is half the width of each display as one tall virtual desktop. GV-NX795T512H-RH Graphics Accelerator - 18 - Vertical Span Mode Dual View Mode This means that the taskbar will not be stretched across displays and 3D applications are not...
... Settings page. Unlike Horizontal Span or Vertical Span mode, Dualview treats each display is half the width of each display as one tall virtual desktop. GV-NX795T512H-RH Graphics Accelerator - 18 - Vertical Span Mode Dual View Mode This means that the taskbar will not be stretched across displays and 3D applications are not...
Manual
Page 19
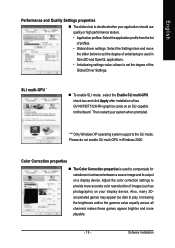
... SLI mode. SLI multi-GPU * „ To enable SLI mode, select the Enable SLI multi-GPU check box and click Apply after installation of two GV-NX795T512H-RH graphics cards on your system when prompted. Then restart your display device. Color Correction properties „ The Color Correction properties is used in Windows 2000.
... SLI mode. SLI multi-GPU * „ To enable SLI mode, select the Enable SLI multi-GPU check box and click Apply after installation of two GV-NX795T512H-RH graphics cards on your system when prompted. Then restart your display device. Color Correction properties „ The Color Correction properties is used in Windows 2000.
Manual
Page 20
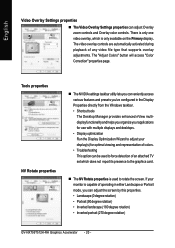
... screen by this properties. • Landscape (0 degree rotation) • Portrait (90 degree rotation) • Inverted landscape (180 degree rotation) • Inverted portrait (270 degree rotation) GV-NX795T512H-RH Graphics Accelerator - 20 - If your display(s) for optimal viewing and representation of colors. • Troubleshooting This option can adjust Overlay zoom controls and Overlay color...
... screen by this properties. • Landscape (0 degree rotation) • Portrait (90 degree rotation) • Inverted landscape (180 degree rotation) • Inverted portrait (270 degree rotation) GV-NX795T512H-RH Graphics Accelerator - 20 - If your display(s) for optimal viewing and representation of colors. • Troubleshooting This option can adjust Overlay zoom controls and Overlay color...