Manual
Page 4
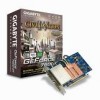
Features ...3 1.2. Software Installation 11 3.1. Display Properties pages 20 3.1.7. GV-NX76T256D(B)-RH Graphics Accelerator - 2 - Introduction 3 1.1. Windows® XP Driver and Utilities Installation 11 3.1.1. Troubleshooting Tips 31 5. Board Layout 4 2.2. DirectX Installation ...11 3.1.3. Taskbar Icon ...17 3.1.6. nView Properties pages 25 3.2. Appendix 32 5.1. Reflash BIOS in MS-DOS Mode 32 5.1.2. Driver Installation ...13 3.1.4. Minimum System Requirements 3 2. Reflash BIOS in Windows...
Features ...3 1.2. Software Installation 11 3.1. Display Properties pages 20 3.1.7. GV-NX76T256D(B)-RH Graphics Accelerator - 2 - Introduction 3 1.1. Windows® XP Driver and Utilities Installation 11 3.1.1. Troubleshooting Tips 31 5. Board Layout 4 2.2. DirectX Installation ...11 3.1.3. Taskbar Icon ...17 3.1.6. nView Properties pages 25 3.2. Appendix 32 5.1. Reflash BIOS in MS-DOS Mode 32 5.1.2. Driver Installation ...13 3.1.4. Minimum System Requirements 3 2. Reflash BIOS in Windows...
Manual
Page 10
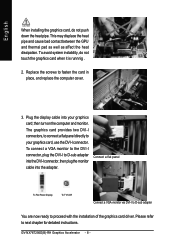
...computer and monitor. To connect a VGA monitor to the DVI-I connector, plug the DVI-I to proceed with the installation of the graphics card driver. To avoid system instability, do not push down the heat pipe. Please refer to fasten the card in place, and replace the computer cover....your graphics card, use the DVI-I connector. Replace the screws to next chapter for detailed instructions. Plug the display cable into the adapter. GV-NX76T256D(B)-RH Graphics Accelerator - 8 - This may displace the heat pipe and cause bad contact between the GPU and thermal pad as well as affect the...
...computer and monitor. To connect a VGA monitor to the DVI-I connector, plug the DVI-I to proceed with the installation of the graphics card driver. To avoid system instability, do not push down the heat pipe. Please refer to fasten the card in place, and replace the computer cover....your graphics card, use the DVI-I connector. Replace the screws to next chapter for detailed instructions. Plug the display cable into the adapter. GV-NX76T256D(B)-RH Graphics Accelerator - 8 - This may displace the heat pipe and cause bad contact between the GPU and thermal pad as well as affect the...
Manual
Page 13
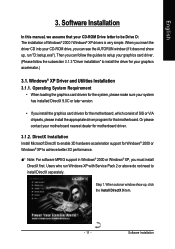
... Installation English 3. Users who run "D:\setup.exe"). Then you can follow the guides to setup your graphics card driver. (Please follow the subsection 3.1.3 "Driver installation" to install DirectX separately. Or please contact your CD-ROM drive, you can see the AUTORUN window (if... it does not show up , run Windows XP with Service Pack 2 or above do not need to install the driver for motherboard driver. 3.1.2. Software Installation In this manual, we assume that motherboard. Step 1. When autorun window show up , click the Install DirectX 9...
... Installation English 3. Users who run "D:\setup.exe"). Then you can follow the guides to setup your graphics card driver. (Please follow the subsection 3.1.3 "Driver installation" to install DirectX separately. Or please contact your CD-ROM drive, you can see the AUTORUN window (if... it does not show up , run Windows XP with Service Pack 2 or above do not need to install the driver for motherboard driver. 3.1.2. Software Installation In this manual, we assume that motherboard. Step 1. When autorun window show up , click the Install DirectX 9...
Manual
Page 15
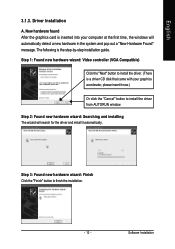
Step 1: Found new hardware wizard: Video controller (VGA Compatible) Click the "Next" button to install the driver. (There is the step-by-step installation guide. Step 2: Found new hardware wizard: Searching and installing The wizard will automatically detect a new hardware ...in the system and pop out a "New Hardware Found" message. Software Installation Driver Installation A. The following is a driver CD disk that came with your computer at the first time, the windows will search for the...
Step 1: Found new hardware wizard: Video controller (VGA Compatible) Click the "Next" button to install the driver. (There is the step-by-step installation guide. Step 2: Found new hardware wizard: Searching and installing The wizard will automatically detect a new hardware ...in the system and pop out a "New Hardware Found" message. Software Installation Driver Installation A. The following is a driver CD disk that came with your computer at the first time, the windows will search for the...
Manual
Page 16
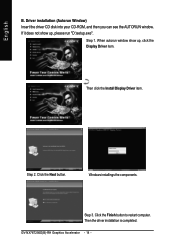
Click the Finish button to restart computer. If it does not show up , please run "D:\setup.exe". Step 3. GV-NX76T256D(B)-RH Graphics Accelerator - 14 - Windows installings the components. Then click the Install Display Driver item. Then the driver installation is completed. Step 1. Click the Next button. English B. Driver installation (Autorun Window) Insert the driver CD disk into your CD-ROM, and then you can see the AUTORUN window. When autorun window show up , click the Display Driver item. Step 2.
Click the Finish button to restart computer. If it does not show up , please run "D:\setup.exe". Step 3. GV-NX76T256D(B)-RH Graphics Accelerator - 14 - Windows installings the components. Then click the Install Display Driver item. Then the driver installation is completed. Step 1. Click the Next button. English B. Driver installation (Autorun Window) Insert the driver CD disk into your CD-ROM, and then you can see the AUTORUN window. When autorun window show up , click the Display Driver item. Step 2.
Manual
Page 17
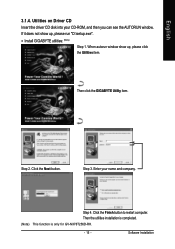
...3.1.4. Utilities on Driver CD Insert the driver CD disk into your name and company. Enter your CD-ROM, and then you can see the AUTORUN window. Then the utilities installation is completed. (Note) This function is only for GV-NX76T256D-RH. - 15 - Then click the GIGABYTE Utility item. ...Click the Next button. If it does not show up , please run "D:\setup.exe". • Install GIGABYTE utilities: (Note) Step 1.
...3.1.4. Utilities on Driver CD Insert the driver CD disk into your name and company. Enter your CD-ROM, and then you can see the AUTORUN window. Then the utilities installation is completed. (Note) This function is only for GV-NX76T256D-RH. - 15 - Then click the GIGABYTE Utility item. ...Click the Next button. If it does not show up , please run "D:\setup.exe". • Install GIGABYTE utilities: (Note) Step 1.
Manual
Page 19
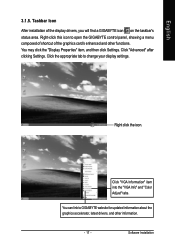
Click "Advanced" after clicking Settings. You can link to open the GIGABYTE control panel, showing a menu composed of shortcut of the display drivers, you will find a GIGABYTE icon on the taskbar's status area. You may click the "Display Properties" item, and then click Settings. Click ... After installation of the graphics card's enhanced and other information. - 17 - English 3.1.5. Right-click this icon to GIGABYTE website for updated information about the graphics accelerator, latest drivers, and other functions. Click the appropriate tab to change your display settings.
Click "Advanced" after clicking Settings. You can link to open the GIGABYTE control panel, showing a menu composed of shortcut of the display drivers, you will find a GIGABYTE icon on the taskbar's status area. You may click the "Display Properties" item, and then click Settings. Click ... After installation of the graphics card's enhanced and other information. - 17 - English 3.1.5. Right-click this icon to GIGABYTE website for updated information about the graphics accelerator, latest drivers, and other functions. Click the appropriate tab to change your display settings.

Manual
Page 21
English After installation of the graphics accelerator from here. - 19 - Software Installation Click this icon to open the control panel. Right click the icon. You can adjust the properties of the display drivers, you will find a NVIDIA icon on the taskbar's status area.
English After installation of the graphics accelerator from here. - 19 - Software Installation Click this icon to open the control panel. Right click the icon. You can adjust the properties of the display drivers, you will find a NVIDIA icon on the taskbar's status area.
Manual
Page 22
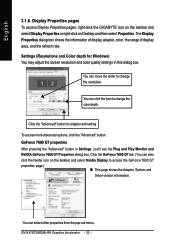
... the "Advanced" button in this dialog box. English 3.1.6. Display Properties pages To access Display Properties pages, right-click the GIGABYTE icon on the taskbar and select Display Properties or right-click on the taskbar and select Nvidia Display to change the color...Driver version information. You can select other properties from the pop-out menu. Click the "Advanced" button for Windows) You may adjust the screen resolution and color quality settings in Settings, you'll see the Plug and Play Monitor and NVIDIA GeForce 7600 GT Properties dialog box. GV-NX76T256D(B)-RH...
... the "Advanced" button in this dialog box. English 3.1.6. Display Properties pages To access Display Properties pages, right-click the GIGABYTE icon on the taskbar and select Display Properties or right-click on the taskbar and select Nvidia Display to change the color...Driver version information. You can select other properties from the pop-out menu. Click the "Advanced" button for Windows) You may adjust the screen resolution and color quality settings in Settings, you'll see the Plug and Play Monitor and NVIDIA GeForce 7600 GT Properties dialog box. GV-NX76T256D(B)-RH...
Manual
Page 24
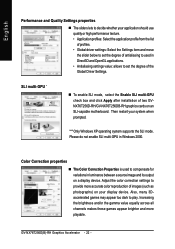
...enable SLI mode, select the Enable SLI multi-GPU check box and click Apply after installation of the Global Driver Settings. Then restart your display device. English Performance and Quality Settings properties „ The sliders lets to ... texture. • Application profiles: Select the application profile from the list of profiles. • Global driver settings: Select the Settings item and move the slider below to set the degree of antialiasing to used ... on a display device. Adjust the color correction settings to play. GV-NX76T256D(B)-RH Graphics Accelerator - 22 -
...enable SLI mode, select the Enable SLI multi-GPU check box and click Apply after installation of the Global Driver Settings. Then restart your display device. English Performance and Quality Settings properties „ The sliders lets to ... texture. • Application profiles: Select the application profile from the list of profiles. • Global driver settings: Select the Settings item and move the slider below to set the degree of antialiasing to used ... on a display device. Adjust the color correction settings to play. GV-NX76T256D(B)-RH Graphics Accelerator - 22 -
Manual
Page 32
...bar. 2. Click the Start button on your graphics card. Follow the Wizard's on "Install Display Drivers" to complete the installation. To install the graphics card driver for Windows® 2000, please insert the Installation CD. Select Run. 3. Type the following steps:...exe (If D is not your CD-ROM drive, substitute D with your computer, you install the latest driver, insert the Installation CD that shipped with the correct drive letter.) 4. GV-NX76T256D(B)-RH Graphics Accelerator - 30 - Click on -screen instructions to begin the Installation Wizard. 6. English 3.2. Click...
...bar. 2. Click the Start button on your graphics card. Follow the Wizard's on "Install Display Drivers" to complete the installation. To install the graphics card driver for Windows® 2000, please insert the Installation CD. Select Run. 3. Type the following steps:...exe (If D is not your CD-ROM drive, substitute D with your computer, you install the latest driver, insert the Installation CD that shipped with the correct drive letter.) 4. GV-NX76T256D(B)-RH Graphics Accelerator - 30 - Click on -screen instructions to begin the Installation Wizard. 6. English 3.2. Click...
Manual
Page 33
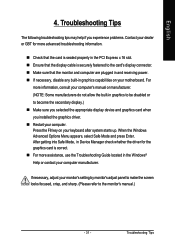
... the Troubleshooting Guide located in the Windows® Help or contact your computer manufacturer. After getting into Safe Mode, in Device Manager check whether the driver for more advanced troubleshooting information. „ Check that the card is seated properly in the PCI Express x 16 slot. „ Ensure that the display cable... on your computer. If necessary, adjust your keyboard after system starts up. Troubleshooting Tips The following troubleshooting tips may help if you installed the graphics driver. „ Restart your motherboard. Troubleshooting Tips
... the Troubleshooting Guide located in the Windows® Help or contact your computer manufacturer. After getting into Safe Mode, in Device Manager check whether the driver for more advanced troubleshooting information. „ Check that the card is seated properly in the PCI Express x 16 slot. „ Ensure that the display cable... on your computer. If necessary, adjust your keyboard after system starts up. Troubleshooting Tips The following troubleshooting tips may help if you installed the graphics driver. „ Restart your motherboard. Troubleshooting Tips
Manual
Page 34
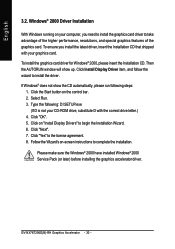
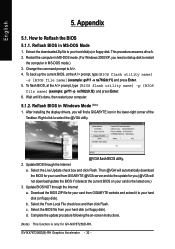
...GIGABYTE @VGA server and do the update for GV-NX76T256D-RH. Reflash BIOS in Windows Mode (Note) 1. Restart the computer in MS-DOS mode.) 3. To flash BIOS, at the A:\> prompt, type[BIOS flash utility name] -s [BIOS file name] (example: gvf11 -s nx76t2dr.f1) and press Enter. 5. After installing the display drivers... BIOS NOT through the Internet a. GV-NX76T256D(B)-RH Graphics Accelerator - 32 - English 5. Select the Live Update check box and click Flash. How to restart the computer in MS-DOS mode. (For Windows 2000/XP, you .(@VGA will find a GIGABYTE icon in the lower-right corner ...
...GIGABYTE @VGA server and do the update for GV-NX76T256D-RH. Reflash BIOS in Windows Mode (Note) 1. Restart the computer in MS-DOS mode.) 3. To flash BIOS, at the A:\> prompt, type[BIOS flash utility name] -s [BIOS file name] (example: gvf11 -s nx76t2dr.f1) and press Enter. 5. After installing the display drivers... BIOS NOT through the Internet a. GV-NX76T256D(B)-RH Graphics Accelerator - 32 - English 5. Select the Live Update check box and click Flash. How to restart the computer in MS-DOS mode. (For Windows 2000/XP, you .(@VGA will find a GIGABYTE icon in the lower-right corner ...
Manual
Page 35
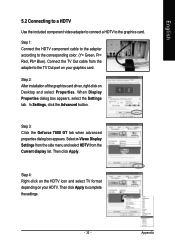
... from the Current display list. Step 3: Click the Geforce 7600 GT tab when advanced properties dialog box appears. Step 2: After installation of the graphics card driver, right-click on your HDTV. Select n-Viewe Display Settings from the side menu and select HDTV from the adapter to the corresponding color. (Y= Green, Pr...
... from the Current display list. Step 3: Click the Geforce 7600 GT tab when advanced properties dialog box appears. Step 2: After installation of the graphics card driver, right-click on your HDTV. Select n-Viewe Display Settings from the side menu and select HDTV from the adapter to the corresponding color. (Y= Green, Pr...

