
Manual
Page 6
... Requirement 3 2. Software Installation 11 3.1. Driver Installation ...13 3.1.4. Display Properties Pages 21 3.1.7. Connecting to Reflash the BIOS 33 5.2. English Table of Contents 1. Hardware Installation 7 3. DirectX Installation ...12 3.1.3. nView Properties Pages 26 3.2. Features ...3 1.2. Resolutions and Color Depth Table (In Windows® XP 35 GV-NX72G Series Graphics Accelerator - 2 - Windows® XP Driver and Utilities Installation 11...
... Requirement 3 2. Software Installation 11 3.1. Driver Installation ...13 3.1.4. Display Properties Pages 21 3.1.7. Connecting to Reflash the BIOS 33 5.2. English Table of Contents 1. Hardware Installation 7 3. DirectX Installation ...12 3.1.3. nView Properties Pages 26 3.2. Features ...3 1.2. Resolutions and Color Depth Table (In Windows® XP 35 GV-NX72G Series Graphics Accelerator - 2 - Windows® XP Driver and Utilities Installation 11...
Manual
Page 12
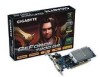
...connector, you can connect a flat panel display to fasten the card in firmly until the card is fully seated. * Please make sure that the gold edge connectors of the graphics card driver. You are now ready to next chapter for detailed instructions. GV-NX72G Series Graphics Accelerator - 8 -... then align your new graphics card: 1. If your card; To D-Sub Monitor To TV / VCR To Flat Panel Display To avoid system instability, do...
...connector, you can connect a flat panel display to fasten the card in firmly until the card is fully seated. * Please make sure that the gold edge connectors of the graphics card driver. You are now ready to next chapter for detailed instructions. GV-NX72G Series Graphics Accelerator - 8 -... then align your new graphics card: 1. If your card; To D-Sub Monitor To TV / VCR To Flat Panel Display To avoid system instability, do...

Manual
Page 13
When Display Properties dialog box appears, select the Settings tab. Select SLI multi-GPU from the side menu and select the Enable SLI multi-GPU check box (... appears. In Settings, click the Advanced button. Please do not enable SLI multi-GPU in Windows® 2000. - 9 - Figure 1 Step 1: After installing the graphics card driver, right-click on an SLI motherboard (example: GV-NX72G128D)(Figure 1), users can enable SLI mode simply through the graphics card...
When Display Properties dialog box appears, select the Settings tab. Select SLI multi-GPU from the side menu and select the Enable SLI multi-GPU check box (... appears. In Settings, click the Advanced button. Please do not enable SLI multi-GPU in Windows® 2000. - 9 - Figure 1 Step 1: After installing the graphics card driver, right-click on an SLI motherboard (example: GV-NX72G128D)(Figure 1), users can enable SLI mode simply through the graphics card...

Manual
Page 18
Driver installation (Autorun Window) Insert the driver CD disk into your CD-ROM, and then you can see the AUTORUN window. Step 1. When autorun window show up , click Install Display Driver item. Step 2. Click "Finish" button to restart computer. Click "Next" button. Windows installings the components. If it does not show up , please run "D:\setup.exe". Then the driver installation is completed. Step 3. GV-NX72G Series Graphics Accelerator - 14 - English B.
Driver installation (Autorun Window) Insert the driver CD disk into your CD-ROM, and then you can see the AUTORUN window. Step 1. When autorun window show up , click Install Display Driver item. Step 2. Click "Finish" button to restart computer. Click "Next" button. Windows installings the components. If it does not show up , please run "D:\setup.exe". Then the driver installation is completed. Step 3. GV-NX72G Series Graphics Accelerator - 14 - English B.
Manual
Page 22
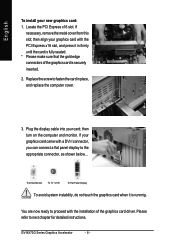
... panel, showing a menu composed of shortcut of the display drivers, you will find a GIGABYTE icon on the taskbar's status area. Right click the icon. Click Advanced after clicking Settings. Click the appropriate tab to GIGABYTE website for updated information about the graphics accelerator, latest drivers, and other functions. GV-NX72G Series Graphics Accelerator - 18 - Taskbar Icon...
... panel, showing a menu composed of shortcut of the display drivers, you will find a GIGABYTE icon on the taskbar's status area. Right click the icon. Click Advanced after clicking Settings. Click the appropriate tab to GIGABYTE website for updated information about the graphics accelerator, latest drivers, and other functions. GV-NX72G Series Graphics Accelerator - 18 - Taskbar Icon...
Manual
Page 24
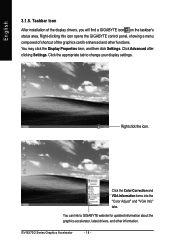
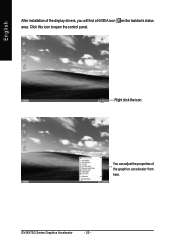
GV-NX72G Series Graphics Accelerator - 20 - Right click the icon. Click this icon to open the control panel. English After installation of the graphics accelerator from here. You can adjust the properties of the display drivers, you will find a NVIDIA icon on the taskbar's status area.
GV-NX72G Series Graphics Accelerator - 20 - Right click the icon. Click this icon to open the control panel. English After installation of the graphics accelerator from here. You can adjust the properties of the display drivers, you will find a NVIDIA icon on the taskbar's status area.

Manual
Page 25
...3.1.6. You can move the slider to access the GeForce 7300 SE/7200 GS properties page.) „ This page shows the Adapter, System and Driver versions information. Software Installation Click the GeForce 7300 SE/7200 GS tab. (You can select other properties from the pop-out menu. - 21 ...- To access more advanced options, click the Advanced button. Display Properties Pages To access Display Properties pages, right-click the GBT icon on the taskbar and select Display Properties or right-click on Desktop and then select Properties. Click the Advanced button for Windows)...
...3.1.6. You can move the slider to access the GeForce 7300 SE/7200 GS properties page.) „ This page shows the Adapter, System and Driver versions information. Software Installation Click the GeForce 7300 SE/7200 GS tab. (You can select other properties from the pop-out menu. - 21 ...- To access more advanced options, click the Advanced button. Display Properties Pages To access Display Properties pages, right-click the GBT icon on the taskbar and select Display Properties or right-click on Desktop and then select Properties. Click the Advanced button for Windows)...
Manual
Page 27
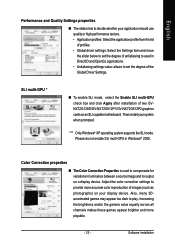
...playable. - 23 - Software Installation English Performance and Quality Settings properties „ The sliders lets to decide whether your display device. Increasing the brightness and/or the gamma value equally across all channels makes these games appear brighter and more accurate...Select the application profile from the list of profiles. • Global driver settings: Select the Settings item and move the slider below to set the degree of two GVNX72G128D/GV-NX72G512P1/GV-NX72G512P2 graphics cards on a display device. "*" Only Windows® XP operating system supports the SLI...
...playable. - 23 - Software Installation English Performance and Quality Settings properties „ The sliders lets to decide whether your display device. Increasing the brightness and/or the gamma value equally across all channels makes these games appear brighter and more accurate...Select the application profile from the list of profiles. • Global driver settings: Select the Settings item and move the slider below to set the degree of two GVNX72G128D/GV-NX72G512P1/GV-NX72G512P2 graphics cards on a display device. "*" Only Windows® XP operating system supports the SLI...

Manual
Page 35
... (If D is not your CD-ROM drive, substitute D with your computer, you install the latest driver, insert the Installation CD that shipped with the correct drive letter.) 4. Windows® 2000 Driver Installation With Windows running on "Install Display Drivers" to take advantage of the higher performance, resolutions, and special graphics features of the graphics...
... (If D is not your CD-ROM drive, substitute D with your computer, you install the latest driver, insert the Installation CD that shipped with the correct drive letter.) 4. Windows® 2000 Driver Installation With Windows running on "Install Display Drivers" to take advantage of the higher performance, resolutions, and special graphics features of the graphics...

Manual
Page 36
After getting into Safe Mode, in Device Manager check whether the driver for more assistance, use the Troubleshooting Guide located in graphics to be disabled or to the monitor's manual.) GV-NX72G Series Graphics Accelerator - 32 - For more information, consult your computer's manual or manufacturer. ... your dealer or GIGABYTE for the graphics card is correct. „ For more advanced troubleshooting information. „ Check that the card is seated properly in the PCI Express x16 slot. „ Ensure that the display cable is securely fastened to the card's display connector. „...
After getting into Safe Mode, in Device Manager check whether the driver for more assistance, use the Troubleshooting Guide located in graphics to be disabled or to the monitor's manual.) GV-NX72G Series Graphics Accelerator - 32 - For more information, consult your computer's manual or manufacturer. ... your dealer or GIGABYTE for the graphics card is correct. „ For more advanced troubleshooting information. „ Check that the card is seated properly in the PCI Express x16 slot. „ Ensure that the display cable is securely fastened to the card's display connector. „...

Manual
Page 38
... select TV format depending on your graphics card. Connect the TV Out cable from the Current display list. Select n-Viewe Display Settings from the side menu and select HDTV from the adapter to complete the settings. GV-NX72G Series Graphics Accelerator - 34 - Step 3: Click the GeForce 7300 SE/7200 GS tab when ... Pr= Red, Pb= Blue). Step 1: Connect the HDTV component cable to the adapter according to the graphics card. Step 2: After installation of the graphics card driver, right-click on your HDTV. Then click Apply to the TV Out port on Desktop and select Properties.
... select TV format depending on your graphics card. Connect the TV Out cable from the Current display list. Select n-Viewe Display Settings from the side menu and select HDTV from the adapter to complete the settings. GV-NX72G Series Graphics Accelerator - 34 - Step 3: Click the GeForce 7300 SE/7200 GS tab when ... Pr= Red, Pb= Blue). Step 1: Connect the HDTV component cable to the adapter according to the graphics card. Step 2: After installation of the graphics card driver, right-click on your HDTV. Then click Apply to the TV Out port on Desktop and select Properties.

