Manual
Page 6
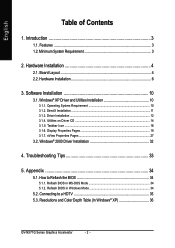
... to Reflash the BIOS 34 5.1.1. Resolutions and Color Depth Table (In Windows® XP 36 GV-NX71G Series Graphics Accelerator - 2 - Operating System Requirement 10 3.1.2. Troubleshooting Tips 33 5. Driver Installation ...12 3.1.4. Utilities on Driver CD 14 3.1.5. Windows® 2000 Driver Installation 32 4. English Table of Contents 1. Minimum System Requirement 3 2. Display Properties Pages 19 3.1.7. Reflash BIOS...
... to Reflash the BIOS 34 5.1.1. Resolutions and Color Depth Table (In Windows® XP 36 GV-NX71G Series Graphics Accelerator - 2 - Operating System Requirement 10 3.1.2. Troubleshooting Tips 33 5. Driver Installation ...12 3.1.4. Utilities on Driver CD 14 3.1.5. Windows® 2000 Driver Installation 32 4. English Table of Contents 1. Minimum System Requirement 3 2. Display Properties Pages 19 3.1.7. Reflash BIOS...

Manual
Page 7
... to dynamically share the available system memory. Available Graphics Memory Calculation for details: Table 1. To support SLI technology via the PCI Express bus(Note) (For GV-NX71G512P8-RH / GV-NX71G512P8 only) • Supports AV / S-Video and HDTV output • Provides D-Sub and DVI-I connectors 1.2. Introduction 1.1. Available Graphics Memory Calculation for full ...DDRII memory • Supports DirectX 9.0c • Supports NVIDIA® SLITM (Scalable Link Interface) technology via the PCI Express bus, the GV-NX71G512P8(-RH) requires driver version 91.47 or later. - 3 -
... to dynamically share the available system memory. Available Graphics Memory Calculation for details: Table 1. To support SLI technology via the PCI Express bus(Note) (For GV-NX71G512P8-RH / GV-NX71G512P8 only) • Supports AV / S-Video and HDTV output • Provides D-Sub and DVI-I connectors 1.2. Introduction 1.1. Available Graphics Memory Calculation for full ...DDRII memory • Supports DirectX 9.0c • Supports NVIDIA® SLITM (Scalable Link Interface) technology via the PCI Express bus, the GV-NX71G512P8(-RH) requires driver version 91.47 or later. - 3 -

Manual
Page 11
... runnnig. If your card; You are now ready to next chapter for detailed instructions. - 7 - Please refer to proceed with the installation of the graphics card driver. then turn on the computer and monitor. Locate the PCI Express x16 slot. then align your new graphics card: 1. To VGA Monitor To TV / VCR...
... runnnig. If your card; You are now ready to next chapter for detailed instructions. - 7 - Please refer to proceed with the installation of the graphics card driver. then turn on the computer and monitor. Locate the PCI Express x16 slot. then align your new graphics card: 1. To VGA Monitor To TV / VCR...

Manual
Page 12
...Scalable Link Interface) technology: (For GV-NX71G512P8-RH / GV-NX71G512P8 only) After installing two SLI-ready graphics cards of the same model on Desktop and select Properties. In Settings, click the Advanced button. Figure 1 Step 1: After installing the graphics card driver, right-click on an SLI motherboard... (Figure 1), users can enable SLI mode simply through the graphics card driver (For the GV-NX71G512P8(-RH), driver version must be at least 91.47)(Note).
...Scalable Link Interface) technology: (For GV-NX71G512P8-RH / GV-NX71G512P8 only) After installing two SLI-ready graphics cards of the same model on Desktop and select Properties. In Settings, click the Advanced button. Figure 1 Step 1: After installing the graphics card driver, right-click on an SLI motherboard... (Figure 1), users can enable SLI mode simply through the graphics card driver (For the GV-NX71G512P8(-RH), driver version must be at least 91.47)(Note).

Manual
Page 14
... the subsection 3.1.3 "Driver installation" to be Drive D: The installation of SIS or VIA chipsets, please install the appropriate driver program for the system, please make sure your CD-ROM drive, you can see the AUTORUN window (if it does not show up, run "D:\setup.exe"). GV-NX71G Series Graphics Accelerator... - 10 - When you insert the driver CD into your system has installed DirectX 9.0c or later version. • If you install the graphics card...
... the subsection 3.1.3 "Driver installation" to be Drive D: The installation of SIS or VIA chipsets, please install the appropriate driver program for the system, please make sure your CD-ROM drive, you can see the AUTORUN window (if it does not show up, run "D:\setup.exe"). GV-NX71G Series Graphics Accelerator... - 10 - When you insert the driver CD into your system has installed DirectX 9.0c or later version. • If you install the graphics card...

Manual
Page 16
GV-NX71G Series Graphics Accelerator - 12 - New hardware found After the graphics card is inserted into your graphics accelerator, please insert it automatically. Step 2: Found new hardware wizard: Searching and installing The wizard will automatically detect a new hardware in the system and pop out a "New Hardware Found" message. Driver Installation A. English 3.1.3. Step 3: Found...
GV-NX71G Series Graphics Accelerator - 12 - New hardware found After the graphics card is inserted into your graphics accelerator, please insert it automatically. Step 2: Found new hardware wizard: Searching and installing The wizard will automatically detect a new hardware in the system and pop out a "New Hardware Found" message. Driver Installation A. English 3.1.3. Step 3: Found...

Manual
Page 17
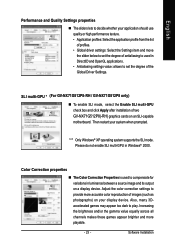
When autorun window show up , please run "D:\setup.exe". Step 2. Step 4. If it does not show up, click Install Display Driver item. When autorun window show up , click Display Driver item. Software Installation Driver installation (Autorun Window) Insert the driver CD disk into your CD-ROM, and then you can see the AUTORUN window. Click "Next" button. Windows installings the components. Step 3. Click "Finish" button to restart computer. Then the driver installation is completed. - 13 - Step 1. English B.
When autorun window show up , please run "D:\setup.exe". Step 2. Step 4. If it does not show up, click Install Display Driver item. When autorun window show up , click Display Driver item. Software Installation Driver installation (Autorun Window) Insert the driver CD disk into your CD-ROM, and then you can see the AUTORUN window. Click "Next" button. Windows installings the components. Step 3. Click "Finish" button to restart computer. Then the driver installation is completed. - 13 - Step 1. English B.
Manual
Page 18
If it does not show up , please run "D:\setup.exe". • Install GIGABYTE utilities: Step 1. Step 3. GV-NX71G Series Graphics Accelerator Step 4. Then click the GIGABYTE Utility item. Then the utilities installation is completed. - 14 - Utilities on Driver CD Insert the driver CD disk into your name and company. When autorun window show up , please click the Utilities item. Step 2. English 3.1.4. Enter your CD-ROM, and then you can see the AUTORUN window. Click the Next button. Click the Finish button to restart computer.
If it does not show up , please run "D:\setup.exe". • Install GIGABYTE utilities: Step 1. Step 3. GV-NX71G Series Graphics Accelerator Step 4. Then click the GIGABYTE Utility item. Then the utilities installation is completed. - 14 - Utilities on Driver CD Insert the driver CD disk into your name and company. When autorun window show up , please click the Utilities item. Step 2. English 3.1.4. Enter your CD-ROM, and then you can see the AUTORUN window. Click the Next button. Click the Finish button to restart computer.

Manual
Page 20
...tabs. You can link to change your display settings. Right-clicking this icon opens the GIGABYTE control panel, showing a menu composed of shortcut of the display drivers, you will find a GIGABYTE icon on the taskbar's status area. You may click the Display Properties item, and then... click Settings. GV-NX71G Series Graphics Accelerator - 16 - Click Advanced after clicking Settings. Click the appropriate tab to GIGABYTE website for updated ...
...tabs. You can link to change your display settings. Right-clicking this icon opens the GIGABYTE control panel, showing a menu composed of shortcut of the display drivers, you will find a GIGABYTE icon on the taskbar's status area. You may click the Display Properties item, and then... click Settings. GV-NX71G Series Graphics Accelerator - 16 - Click Advanced after clicking Settings. Click the appropriate tab to GIGABYTE website for updated ...

Manual
Page 22
GV-NX71G Series Graphics Accelerator - 18 - You can adjust the properties of the display drivers, you will find a NVIDIA icon on the taskbar's status area. Right click the icon. Click this icon to open the control panel. English After installation of the graphics accelerator from here.
GV-NX71G Series Graphics Accelerator - 18 - You can adjust the properties of the display drivers, you will find a NVIDIA icon on the taskbar's status area. Right click the icon. Click this icon to open the control panel. English After installation of the graphics accelerator from here.

Manual
Page 24
...NVIDIA Control Panel This is the default user interface, which provides control of the NVIDIA control panels have installed on your system. - 20 - GV-NX71G Series Graphics Accelerator „ Control Panel User Interface You can also click the NVIDIA icon on the left submenu: „ Launch Page ...All of the NVIDIA graphics driver settings and other NVIDIA utilities you 'll see two items in Settings, you might have been consolidated into a single application, the NVIDIA Control...
...NVIDIA Control Panel This is the default user interface, which provides control of the NVIDIA control panels have installed on your system. - 20 - GV-NX71G Series Graphics Accelerator „ Control Panel User Interface You can also click the NVIDIA icon on the left submenu: „ Launch Page ...All of the NVIDIA graphics driver settings and other NVIDIA utilities you 'll see two items in Settings, you might have been consolidated into a single application, the NVIDIA Control...

Manual
Page 25
GeForce 7100 GS properties „ This page shows the Adapter, System and Driver version information. Options: Single display/ Clone/ Horizontal Sapn/ Vertical Span/ Dual View • Primary/Secondary display: select a single display or display pair. To do ...by Select TV format. Select the format for your preferred nView display modes here. Software Installation Display Matrix Model CRT+TV CRT+DVI DVI+TV GV-NX71G512P8(-RH)/GV-NX71G256P4-RH Yes Yes Yes "*" Only Single display mode is available when SLI mode is chosen as the example. You can select other properties from the...
GeForce 7100 GS properties „ This page shows the Adapter, System and Driver version information. Options: Single display/ Clone/ Horizontal Sapn/ Vertical Span/ Dual View • Primary/Secondary display: select a single display or display pair. To do ...by Select TV format. Select the format for your preferred nView display modes here. Software Installation Display Matrix Model CRT+TV CRT+DVI DVI+TV GV-NX71G512P8(-RH)/GV-NX71G256P4-RH Yes Yes Yes "*" Only Single display mode is available when SLI mode is chosen as the example. You can select other properties from the...
Manual
Page 27
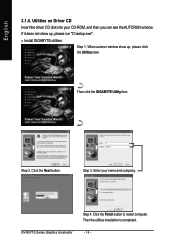
...from the list of profiles. • Global driver settings: Select the Settings item and move the slider below to set the degree of antialiasing to used to compensate for variations in Windows® 2000. SLI multi-GPU * (For GV-NX71G512P8-RH / GV-NX71G512P8 only) „ To enable SLI mode, select... the Enable SLI multi-GPU check box and click Apply after installation of the Global Driver Settings. Please do not enable SLI multi-GPU in luminance between a ...
...from the list of profiles. • Global driver settings: Select the Settings item and move the slider below to set the degree of antialiasing to used to compensate for variations in Windows® 2000. SLI multi-GPU * (For GV-NX71G512P8-RH / GV-NX71G512P8 only) „ To enable SLI mode, select... the Enable SLI multi-GPU check box and click Apply after installation of the Global Driver Settings. Please do not enable SLI multi-GPU in luminance between a ...

Manual
Page 36
... does not show up. Type the following steps: 1. Click "Next". 7. English 3.2. To ensure you need to install the graphics card driver to take advantage of the higher performance, resolutions, and special graphics features of the graphics card. Select Run. 3. Click "OK". 5. ...driver. Click Install Display Driver item, and follow the wizard to the license agreement. 8. Please make sure the Windows® 2000 have installed Windows® 2000 Service Pack (or later) before installing the graphics card driver. GV-NX71G Series Graphics Accelerator - 32 - Windows® 2000 Driver...
... does not show up. Type the following steps: 1. Click "Next". 7. English 3.2. To ensure you need to install the graphics card driver to take advantage of the higher performance, resolutions, and special graphics features of the graphics card. Select Run. 3. Click "OK". 5. ...driver. Click Install Display Driver item, and follow the wizard to the license agreement. 8. Please make sure the Windows® 2000 have installed Windows® 2000 Service Pack (or later) before installing the graphics card driver. GV-NX71G Series Graphics Accelerator - 32 - Windows® 2000 Driver...

Manual
Page 37
Troubleshooting Tips The following troubleshooting tips may help if you experience problems. Contact your dealer or GIGABYTE for the graphics card is securely fastened to the monitor's manual.) - 33 - When the Windows Advanced Options Menu appears, select Safe Mode and ...motherboard. Troubleshooting Tips Press the F8 key on your keyboard after system starts up. After getting into Safe Mode, in Device Manager check whether the driver for more advanced troubleshooting information. „ Check that the card is seated properly in the PCI Express x16 slot. „ Ensure that the ...
Troubleshooting Tips The following troubleshooting tips may help if you experience problems. Contact your dealer or GIGABYTE for the graphics card is securely fastened to the monitor's manual.) - 33 - When the Windows Advanced Options Menu appears, select Safe Mode and ...motherboard. Troubleshooting Tips Press the F8 key on your keyboard after system starts up. After getting into Safe Mode, in Device Manager check whether the driver for more advanced troubleshooting information. „ Check that the card is seated properly in the PCI Express x16 slot. „ Ensure that the ...

Manual
Page 38
Reflash BIOS in the lower-right corner of @VGA flash BIOS utility. 2. After installing the display drivers, you .(@VGA will find a GIGABYTE the Taskbar. Update BIOS through the Internet a. Select the From Local File check box and then click Flash. Extract the downloaded Zip...extract it 's done, then restart your card is the latest one.) 3. b. d. Complete the update procedure following the on your computer. 5.1.2. GV-NX71G Series Graphics Accelerator - 34 - Wait until it to restart the computer in MS-DOS mode.) 3. Then @VGA will automatically download the BIOS...
Reflash BIOS in the lower-right corner of @VGA flash BIOS utility. 2. After installing the display drivers, you .(@VGA will find a GIGABYTE the Taskbar. Update BIOS through the Internet a. Select the From Local File check box and then click Flash. Extract the downloaded Zip...extract it 's done, then restart your card is the latest one.) 3. b. d. Complete the update procedure following the on your computer. 5.1.2. GV-NX71G Series Graphics Accelerator - 34 - Wait until it to restart the computer in MS-DOS mode.) 3. Then @VGA will automatically download the BIOS...

Manual
Page 39
... 1: Connect the HDTV component cable to the adapter according to the TV Out port on your graphics card. Step 2: After installation of the graphics card driver, right-click on Desktop and select Properties.
... 1: Connect the HDTV component cable to the adapter according to the TV Out port on your graphics card. Step 2: After installation of the graphics card driver, right-click on Desktop and select Properties.

