Manual
Page 4
... ...3 1.2. Taskbar icon ...16 3.1.6. Display properties pages 19 3.1.7. Reflash BIOS in MS-DOS mode 30 5.1.2. Resolutions and color depth table (In Windows® XP 31 GV-NX66256DP2 Graphics Accelerator - 2 - Hardware Installation 4 2.1. Reflash BIOS in Windows mode 30 5.2. Introduction 3 1.1. Board layout 4 2.2. Driver installation ...12 3.1.4. Utilities on driver CD ...14 3.1.5. Software Installation 9 3.1. Operating system requirement 9 3.1.2. Troubleshooting Tips...
... ...3 1.2. Taskbar icon ...16 3.1.6. Display properties pages 19 3.1.7. Reflash BIOS in MS-DOS mode 30 5.1.2. Resolutions and color depth table (In Windows® XP 31 GV-NX66256DP2 Graphics Accelerator - 2 - Hardware Installation 4 2.1. Reflash BIOS in Windows mode 30 5.2. Introduction 3 1.1. Board layout 4 2.2. Driver installation ...12 3.1.4. Utilities on driver CD ...14 3.1.5. Software Installation 9 3.1. Operating system requirement 9 3.1.2. Troubleshooting Tips...
Manual
Page 12
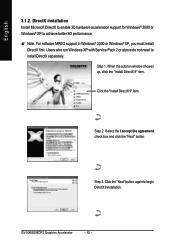
... Pack 2 or above do not need to begin DirectX 9 installation. When the autorun window showes up, click the "Install DirectX 9" item. Step 2. GV-NX66256DP2 Graphics Accelerator - 10 - DirectX installation Install Microsoft DirectX to enable 3D hardware acceleration support for Windows® 2000 or Windows® XP to achieve better 3D performance. 0 Note: For software MPEG support...
... Pack 2 or above do not need to begin DirectX 9 installation. When the autorun window showes up, click the "Install DirectX 9" item. Step 2. GV-NX66256DP2 Graphics Accelerator - 10 - DirectX installation Install Microsoft DirectX to enable 3D hardware acceleration support for Windows® 2000 or Windows® XP to achieve better 3D performance. 0 Note: For software MPEG support...
