
Manual
Page 2
... pages 23 3.2. Introduction 3 1.1. Minimum system requirement 3 2. English Table of Contents 1. Software Installation 8 3.1. Win® XP driver and utilities installation 8 3.1.1. Display properties pages 18 3.1.7. Hardware installation 6 3. Utilities on driver CD 13 3.1.5. BIOS flash utility 28 4. How to reflash the BIOS 30 5.2. Resolutions and color depth table (In Windows® XP 31 GV-NX53128D Graphics Accelerator - 2 -
... pages 23 3.2. Introduction 3 1.1. Minimum system requirement 3 2. English Table of Contents 1. Software Installation 8 3.1. Win® XP driver and utilities installation 8 3.1.1. Display properties pages 18 3.1.7. Hardware installation 6 3. Utilities on driver CD 13 3.1.5. BIOS flash utility 28 4. How to reflash the BIOS 30 5.2. Resolutions and color depth table (In Windows® XP 31 GV-NX53128D Graphics Accelerator - 2 -

Manual
Page 4
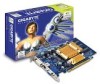
Unpacking The GV-NX53128D package contains the following: The GV-NX53128D graphics accelerator GV-NX53128D user's manual NVIDIA Series driver and utility CD PowerDVD CD S to AV cable DVI-I to a metal object, such as the anti-static mat. To protect them against damage from... left in its original packing until it is installed. Shipping and handling may cause damage to ensure your graphics card working correctly, please use official Gigabyte BIOS only. In order to your hands to a safely grounded object or to D-Sub connector Expansion cards contain very delicate Integrated Circuit (IC) ...
Unpacking The GV-NX53128D package contains the following: The GV-NX53128D graphics accelerator GV-NX53128D user's manual NVIDIA Series driver and utility CD PowerDVD CD S to AV cable DVI-I to a metal object, such as the anti-static mat. To protect them against damage from... left in its original packing until it is installed. Shipping and handling may cause damage to ensure your graphics card working correctly, please use official Gigabyte BIOS only. In order to your hands to a safely grounded object or to D-Sub connector Expansion cards contain very delicate Integrated Circuit (IC) ...

Manual
Page 7
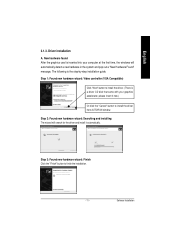
... cover. 6. Locate the PCI Express x 16 slot. Hardware Installation Plug the display cable into your graphics card came with the installation of the graphics card driver. then turn on the computer and monitor. English 4. If your card; If necessary, remove the metal cover from this slot; Please refer to proceed with...
... cover. 6. Locate the PCI Express x 16 slot. Hardware Installation Plug the display cable into your graphics card came with the installation of the graphics card driver. then turn on the computer and monitor. English 4. If your card; If necessary, remove the metal cover from this slot; Please refer to proceed with...

Manual
Page 8
... make sure your graphics accelerator.) 3.1. Then you can see the AUTORUN window (if it does not show up, run "D:\setup.exe"). GV-NX53128D Graphics Accelerator - 8 - English 3. Or please contact your CD-ROM drive, you insert the driver CD into your motherboard nearest dealer for that your CD-ROM Drive letter to install the...
... make sure your graphics accelerator.) 3.1. Then you can see the AUTORUN window (if it does not show up, run "D:\setup.exe"). GV-NX53128D Graphics Accelerator - 8 - English 3. Or please contact your CD-ROM drive, you insert the driver CD into your motherboard nearest dealer for that your CD-ROM Drive letter to install the...
Manual
Page 11
...graphics accelerator, please insert it automatically. Driver installation A. Step 3: Found new hardware wizard: Finish Click the "Finish" button to install the driver. (There is a driver CD disk that came with your computer at the first time, the windows will search for the driver and install it now.) Or click ...the "Cancel" button to install the driver from AUTORUN window. New hardware found After the graphics card is the step-by-step installation guide. Step...
...graphics accelerator, please insert it automatically. Driver installation A. Step 3: Found new hardware wizard: Finish Click the "Finish" button to install the driver. (There is a driver CD disk that came with your computer at the first time, the windows will search for the driver and install it now.) Or click ...the "Cancel" button to install the driver from AUTORUN window. New hardware found After the graphics card is the step-by-step installation guide. Step...

Manual
Page 12
Driver installation (Autorun Window) Insert the driver CD disk into your CD-ROM, and then you can see the AUTORUN window. Click "Next" button. Then the driver installation is completed. Step 1. Step 2. GV-NX53128D Graphics Accelerator - 12 - English B. When autorun window show up , click Install Display Driver item. Windows installings the components. Step 3. If it does not show up , please run "D:\setup.exe". Click "Finish" button to restart computer. Click "Install Display Driver" item.
Driver installation (Autorun Window) Insert the driver CD disk into your CD-ROM, and then you can see the AUTORUN window. Click "Next" button. Then the driver installation is completed. Step 1. Step 2. GV-NX53128D Graphics Accelerator - 12 - English B. When autorun window show up , click Install Display Driver item. Windows installings the components. Step 3. If it does not show up , please run "D:\setup.exe". Click "Finish" button to restart computer. Click "Install Display Driver" item.

Manual
Page 13
Utilities on driver CD Insert the driver CD disk into your name and company. When autorun window show up , click V-Tuner 2 item. Step 4. Click "V-Tuner 2" item. Step 3. Then the V-Tuner 2 installation is completed. - 13 - Enter your CD-ROM, and then you can see the AUTORUN window. Click "Finish" button to restart computer. Click "Next" button. If it does not show up , please run "D:\setup.exe". • Install V-Tuner 2: Step 1. Step 2. Software Installation English 3.1.4.
Utilities on driver CD Insert the driver CD disk into your name and company. When autorun window show up , click V-Tuner 2 item. Step 4. Click "V-Tuner 2" item. Step 3. Then the V-Tuner 2 installation is completed. - 13 - Enter your CD-ROM, and then you can see the AUTORUN window. Click "Finish" button to restart computer. Click "Next" button. If it does not show up , please run "D:\setup.exe". • Install V-Tuner 2: Step 1. Step 2. Software Installation English 3.1.4.
Manual
Page 15
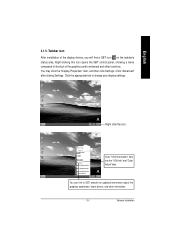
Click "Advanced" after clickng Settings. Software Installation Right-clicking this icon opens the GBT control panel, showing a menu composed of shortcut of the display drivers, you will find a GBT icon on the taskbar's status area. Taskbar icon After installation of the graphics card's enhanced and other information. - 15 - Click "VGA..." item, and then click Settings. Right click the icon. Click the appropriate tab to GBT website for updated information about the graphics accelerator, latest drivers, and other functions. You can link to change your display settings.
Click "Advanced" after clickng Settings. Software Installation Right-clicking this icon opens the GBT control panel, showing a menu composed of shortcut of the display drivers, you will find a GBT icon on the taskbar's status area. Taskbar icon After installation of the graphics card's enhanced and other information. - 15 - Click "VGA..." item, and then click Settings. Right click the icon. Click the appropriate tab to GBT website for updated information about the graphics accelerator, latest drivers, and other functions. You can link to change your display settings.

Manual
Page 17
Right click the icon. You can adjust the properties of the display drivers, you will find a NVIDIA icon on the taskbar's status area. English After installation of the graphics accelertaor from here. - 17 - Clicking this icon open the control panel. Software Installation
Right click the icon. You can adjust the properties of the display drivers, you will find a NVIDIA icon on the taskbar's status area. English After installation of the graphics accelertaor from here. - 17 - Clicking this icon open the control panel. Software Installation

Manual
Page 18
... the screen resolution and color quality settings. You can move the slider to change the resolution. Settings (Resolutions and Color depth for adapter and setting. GV-NX53128D Graphics Accelerator - 18 - Display properties pages The screen shows the information of display adapter, color, the range of display area and the refresh rate. Click...
... the screen resolution and color quality settings. You can move the slider to change the resolution. Settings (Resolutions and Color depth for adapter and setting. GV-NX53128D Graphics Accelerator - 18 - Display properties pages The screen shows the information of display adapter, color, the range of display area and the refresh rate. Click...

Manual
Page 19
To do this, click "Device Setting" followed by "OK". Display Matrix Model CRT+TV CRT+DVI DVI+TV GV-NX53128D Yes Yes Yes Performance and Quality Settings properties n The sliders lets to decide whether your television and then click "Apply" followed by "Select TV format...to set the degree of antialiasing to used in Direct3D and OpenGL applications. • Antialiasing settings: alows to set the degree of profiles. • Global Driver Settings: Slect the Settings item and move the slider below . • Display: select the primary display device • Click Apply to apply settings or ...
To do this, click "Device Setting" followed by "OK". Display Matrix Model CRT+TV CRT+DVI DVI+TV GV-NX53128D Yes Yes Yes Performance and Quality Settings properties n The sliders lets to decide whether your television and then click "Apply" followed by "Select TV format...to set the degree of antialiasing to used in Direct3D and OpenGL applications. • Antialiasing settings: alows to set the degree of profiles. • Global Driver Settings: Slect the Settings item and move the slider below . • Display: select the primary display device • Click Apply to apply settings or ...

Manual
Page 28
...; 2000 have installed Windows® 2000 Service Pack (or later) before installing the graphics accelerator driver. 3.3. GV-NX53128D Graphics Accelerator - 28 - BIOS flash utility BIOS update procedure: MNote: Please download the newest BIOS from our website (www.gigabyte.com.tw) or contact your graphics card. To ensure you want to realize the BIOS flash...
...; 2000 have installed Windows® 2000 Service Pack (or later) before installing the graphics accelerator driver. 3.3. GV-NX53128D Graphics Accelerator - 28 - BIOS flash utility BIOS update procedure: MNote: Please download the newest BIOS from our website (www.gigabyte.com.tw) or contact your graphics card. To ensure you want to realize the BIOS flash...

Manual
Page 29
... the graphics card is securely fastened to the card's display connector. n For more assistance, use the Troubleshooting Guide located in Device Manager check whether the driver for more information, consult your computer manufacturer. n Restart your keyboard after system starts up. n Check that the display cable is correct. When the Windows Advanced... the monitor and computer are plugged in graphics capabilities on your computer. Troubleshooting Tips The following troubleshooting tips may help if you installed the graphics driver.
... the graphics card is securely fastened to the card's display connector. n For more assistance, use the Troubleshooting Guide located in Device Manager check whether the driver for more information, consult your computer manufacturer. n Restart your keyboard after system starts up. n Check that the display cable is correct. When the Windows Advanced... the monitor and computer are plugged in graphics capabilities on your computer. Troubleshooting Tips The following troubleshooting tips may help if you installed the graphics driver.

