
Manual
Page 4
... Installation 11 3.1.1. Troubleshooting Tips 24 5. Appendix ...25 5.1. Board Layout ...6 2.2. Features ...5 1.2. Driver Installation ...11 3.1.2. Resolutions and Color Depth Tables 26 5.3. Hardware Installation 6 2.1. Software Installation 11 3.1. Accessing NVIDIA Control Panel 16 4. Introduction ...5 1.1. Hardware Installation ...9 3. GIGABYTE Gamer HUD on Driver Disk 13 3.2. Regulatory Statements 28 - 4 - How to Reflash the BIOS in MS-DOS Mode 25 5.2. Display...
... Installation 11 3.1.1. Troubleshooting Tips 24 5. Appendix ...25 5.1. Board Layout ...6 2.2. Features ...5 1.2. Driver Installation ...11 3.1.2. Resolutions and Color Depth Tables 26 5.3. Hardware Installation 6 2.1. Software Installation 11 3.1. Accessing NVIDIA Control Panel 16 4. Introduction ...5 1.1. Hardware Installation ...9 3. GIGABYTE Gamer HUD on Driver Disk 13 3.2. Regulatory Statements 28 - 4 - How to Reflash the BIOS in MS-DOS Mode 25 5.2. Display...
Manual
Page 5
... correct chipset driver - An SLI certified motherboard with the same model name (e.g. Windows® 7 - GV-N98TOC-1GI/GV-N98TOC-512I/GV-N98TOC-1GI rev2.0/ GV-N98TOC-512I rev2.0) and from the samevendor (e.g. Minimum System Requirements • Hardware - A rating power 500 Watt power supply or above is a must - A rating power 500 Watt power supply or above is a must • Operating System - GIGABYTE TECHNOLOGY...
... correct chipset driver - An SLI certified motherboard with the same model name (e.g. Windows® 7 - GV-N98TOC-1GI/GV-N98TOC-512I/GV-N98TOC-1GI rev2.0/ GV-N98TOC-512I rev2.0) and from the samevendor (e.g. Minimum System Requirements • Hardware - A rating power 500 Watt power supply or above is a must - A rating power 500 Watt power supply or above is a must • Operating System - GIGABYTE TECHNOLOGY...
Manual
Page 10
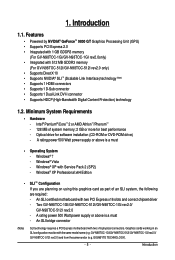
...enable the S/PDIF in a system that provides two x16 PCI Express slots to proceed with the installation of the same type. (Example: GV-NX88X768H-RH) GV-N98 Series Graphics Accelerator - 10 - Connect the provided S/PDIF cable to next chapter for the graphics card. 1. SLI bridge connector (...provided by motherboard manufacturer) Two SLI-ready graphics cards of the graphics card driver. To connect an HDMI TV, follow the steps below shows ...
...enable the S/PDIF in a system that provides two x16 PCI Express slots to proceed with the installation of the same type. (Example: GV-NX88X768H-RH) GV-N98 Series Graphics Accelerator - 10 - Connect the provided S/PDIF cable to next chapter for the graphics card. 1. SLI bridge connector (...provided by motherboard manufacturer) Two SLI-ready graphics cards of the graphics card driver. To connect an HDMI TV, follow the steps below shows ...

Manual
Page 11
... screen is automatically displayed which looks like that shown in Windows XP, you must install DirectX first. Step 2: Click the Next button. Software Installation 3. Driver and Utility Installation 3.1.1. Users who run Windows XP with Service Pack 2 or above do not need to My Computer, double-click the optical drive and ...
... screen is automatically displayed which looks like that shown in Windows XP, you must install DirectX first. Step 2: Click the Next button. Software Installation 3. Driver and Utility Installation 3.1.1. Users who run Windows XP with Service Pack 2 or above do not need to My Computer, double-click the optical drive and ...

Manual
Page 12
Step 4: Click the Finish button to restart the computer. GV-N98 Series Graphics Accelerator - 12 - The system is completed. Then the driver installation is installing the components. Step 3: Click the Yes button.
Step 4: Click the Finish button to restart the computer. GV-N98 Series Graphics Accelerator - 12 - The system is completed. Then the driver installation is installing the components. Step 3: Click the Yes button.

Manual
Page 13
Step 5: Click the Finish button. Then the installation of the GIGABYTE Gamer HUD is installing the components. Step 2: Choose the language for the installation and click the OK button. Software Installation 3.1.2. Step 3: Click the Next button. Step 4: Click the Install button. GIGABYTE Gamer HUD on Driver Disk Step 1: Click the GIGABYTE Gamer HUD item. The system is completed. - 13 -
Step 5: Click the Finish button. Then the installation of the GIGABYTE Gamer HUD is installing the components. Step 2: Choose the language for the installation and click the OK button. Software Installation 3.1.2. Step 3: Click the Next button. Step 4: Click the Install button. GIGABYTE Gamer HUD on Driver Disk Step 1: Click the GIGABYTE Gamer HUD item. The system is completed. - 13 -
Manual
Page 16
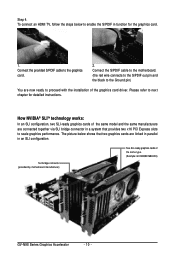
...tab page, click Start the NVIDIA Control Panel to access the NVIDIA Control Panel. Accessing NVIDIA Control Panel After installation of the display driver, right-click on the desktop and select Personalize, and then the Personalize appearance and sounds window will show up. After clicking the... Advanced Settings button in Display Settings, you can right-click on the desktop and select NVIDIA Control Panel. GV-N98 Series Graphics Accelerator - 16 - The NVIDIA Control Panel is used to configure all your graphics card settings. 3.3. Right-click on ...
...tab page, click Start the NVIDIA Control Panel to access the NVIDIA Control Panel. Accessing NVIDIA Control Panel After installation of the display driver, right-click on the desktop and select Personalize, and then the Personalize appearance and sounds window will show up. After clicking the... Advanced Settings button in Display Settings, you can right-click on the desktop and select NVIDIA Control Panel. GV-N98 Series Graphics Accelerator - 16 - The NVIDIA Control Panel is used to configure all your graphics card settings. 3.3. Right-click on ...

Manual
Page 23
... mirroring. „ Adjust Video Color Settings Use the controls on this page to fine tune the color settings for updated information on your ForceWare graphics driver version. Consult the release notes for video content on your display.
... mirroring. „ Adjust Video Color Settings Use the controls on this page to fine tune the color settings for updated information on your ForceWare graphics driver version. Consult the release notes for video content on your display.
Manual
Page 24
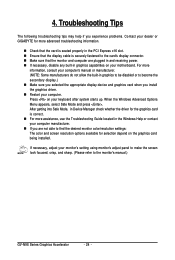
...Safe Mode and press . After getting into Safe Mode, in Device Manager check whether the driver for the graphics card is correct. „ For more assistance, use the Troubleshooting Guide located...(NOTE: Some manufacturers do not allow the built-in graphics capabilities on your dealer or GIGABYTE for selection depend on the graphics card being installed. For more advanced troubleshooting information. „... any built-in graphics to be disabled or to the monitor's manual.) GV-N98 Series Graphics Accelerator - 24 - Press on your computer. Troubleshooting Tips The following troubleshooting...
...Safe Mode and press . After getting into Safe Mode, in Device Manager check whether the driver for the graphics card is correct. „ For more assistance, use the Troubleshooting Guide located...(NOTE: Some manufacturers do not allow the built-in graphics capabilities on your dealer or GIGABYTE for selection depend on the graphics card being installed. For more advanced troubleshooting information. „... any built-in graphics to be disabled or to the monitor's manual.) GV-N98 Series Graphics Accelerator - 24 - Press on your computer. Troubleshooting Tips The following troubleshooting...

