
Manual
Page 4
Introduction ...5 1.1. Hardware Installation 6 2.1. Driver and Utility Installation 11 3.1.1. GIGABYTE Gamer HUD on Driver Disk 13 3.2. Display Properties Pages 15 3.3. Appendix ...25 5.1. Resolutions and Color Depth Tables 26 5.3. Software Installation 11 3.1. Minimum System Requirements 5 2. How to Reflash the BIOS in MS-DOS Mode 25 5.2. Table of Contents 1. Accessing NVIDIA Control Panel 16 4. Driver Installation ...11 3.1.2. Troubleshooting...
Introduction ...5 1.1. Hardware Installation 6 2.1. Driver and Utility Installation 11 3.1.1. GIGABYTE Gamer HUD on Driver Disk 13 3.2. Display Properties Pages 15 3.3. Appendix ...25 5.1. Resolutions and Color Depth Tables 26 5.3. Software Installation 11 3.1. Minimum System Requirements 5 2. How to Reflash the BIOS in MS-DOS Mode 25 5.2. Table of Contents 1. Accessing NVIDIA Control Panel 16 4. Driver Installation ...11 3.1.2. Troubleshooting...
Manual
Page 5
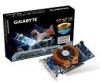
...GV-N98TOC-1GI/GV-N98TOC-1GI rev2.0only) • Integrated with two PCI Express x16 slots and correct chipset driver - Windows® Vista - GV-N98TOC-1GI/GV-N98TOC-512I/GV-N98TOC-1GI rev2.0/ GV-N98TOC-512I rev2.0) and from the samevendor (e.g. Intel® Pentium®/CoreTM 2 or AMD AthlonTM/PhenomTM - 128 MB of an SLI system, the following are required: - Two GV-N98TOC-1GI/GV-N98TOC-512I/GV-N98TOC-1GI rev2.0/ GV-N98TOC... as part of system memory; 2 GB or more for software installation (CD-ROM or DVD-ROM drive) - Introduction 1. GIGABYTE TECHNOLOGY). - 5 - Introduction 1.1.
...GV-N98TOC-1GI/GV-N98TOC-1GI rev2.0only) • Integrated with two PCI Express x16 slots and correct chipset driver - Windows® Vista - GV-N98TOC-1GI/GV-N98TOC-512I/GV-N98TOC-1GI rev2.0/ GV-N98TOC-512I rev2.0) and from the samevendor (e.g. Intel® Pentium®/CoreTM 2 or AMD AthlonTM/PhenomTM - 128 MB of an SLI system, the following are required: - Two GV-N98TOC-1GI/GV-N98TOC-512I/GV-N98TOC-1GI rev2.0/ GV-N98TOC... as part of system memory; 2 GB or more for software installation (CD-ROM or DVD-ROM drive) - Introduction 1. GIGABYTE TECHNOLOGY). - 5 - Introduction 1.1.
Manual
Page 10
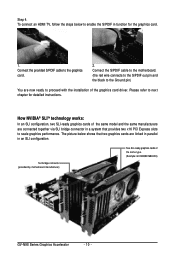
... out pin and the black to proceed with the installation of the graphics card driver. How NVIDIA® SLITM technology works: In an SLI configuration, two SLI-ready graphics cards of the same type. (Example: GV-NX88X768H-RH) GV-N98 Series Graphics Accelerator - 10 - Please refer to the graphics card. 2. To connect an...
... out pin and the black to proceed with the installation of the graphics card driver. How NVIDIA® SLITM technology works: In an SLI configuration, two SLI-ready graphics cards of the same type. (Example: GV-NX88X768H-RH) GV-N98 Series Graphics Accelerator - 10 - Please refer to the graphics card. 2. To connect an...

Manual
Page 11
...that shown in Windows XP, you must install DirectX first. For software MPEG support in the screen shot below. (If the driver Autorun screen does not appear automatically, go to install DirectX separately. - 11 - First make sure your optical drive. Software ...Installation Make sure your system has installed the appropriate motherboard drivers (for the motherboard drivers, please contact the motherboard manufacturer.) 3.1. Step 2: Click the Next button. Software Installation Notice the following guidelines before installing ...
...that shown in Windows XP, you must install DirectX first. For software MPEG support in the screen shot below. (If the driver Autorun screen does not appear automatically, go to install DirectX separately. - 11 - First make sure your optical drive. Software ...Installation Make sure your system has installed the appropriate motherboard drivers (for the motherboard drivers, please contact the motherboard manufacturer.) 3.1. Step 2: Click the Next button. Software Installation Notice the following guidelines before installing ...

Manual
Page 12
Then the driver installation is installing the components. Step 4: Click the Finish button to restart the computer. GV-N98 Series Graphics Accelerator - 12 - The system is completed. Step 3: Click the Yes button.
Then the driver installation is installing the components. Step 4: Click the Finish button to restart the computer. GV-N98 Series Graphics Accelerator - 12 - The system is completed. Step 3: Click the Yes button.

Manual
Page 13
GIGABYTE Gamer HUD on Driver Disk Step 1: Click the GIGABYTE Gamer HUD item. Step 5: Click the Finish button. Then the installation of the GIGABYTE Gamer HUD is installing the components. Software Installation Step 4: Click the Install button. The system is completed. - 13 - 3.1.2. Step 3: Click the Next button. Step 2: Choose the language for the installation and click the OK button.
GIGABYTE Gamer HUD on Driver Disk Step 1: Click the GIGABYTE Gamer HUD item. Step 5: Click the Finish button. Then the installation of the GIGABYTE Gamer HUD is installing the components. Software Installation Step 4: Click the Install button. The system is completed. - 13 - 3.1.2. Step 3: Click the Next button. Step 2: Choose the language for the installation and click the OK button.
Manual
Page 16
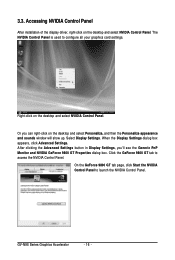
...the desktop and select Personalize, and then the Personalize appearance and sounds window will show up. Accessing NVIDIA Control Panel After installation of the display driver, right-click on the desktop and select NVIDIA Control Panel. Select Display Settings. On the GeForce 9800 GT tab page, click Start the ... box. Click the GeForce 9800 GT tab to launch the NVIDIA Control Panel. 3.3. When the Display Settings dialog box appears, click Advanced Settings. GV-N98 Series Graphics Accelerator - 16 - The NVIDIA Control Panel is used to configure all your graphics card settings.
...the desktop and select Personalize, and then the Personalize appearance and sounds window will show up. Accessing NVIDIA Control Panel After installation of the display driver, right-click on the desktop and select NVIDIA Control Panel. Select Display Settings. On the GeForce 9800 GT tab page, click Start the ... box. Click the GeForce 9800 GT tab to launch the NVIDIA Control Panel. 3.3. When the Display Settings dialog box appears, click Advanced Settings. GV-N98 Series Graphics Accelerator - 16 - The NVIDIA Control Panel is used to configure all your graphics card settings.

Manual
Page 23
...; Adjust your television picture quality and video color settings for the best possible viewing in development and may not be available with your ForceWare graphics driver version. Consult the release notes for some features under Windows Vista is in its environment. • Change the position and size of the test images...
...; Adjust your television picture quality and video color settings for the best possible viewing in development and may not be available with your ForceWare graphics driver version. Consult the release notes for some features under Windows Vista is in its environment. • Change the position and size of the test images...
Manual
Page 24
... The following troubleshooting tips may help if you install the graphics driver. „ Restart your keyboard after system starts up. For more... sure you selected the appropriate display device and graphics card when you experience problems. Contact your dealer or GIGABYTE for more advanced troubleshooting information. „ Check that the card is seated properly in the PCI Express...„ Make sure that the monitor and computer are not able to the monitor's manual.) GV-N98 Series Graphics Accelerator - 24 - Press on the graphics card being installed. After getting into Safe Mode...
... The following troubleshooting tips may help if you install the graphics driver. „ Restart your keyboard after system starts up. For more... sure you selected the appropriate display device and graphics card when you experience problems. Contact your dealer or GIGABYTE for more advanced troubleshooting information. „ Check that the card is seated properly in the PCI Express...„ Make sure that the monitor and computer are not able to the monitor's manual.) GV-N98 Series Graphics Accelerator - 24 - Press on the graphics card being installed. After getting into Safe Mode...

