
Manual
Page 1
Doing so may be reproduced or transmitted in any form without the expressed, written permission of this graphics card. Rovi Product Notice: This product incorporates copyright protection technology that may appear in technology, some of this this manual.The author assumes no responsibility for... otherwise authorized by GIGA-BYTE TECHNOLOGY CO., LTD. ("GBT"). Due to update the information contained herein. No part of their respective owners. NVIDIA® Graphics Accelerator User's Manual Rev. 103 Copyright © 2012 GIGABYTE TECHNOLOGY CO., LTD Copyright by Rovi Corporation.
Doing so may be reproduced or transmitted in any form without the expressed, written permission of this graphics card. Rovi Product Notice: This product incorporates copyright protection technology that may appear in technology, some of this this manual.The author assumes no responsibility for... otherwise authorized by GIGA-BYTE TECHNOLOGY CO., LTD. ("GBT"). Due to update the information contained herein. No part of their respective owners. NVIDIA® Graphics Accelerator User's Manual Rev. 103 Copyright © 2012 GIGABYTE TECHNOLOGY CO., LTD Copyright by Rovi Corporation.

Manual
Page 4
... with the components whenever the components are no shipping and handling damages on the graphics card. Unpacking and installation should be left in its original packing until it is installed. Using non-official GIGABYTE BIOS might cause problem(s) on the card before handling computer components. Use a grounded wrist strap before proceeding. Turn off your...
... with the components whenever the components are no shipping and handling damages on the graphics card. Unpacking and installation should be left in its original packing until it is installed. Using non-official GIGABYTE BIOS might cause problem(s) on the card before handling computer components. Use a grounded wrist strap before proceeding. Turn off your...
Manual
Page 5
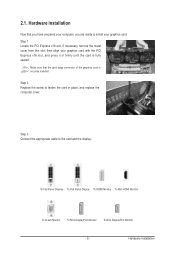
... the display. Connect the appropriate cable to fasten the card in firmly until the card is securely inserted. then align your graphics card. Step 3. 2.1. Step 1. Make sure that you have prepared your computer, you are ready to install your graphics card with the PCI Express x16 slot, and press it in place, and replace the computer... To Mini DisplayPort Monitor - 5 - If necessary, remove the metal cover from this slot; Hardware Installation Hardware Installation Now that the gold edge connector of the graphics card is fully seated.
... the display. Connect the appropriate cable to fasten the card in firmly until the card is securely inserted. then align your graphics card. Step 3. 2.1. Step 1. Make sure that you have prepared your computer, you are ready to install your graphics card with the PCI Express x16 slot, and press it in place, and replace the computer... To Mini DisplayPort Monitor - 5 - If necessary, remove the metal cover from this slot; Hardware Installation Hardware Installation Now that the gold edge connector of the graphics card is fully seated.
Manual
Page 6
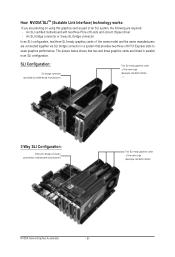
... are linked in parallel in a system that two and three graphics cards are required: - SLI Configuration: SLI bridge connector (provided by motherboard manufacturer) Two SLI-ready graphics cards of the same type. (Example: GV-N28-1GH-B) 3-Way SLI Configuration: 3-Way SLI bridge connector ...(provided by motherboard manufacturer) Two SLI-ready graphics cards of the same model and the same manufacturers are ...
... are linked in parallel in a system that two and three graphics cards are required: - SLI Configuration: SLI bridge connector (provided by motherboard manufacturer) Two SLI-ready graphics cards of the same type. (Example: GV-N28-1GH-B) 3-Way SLI Configuration: 3-Way SLI bridge connector ...(provided by motherboard manufacturer) Two SLI-ready graphics cards of the same model and the same manufacturers are ...
Manual
Page 14
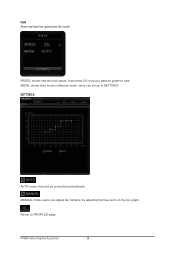
MODE: shows Auto mode or Manual mode, users can adjust fan behavior by adjusting the blue point on the fan graph. MANUAL mode, users can set up in SETTINGS SETTINGS: AUTO mode, fans will show 0% if using a passive graphics card. NVIDIA Series Graphics Accelerator - 14 - Return to PROFILES page. FAN Show real time fan speed and fan mode SPEED: shows real time fan speed, it will be controlled automatically.
MODE: shows Auto mode or Manual mode, users can adjust fan behavior by adjusting the blue point on the fan graph. MANUAL mode, users can set up in SETTINGS SETTINGS: AUTO mode, fans will show 0% if using a passive graphics card. NVIDIA Series Graphics Accelerator - 14 - Return to PROFILES page. FAN Show real time fan speed and fan mode SPEED: shows real time fan speed, it will be controlled automatically.
Manual
Page 20
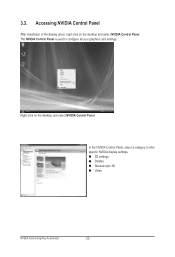
Right-click on the desktop and select NVIDIA Control Panel. Accessing NVIDIA Control Panel After installation of the display driver, right-click on the desktop and select NVIDIA Control Panel. The NVIDIA Control Panel is used to alter specific NVIDIA display settings. 3D settings Display Stereoscopic 3D Video NVIDIA Series Graphics Accelerator - 20 - In the NVIDIA Control Panel, select a category to configure all your graphics card settings. 3.3.
Right-click on the desktop and select NVIDIA Control Panel. Accessing NVIDIA Control Panel After installation of the display driver, right-click on the desktop and select NVIDIA Control Panel. The NVIDIA Control Panel is used to alter specific NVIDIA display settings. 3D settings Display Stereoscopic 3D Video NVIDIA Series Graphics Accelerator - 20 - In the NVIDIA Control Panel, select a category to configure all your graphics card settings. 3.3.
Manual
Page 28
... the secondary display.) Make sure you selected the appropriate display device and graphics card when you install the graphics driver. Restart your keyboard after system starts up. If necessary, adjust your computer manufacturer. If you experience problems. Contact your dealer or GIGABYTE for more assistance, use the Troubleshooting Guide located in the Windows Help...
... the secondary display.) Make sure you selected the appropriate display device and graphics card when you install the graphics driver. Restart your keyboard after system starts up. If necessary, adjust your computer manufacturer. If you experience problems. Contact your dealer or GIGABYTE for more assistance, use the Troubleshooting Guide located in the Windows Help...

