
Manual
Page 3
... Table (In Windows XP 26 5.3. Driver Installation ...10 3.1.2. Troubleshooting Tips 24 5. Display Properties Pages 15 3.3. How to Reflash the BIOS in MS-DOS Mode 25 5.2. Introduction ...4 1.1. Appendix ...25 5.1. Minimum System Requirements 4 2. Features ...4 1.2. Hardware Installation 5 2.1. Driver and Utility Installation 10 3.1.1. Regulatory Statements 28 - 3 - Board Layout ...5 2.2. GIGABYTE Easy Boost on Driver Disk 12 3.2. Table of Contents...
... Table (In Windows XP 26 5.3. Driver Installation ...10 3.1.2. Troubleshooting Tips 24 5. Display Properties Pages 15 3.3. How to Reflash the BIOS in MS-DOS Mode 25 5.2. Introduction ...4 1.1. Appendix ...25 5.1. Minimum System Requirements 4 2. Features ...4 1.2. Hardware Installation 5 2.1. Driver and Utility Installation 10 3.1.1. Regulatory Statements 28 - 3 - Board Layout ...5 2.2. GIGABYTE Easy Boost on Driver Disk 12 3.2. Table of Contents...

Manual
Page 4
... supply specification or above is recommended - Two GV-N56GOC-1GI for software installation (CD-ROM or DVD-ROM drive) • Operating System - An SLI bridge connector (Note 1) SLI technology requires a PCI Express motherboard with two PCIe x16 slots and correct chipset driver - GV-N500 Series Graphics Accelerator - 4 - GIGABYTE TECHNOLOGY). An SLI certified motherboard with two x16...
... supply specification or above is recommended - Two GV-N56GOC-1GI for software installation (CD-ROM or DVD-ROM drive) • Operating System - An SLI bridge connector (Note 1) SLI technology requires a PCI Express motherboard with two PCIe x16 slots and correct chipset driver - GV-N500 Series Graphics Accelerator - 4 - GIGABYTE TECHNOLOGY). An SLI certified motherboard with two x16...

Manual
Page 10
... must install DirectX first. For software MPEG support in the screen shot below. (If the driver Autorun screen does not appear automatically, go to install DirectX separately. Step 2: Click the Next button. GV-N500 Series Graphics Accelerator - 10 - Driver and Utility Installation 3.1.1. Users who run Windows XP with Service Pack 2 or above do...
... must install DirectX first. For software MPEG support in the screen shot below. (If the driver Autorun screen does not appear automatically, go to install DirectX separately. Step 2: Click the Next button. GV-N500 Series Graphics Accelerator - 10 - Driver and Utility Installation 3.1.1. Users who run Windows XP with Service Pack 2 or above do...

Manual
Page 11
Then the driver installation is installing the components. Software Installation The system is completed. - 11 - Step 4: Click the Finish button to restart the computer. Step 3: Click the Yes button.
Then the driver installation is installing the components. Software Installation The system is completed. - 11 - Step 4: Click the Finish button to restart the computer. Step 3: Click the Yes button.
Manual
Page 12
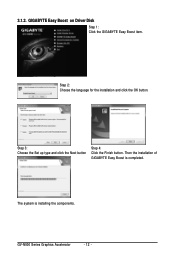
Then the installation of GIGABYTE Easy Boost is installing the components. Step 3: Choose the Set up type and click the Next button Step 4: Click the Finish button. GV-N500 Series Graphics Accelerator - 12 - The system is completed. GIGABYTE Easy Boost on Driver Disk Step 1: Click the GIGABYTE Easy Boost item. Step 2: Choose the language for the installation and click the OK button. 3.1.2.
Then the installation of GIGABYTE Easy Boost is installing the components. Step 3: Choose the Set up type and click the Next button Step 4: Click the Finish button. GV-N500 Series Graphics Accelerator - 12 - The system is completed. GIGABYTE Easy Boost on Driver Disk Step 1: Click the GIGABYTE Easy Boost item. Step 2: Choose the language for the installation and click the OK button. 3.1.2.

Manual
Page 16
... the NVIDIA Control Panel to configure all your graphics card settings. Accessing NVIDIA Control Panel After installation of the display driver, right-click on the desktop and select NVIDIA Control Panel. GV-N500 Series Graphics Accelerator - 16 - Select Display Settings. Or you 'll see the Generic PnP Monitor and NVIDIA GeForce GTX...
... the NVIDIA Control Panel to configure all your graphics card settings. Accessing NVIDIA Control Panel After installation of the display driver, right-click on the desktop and select NVIDIA Control Panel. GV-N500 Series Graphics Accelerator - 16 - Select Display Settings. Or you 'll see the Generic PnP Monitor and NVIDIA GeForce GTX...

Manual
Page 23
... inverse telecine, adjust edge sharpness, or apply noise filtering. You can choose to fine tune the color settings for video content on your ForceWare graphics driver version. Select one of the desktop video to best fit your television screen. „ Adjust Video Color Settings Use the controls on this page to...
... inverse telecine, adjust edge sharpness, or apply noise filtering. You can choose to fine tune the color settings for video content on your ForceWare graphics driver version. Select one of the desktop video to best fit your television screen. „ Adjust Video Color Settings Use the controls on this page to...

Manual
Page 24
...Tips The following troubleshooting tips may help if you experience problems. Contact your dealer or GIGABYTE for selection depend on your motherboard. When the Windows Advanced Options Menu appears, select ...card being installed. After getting into Safe Mode, in Device Manager check whether the driver for the graphics card is securely fastened to find the desired monitor color/resolution settings:... the Windows Help or contact your computer manufacturer. „ If you install the graphics driver. „ Restart your monitor's setting using monitor's adjust panel to make the screen look ...
...Tips The following troubleshooting tips may help if you experience problems. Contact your dealer or GIGABYTE for selection depend on your motherboard. When the Windows Advanced Options Menu appears, select ...card being installed. After getting into Safe Mode, in Device Manager check whether the driver for the graphics card is securely fastened to find the desired monitor color/resolution settings:... the Windows Help or contact your computer manufacturer. „ If you install the graphics driver. „ Restart your monitor's setting using monitor's adjust panel to make the screen look ...

