
Manual
Page 3
... ...10 3.1.2. Resolutions and Color Depth Table (In Windows XP 26 5.3. Minimum System Requirements 4 2. Driver and Utility Installation 10 3.1.1. Display Properties Pages 15 3.3. Troubleshooting Tips 24 5. GIGABYTE Easy Boost on Driver Disk 12 3.2. Hardware Installation ...8 3. Introduction ...4 1.1. Software Installation 10 3.1. Appendix ...25 5.1. Regulatory Statements 28 - 3 - Table of Contents 1. Features ...4 1.2. Board Layout ...5 2.2. Accessing NVIDIA...
... ...10 3.1.2. Resolutions and Color Depth Table (In Windows XP 26 5.3. Minimum System Requirements 4 2. Driver and Utility Installation 10 3.1.1. Display Properties Pages 15 3.3. Troubleshooting Tips 24 5. GIGABYTE Easy Boost on Driver Disk 12 3.2. Hardware Installation ...8 3. Introduction ...4 1.1. Software Installation 10 3.1. Appendix ...25 5.1. Regulatory Statements 28 - 3 - Table of Contents 1. Features ...4 1.2. Board Layout ...5 2.2. Accessing NVIDIA...

Manual
Page 7
...CARD IS DAMAGED. Hardware Installation Expansion cards contain very delicate Integrated Circuit (IC) chips. If you work correctly, please use official GIGABYTE BIOS only. In order to ensure that came with the components whenever the components are no shipping and handling damages on the bag ...wristband, grounded at the same point as the power supply case. 3. Use a grounded wrist strap before proceeding. Using non-official GIGABYTE BIOS might cause problem(s) on a grounded anti-static mat. Inspect the card carton for obvious damage. To protect them against damage from the ...
...CARD IS DAMAGED. Hardware Installation Expansion cards contain very delicate Integrated Circuit (IC) chips. If you work correctly, please use official GIGABYTE BIOS only. In order to ensure that came with the components whenever the components are no shipping and handling damages on the bag ...wristband, grounded at the same point as the power supply case. 3. Use a grounded wrist strap before proceeding. Using non-official GIGABYTE BIOS might cause problem(s) on a grounded anti-static mat. Inspect the card carton for obvious damage. To protect them against damage from the ...
Manual
Page 13
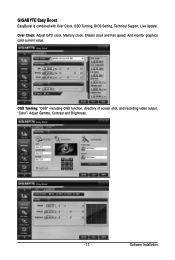
Adjust Gamma, Contrast and Brightness. - 13 - "Color"- GIGABYTE Easy Boost EasyBoost is combined with Over Clock, OSD Tunning, BIOS Setting, Technical Support, Live Update. Over Clock: Adjust GPU clock, Memory clock, Shader clock and Fan speed. OSD Tunning: "OSD" -including OSD function, directory of screen shot, and recording video output. Software Installation And monitor graphics card current value.
Adjust Gamma, Contrast and Brightness. - 13 - "Color"- GIGABYTE Easy Boost EasyBoost is combined with Over Clock, OSD Tunning, BIOS Setting, Technical Support, Live Update. Over Clock: Adjust GPU clock, Memory clock, Shader clock and Fan speed. OSD Tunning: "OSD" -including OSD function, directory of screen shot, and recording video output. Software Installation And monitor graphics card current value.
Manual
Page 14
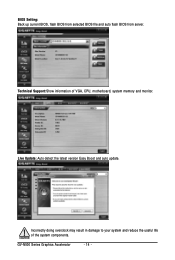
Live Update: Auto detect the latest version Easy Boost and auto update. GV-N500 Series Graphics Accelerator - 14 - BIOS Setting: Back up current BIOS, flash BIOS from selected BIOS file and auto flash BIOS from server. Incorrectly doing overclock may result in damage to your system and reduce the useful life of VGA, CPU, motherboard, system memory and monitor. Technical Support:Show information of the system components.
Live Update: Auto detect the latest version Easy Boost and auto update. GV-N500 Series Graphics Accelerator - 14 - BIOS Setting: Back up current BIOS, flash BIOS from selected BIOS file and auto flash BIOS from server. Incorrectly doing overclock may result in damage to your system and reduce the useful life of VGA, CPU, motherboard, system memory and monitor. Technical Support:Show information of the system components.

Manual
Page 25
... in MS-DOS mode.) 3. How to A:\>. 4. To back up the current BIOS, at the A:\> prompt, type[ B I O S f l a s h u t i l i t y n a m e ] - Appendix Change the command prompt to Reflash the BIOS in MS-DOS mode. (You may need a startup disk to your computer. - 25 - This procedure assumes drive A. 2. p [BIOS file name] (example: gvf19 -p N56GOC1GI.F2) and press Enter. 6. Appendix...
... in MS-DOS mode.) 3. How to A:\>. 4. To back up the current BIOS, at the A:\> prompt, type[ B I O S f l a s h u t i l i t y n a m e ] - Appendix Change the command prompt to Reflash the BIOS in MS-DOS mode. (You may need a startup disk to your computer. - 25 - This procedure assumes drive A. 2. p [BIOS file name] (example: gvf19 -p N56GOC1GI.F2) and press Enter. 6. Appendix...

