Gigabyte GB-BEi7HS-1260 Support and Manuals
Get Help and Manuals for this Gigabyte item
View All Support Options Below
Free Gigabyte GB-BEi7HS-1260 manuals!
Problems with Gigabyte GB-BEi7HS-1260?
Ask a Question
Free Gigabyte GB-BEi7HS-1260 manuals!
Problems with Gigabyte GB-BEi7HS-1260?
Ask a Question
Popular Gigabyte GB-BEi7HS-1260 Manual Pages
Quick Start Guide - Page 2
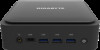
...;小型PCキット / BRIX Extreme GB-BEi Ultra Compact PC 키트
Quick Start Guide Kurzanleitung / Guide de démarrage rapide / Guía de inicio rápido / Guia de in this manual may be made by GIGABYTE without GIGABYTE's prior written permission.
Changes to the specifications and features in any form or by any...
Quick Start Guide - Page 13
... 14
1-2 Product Specifications 15
1-3 Package Contents 17
1-3-1 GB-BEi Bare-bone 17
1-3-2 VESA Mount...18
1-3-3 135W Adapter & Power Cord
18
1-3-4 Quick Start Guide...18
Chapter 2 System Appearance 19
2-1 Front View...19
2-1-1 Standard...19 2-1-2 HDD / Super...20
2-2 Rear View...21
2-2-1 Standard...21 2-2-2 HDD / Super...22 2-2-3 Installed GC-CMM-DLCS upgrade kit 22
2-3 Left...
Quick Start Guide - Page 14

...well as a motherboard, CPU or memory. Prior to installation, carefully read the user manual and follow these procedures:
• Prior to wear ...8226; Turning on the motherboard, make sure the power supply voltage has been set according to the local voltage standard. • Before using the product, ...installation steps or have a problem related to the use of electrostatic discharge (ESD).
Quick Start Guide - Page 15

...GB-BEi7-1260 & GB-BEi7H-1260 & GB-BEi7HS-1260 12th Generation Intel® Core™ i7-1260P Processors, 12 Cores (4P+8E) 16 Threads, 12MB L2 Cache, Frequency 2.1GHz-4.7GHz(P Core), 28W
GB-BEi5-1240 & GB-BEi5H-1240 & GB... x SO-DIMM DDR4 slots, support up to the product specifications and product-related information without prior notice.
1-2 Product Specifications
NOTE: We reserve the right to...
Quick Start Guide - Page 16

...; 1 x Power Button Š 1 x USB 3.2 type C (Gen2) Š 3 x USB 3.2 type A (Gen2) Š 1 x head phone jack with MIC Š 2 x HDMI(2.1) Š 2 x HDMI(2.0b) Š 1 x mDP Š 1 x USB 4.0 (Support Intel Thunderbolt 4) w/ DP alt mode Š 2 x USB 3.2 type A (Gen 1) Š 1 x RJ45 Š 1 x DC-In Š 1 x Kensington lock slot
Š Integrate TPM module* (in selected regions...
Quick Start Guide - Page 20
USB 3.2 Gen2 with Type-C
3.
3 x USB 3.2 Gen2 Type A
4.
Headphone/Microphone
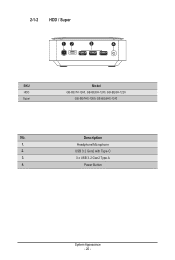
2. 2-1-2 HDD / Super
12
3
4
SKU HDD Super
Model GB-BEi7H-1260, GB-BEi5H-1240, GB-BEi3H-1220
GB-BEi7HS-1260, GB-BEi5HS-1240
No. Description
1.
Power Button
System Appearance - 20 -
Quick Start Guide - Page 21
.../2500Mbps)
7.
Kensington Lock Slot
8.
2 x USB 2.0 Type A(5V/0.5A)
12. HDMI 2.1
10. DC-In
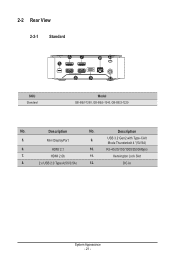
System Appearance - 21 - 2-2 Rear View
2-2-1 Standard
SKU Standard
67 5
10 11
8
9
12
Model GB-BEi7-1260, GB-BEi5-1240, GB-BEi3-1220
No.
USB 3.2 Gen2 with Type-CAlt
Mode Thunderbolt 4 *(5V/3A)
6. HDMI 2.0b
11.
Description
No.
Quick Start Guide - Page 22
...RJ-45 (10/100/1000/2500Mbps)
Mode Thunderbolt 4 *(5V/3A)
(Optional Upgrade Kit
NOTE! HDMI 2.1
11. USB 3.2 Gen2 with Type-CAlt
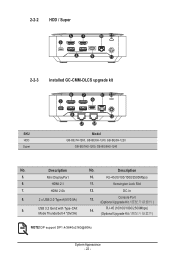
14. 2-2-2 HDD / Super
67 5
10 11
8
9
12
2-2-3 Installed GC-CMM-DLCS upgrade kit
SKU HDD Super
6 5
7
10 11
9
8
12
13 14
Model GB-BEi7H-1260, GB-BEi5H-1240, GB-BEi3H-1220
GB-BEi7HS-1260, GB-BEi5HS-1240
No.
Mini DisplayPort
10. Description
5.
Quick Start Guide - Page 23
Model GB-BEi7H-1260, GB-BEi5H-1240, GB-BEi3H-1220
GB-BEi7HS-1260, GB-BEi5HS-1240
Description Cooling Vent
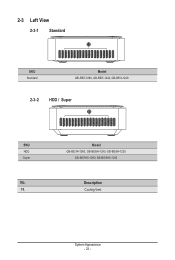
System Appearance - 23 - 2-3 Left View
2-3-1 Standard
15
SKU Standard
Model GB-BEi7-1260, GB-BEi5-1240, GB-BEi3-1220
2-3-2 HDD / Super 15
SKU HDD Super
No. 15.
Quick Start Guide - Page 30

It is recommended that the sysytem supports the memory. Follow these instructions to install the memory: • Make sure that memory of the same
capacity, brand, speed, and chips be installed in only one
direction.
Carefully insert SO-DIMM memory modules. Push down until the modules click into place.
3. Carefully insert SO-DIMM memory modules...
Quick Start Guide - Page 31

...the slot M.2
1
2
3
System Hardware Installation - 31 - Disconnect the two antennas by manually lifting off the clips that hold them in... sicurezza Moduł bezprzewodowy: Bezpieczne usuwanie modułu / Kablosuz Modül: Modül Güvenli Bir Şekilde nasıl Çıkartılır
NOTE
Follow these instructions...
Quick Start Guide - Page 32

... with two screws on each side VESA BRIX Extreme 插入 VESA
1 2
3
System Hardware Installation - 32 - Remove both side covers VESA BRIX Extreme 底部。) 2. Follow these instructions to install the VESA Bracket: 1. 3-5 Installing the VESA Bracket
VESA Halterung / Support VESA / Soporte VESA / Suporte VESA / Staffa VESA VESA / Wspornik VESA / VESA Braketi / VESA...
Quick Start Guide - Page 33
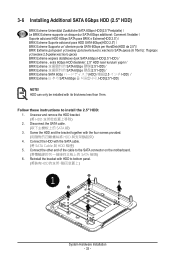
...ätzliche SATA 6Gbps HDD(2.5 "Festplatte) / Le BRIX Extreme supporte un disque dur SATA 6Gbps additionel: Comment l'installer / Soporte adicional HDD 6Gbps SATA para BRIX s Extreme(HDD 2.5")...HDD 相連) 5. Follow these instructions to bottom panel. (將裝有HDD
1
System Hardware Installation - 33 - HDD can only be installed with the four screws provided HDD 4. ...
Quick Start Guide - Page 35

... 線) 3. also the M.2 module here cannot be equipped with upgrade kit to the space limitation. Reinstall the bracket with a thermal plate due to bottom panel
1
System Hardware Installation - 35 - Connect the cable included in the upgrade kit to install the Upgrade kit: 1. Follow these instructions to the upgrade kit board 5. 3-7 Installing LAN/COM/M.2 Upgrade Kit
NOTE!
Quick Start Guide - Page 37

...when mounted behind a display or monitor.
Manually configure "USB S5 Wakeup Support" settings to enter BIOS Del 鍵進入...Support Enable") 4. Windows USB Power-On USB Power-On Patch USB PowerOn BRIX 上的 USB BRIX BRIX
Follow these instructions to Save and Exit. (按啟 F4 BIOS
BIOS Setup - 37 - Your GIGABYTE BRIX can be powered on GIGABYTE...
Gigabyte GB-BEi7HS-1260 Reviews
We have not received any reviews for Gigabyte yet.