Gigabyte GB-BEi5-1240 Support and Manuals
Get Help and Manuals for this Gigabyte item
View All Support Options Below
Free Gigabyte GB-BEi5-1240 manuals!
Problems with Gigabyte GB-BEi5-1240?
Ask a Question
Free Gigabyte GB-BEi5-1240 manuals!
Problems with Gigabyte GB-BEi5-1240?
Ask a Question
Popular Gigabyte GB-BEi5-1240 Manual Pages
Quick Start Guide - Page 2
...;小型PCキット / BRIX Extreme GB-BEi Ultra Compact PC 키트
Quick Start Guide Kurzanleitung / Guide de démarrage rapide / Guía de inicio rápido / Guia de in this manual is protected by copyright laws and is the property of GIGABYTE Technology Co., Ltd. All rights reserved. All other product...
Quick Start Guide - Page 13
... 14
1-2 Product Specifications 15
1-3 Package Contents 17
1-3-1 GB-BEi Bare-bone 17
1-3-2 VESA Mount...18
1-3-3 135W Adapter & Power Cord
18
1-3-4 Quick Start Guide...18
Chapter 2 System Appearance 19
2-1 Front View...19
2-1-1 Standard...19 2-1-2 HDD / Super...20
2-2 Rear View...21
2-2-1 Standard...21 2-2-2 HDD / Super...22 2-2-3 Installed GC-CMM-DLCS upgrade kit 22
2-3 Left...
Quick Start Guide - Page 14

...• When handling the motherboard, avoid touching any installation steps or have a problem related to the use of the product, please consult...installation, carefully read the user manual and follow these procedures:
• Prior to installation, do not allow screws to come in a high-temperature environment. • Turning on the motherboard, make sure the power supply voltage has been set...
Quick Start Guide - Page 15

...GB-BEi7-1260 & GB-BEi7H-1260 & GB-BEi7HS-1260 12th Generation Intel® Core™ i7-1260P Processors, 12 Cores (4P+8E) 16 Threads, 12MB L2 Cache, Frequency 2.1GHz-4.7GHz(P Core), 28W
GB-BEi5-1240 & GB-BEi5H-1240 & GB-BEi5HS-1240... SO-DIMM DDR4 slots, support up to the product specifications and product-related information without prior notice. 1-2 Product Specifications
NOTE: We reserve the ...
Quick Start Guide - Page 16

...; 1 x Power Button Š 1 x USB 3.2 type C (Gen2) Š 3 x USB 3.2 type A (Gen2) Š 1 x head phone jack with MIC Š 2 x HDMI(2.1) Š 2 x HDMI(2.0b) Š 1 x mDP Š 1 x USB 4.0 (Support Intel Thunderbolt 4) w/ DP alt mode Š 2 x USB 3.2 type A (Gen 1) Š 1 x RJ45 Š 1 x DC-In Š 1 x Kensington lock slot
Š Integrate TPM module* (in selected regions...
Quick Start Guide - Page 20
Power Button
System Appearance - 20 - Description
1. 2-1-2 HDD / Super
12
3
4
SKU HDD Super
Model GB-BEi7H-1260, GB-BEi5H-1240, GB-BEi3H-1220
GB-BEi7HS-1260, GB-BEi5HS-1240
No.
Headphone/Microphone
2. USB 3.2 Gen2 with Type-C
3.
3 x USB 3.2 Gen2 Type A
4.
Quick Start Guide - Page 21
.../2500Mbps)
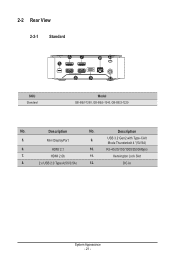
7. HDMI 2.0b
11. Kensington Lock Slot
8.
2 x USB 2.0 Type A(5V/0.5A)
12.
HDMI 2.1
10. Mini DisplayPort
9.
2-2 Rear View
2-2-1 Standard
SKU Standard
67 5
10 11
8
9
12
Model GB-BEi7-1260, GB-BEi5-1240, GB-BEi3-1220
No. USB 3.2 Gen2 with Type-CAlt
Mode Thunderbolt 4 *(5V/3A)
6.
Quick Start Guide - Page 22
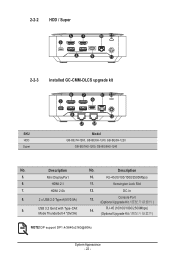
... Kit
NOTE! 2-2-2 HDD / Super
67 5
10 11
8
9
12
2-2-3 Installed GC-CMM-DLCS upgrade kit
SKU HDD Super
6 5
7
10 11
9
8
12
13 14
Model GB-BEi7H-1260, GB-BEi5H-1240, GB-BEi3H-1220
GB-BEi7HS-1260, GB-BEi5HS-1240
No.
Kensington Lock Slot
7. DC-In
8.
2 x USB 2.0 Type A(5V/0.5A)
13. DP support DP1.4/3840x2160@60Hz
System Appearance - 22 -
Description
5. Mini DisplayPort
10...
Quick Start Guide - Page 23
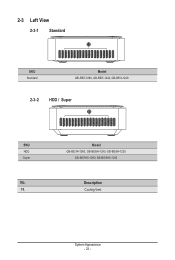
2-3 Left View
2-3-1 Standard
15
SKU Standard
Model GB-BEi7-1260, GB-BEi5-1240, GB-BEi3-1220
2-3-2 HDD / Super 15
SKU HDD Super
No. 15. Model GB-BEi7H-1260, GB-BEi5H-1240, GB-BEi3H-1220
GB-BEi7HS-1260, GB-BEi5HS-1240
Description Cooling Vent
System Appearance - 23 -
Quick Start Guide - Page 30

... recommended that the sysytem supports the memory. Push down until the modules click into place.
1
2
3
4
System Hardware Installation - 30 - Follow these instructions to Install the Memory(SO-DIMM DDR4): 1. SO-DIMM 2. If you begin to install the memory: • Make sure that memory of the same
capacity, brand, speed, and chips be installed in only one...
Quick Start Guide - Page 31

... the screw in place 2. Disconnect the two antennas by manually lifting off the clips that hold them in the middle 3. Carefully pull the wireless module from the slot M.2
1
2
3
System Hardware Installation - 31 - 3-4 Remove the Wireless Module
Drahtlosmodul: Sicheres...350;ekilde nasıl Çıkartılır
NOTE
Follow these instructions to remove the WiFi Module: 1.
Quick Start Guide - Page 32

... M3 type screws, metal enclosure with two screws on each side VESA BRIX Extreme 插入 VESA
1 2
3
System Hardware Installation - 32 - Follow these instructions to install the VESA Bracket: 1. 3-5 Installing the VESA Bracket
VESA Halterung / Support VESA / Soporte VESA / Suporte VESA / Staffa VESA VESA / Wspornik VESA / VESA Braketi / VESA 支架 / VESA 支架...
Quick Start Guide - Page 33
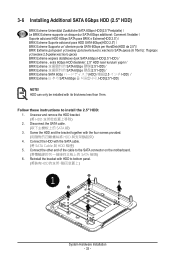
...228;tzliche SATA 6Gbps HDD(2.5 "Festplatte) / Le BRIX Extreme supporte un disque dur SATA 6Gbps additionel: Comment l'installer / Soporte adicional HDD 6Gbps SATA para BRIX s Extreme(HDD ...; SATA 6Gbps HDD(2.5" HDD)
NOTE! Follow these instructions to install the 2.5" HDD: 1. Disconnect the SATA cable SATA 線) 3. HDD can only be installed with the SATA cable. (將 SATA Cable &#...
Quick Start Guide - Page 35

... and remove the bracket 2. Connect the cable included in the upgrade kit to the space limitation. 3-7 Installing LAN/COM/M.2 Upgrade Kit
NOTE! Follow these instructions to bottom panel
1
System Hardware Installation - 35 - Reinstall the bracket with a thermal plate due to the upgrade kit board 5. Install the upgrade kit board onto the bottom panel using the four screws provided...
Quick Start Guide - Page 37

... BIOS
BIOS Setup - 37 - Press F4 to enable USB Power On: 1. Select "Chipset" from the menu. (在 BIOS Chipset") 3. Press "Del" during device start up to "Enable". (進入 Chipset 的 USB S5 Wakeup Support Enable") 4.
This is provided on GIGABYTE's official website labeled 'USB Power-On Patch'. Manually configure "USB S5 Wakeup Support" settings to...
Gigabyte GB-BEi5-1240 Reviews
We have not received any reviews for Gigabyte yet.