User Manual
Page 2
... in this : "REV: X.X." Check your motherboard looks like this manual may be made by any form or by GIGABYTE without GIGABYTE's prior written permission. „„ In ...gigabyte.com Identifying Your Motherboard Revision The revision number on your motherboard revision before updating motherboard BIOS, drivers, or when looking for technical information. The trademarks mentioned in the use of this manual may be reproduced, copied, translated, transmitted, or published in any means without prior notice. Motherboard GA-Z97M-D3H GA-H97M-D3H Motherboard GA-Z97M-D3H GA-H97M-D3H...
... in this : "REV: X.X." Check your motherboard looks like this manual may be made by any form or by GIGABYTE without GIGABYTE's prior written permission. „„ In ...gigabyte.com Identifying Your Motherboard Revision The revision number on your motherboard revision before updating motherboard BIOS, drivers, or when looking for technical information. The trademarks mentioned in the use of this manual may be reproduced, copied, translated, transmitted, or published in any means without prior notice. Motherboard GA-Z97M-D3H GA-H97M-D3H Motherboard GA-Z97M-D3H GA-H97M-D3H...

User Manual
Page 3
Table of Contents GA-Z97M-D3H/GA-H97M-D3H Motherboard Layout 4 GA-Z97M-D3H/GA-H97M-D3H Motherboard Block Diagram 5 Chapter 1 Hardware Installation 6 1-1 Installation Precautions 6 1-2 Product Specifications 7 1-3 Installing the CPU 9 1-4 Installing the Memory 10 1-5 Installing an Expansion Card 10 1-6 Back Panel Connectors 10 1-7 ...
Table of Contents GA-Z97M-D3H/GA-H97M-D3H Motherboard Layout 4 GA-Z97M-D3H/GA-H97M-D3H Motherboard Block Diagram 5 Chapter 1 Hardware Installation 6 1-1 Installation Precautions 6 1-2 Product Specifications 7 1-3 Installing the CPU 9 1-4 Installing the Memory 10 1-5 Installing an Expansion Card 10 1-6 Back Panel Connectors 10 1-7 ...

User Manual
Page 4
... I/O Shield The box contents above are for reference only and the actual items shall depend on the product package you obtain. j Only for GA-H97M-D3H. - 4 - k Only for GA-Z97M-D3H. GA-Z97M-D3H/GA-H97M-D3H Motherboard Layout KB_MS_USB SYS_FAN1 ATX_12V_2X4 CPU_FAN ATX DVI VGA LGA1150 F_USB30 USB30 R_USB30 HDMI LAN 5 4 Realtek® AUDIO GbE LAN SYS_FAN2 BAT PCIEX16 3 2 1 0 SATA3...
... I/O Shield The box contents above are for reference only and the actual items shall depend on the product package you obtain. j Only for GA-H97M-D3H. - 4 - k Only for GA-Z97M-D3H. GA-Z97M-D3H/GA-H97M-D3H Motherboard Layout KB_MS_USB SYS_FAN1 ATX_12V_2X4 CPU_FAN ATX DVI VGA LGA1150 F_USB30 USB30 R_USB30 HDMI LAN 5 4 Realtek® AUDIO GbE LAN SYS_FAN2 BAT PCIEX16 3 2 1 0 SATA3...
User Manual
Page 5
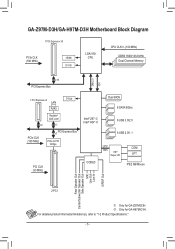
GA-Z97M-D3H/GA-H97M-D3H Motherboard Block Diagram 1 PCI Express x16 PCIe CLK (100 MHz) HDMI DVI-D LGA1150 CPU CPU CLK+/- (100 MHz) DDR3 1600/1333 MHz... LAN RJ45 D-Sub Realtek® GbE LAN x4 x1 PCIe CLK (100 MHz) x1 PCI Express Bus PCIe to "1-2 Product Specifications." - 5 - k Only for GA-Z97M-D3H. For detailed product information/limitation(s), refer to PCI Bridge PCI CLK (33 MHz) Intel® Z97 j Intel® H97 k Dual BIOS 6 SATA 6Gb/s 6 ...Mouse Rear Speaker Out Center/Subwoofer Speaker Out Side Speaker Out MIC Line Out Line In S/PDIF Out 2 PCI j Only for GA-H97M-D3H.
GA-Z97M-D3H/GA-H97M-D3H Motherboard Block Diagram 1 PCI Express x16 PCIe CLK (100 MHz) HDMI DVI-D LGA1150 CPU CPU CLK+/- (100 MHz) DDR3 1600/1333 MHz... LAN RJ45 D-Sub Realtek® GbE LAN x4 x1 PCIe CLK (100 MHz) x1 PCI Express Bus PCIe to "1-2 Product Specifications." - 5 - k Only for GA-Z97M-D3H. For detailed product information/limitation(s), refer to PCI Bridge PCI CLK (33 MHz) Intel® Z97 j Intel® H97 k Dual BIOS 6 SATA 6Gb/s 6 ...Mouse Rear Speaker Out Center/Subwoofer Speaker Out Side Speaker Out MIC Line Out Line In S/PDIF Out 2 PCI j Only for GA-H97M-D3H.
User Manual
Page 9
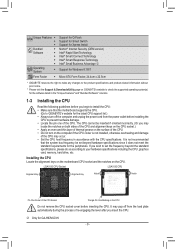
...do so according to your hardware specifications including the CPU, graphics card, memory, hard drive, etc. If you insert the CPU. k Only for GA-H97M-D3H. - 9 - LGA1150 CPU Socket LGA1150 CPU Alignment Key Alignment Key Notch Notch Pin One Corner of the CPU. Installing the CPU Locate the alignment...CPU Do not remove the CPU socket cover before you begin to install the CPU: •• Make sure that the motherboard supports the CPU. (Go to GIGABYTE's website for the latest CPU support list.) •• Always turn on the computer if the CPU cooler is not ...
...do so according to your hardware specifications including the CPU, graphics card, memory, hard drive, etc. If you insert the CPU. k Only for GA-H97M-D3H. - 9 - LGA1150 CPU Socket LGA1150 CPU Alignment Key Alignment Key Notch Notch Pin One Corner of the CPU. Installing the CPU Locate the alignment...CPU Do not remove the CPU socket cover before you begin to install the CPU: •• Make sure that the motherboard supports the CPU. (Go to GIGABYTE's website for the latest CPU support list.) •• Always turn on the computer if the CPU cooler is not ...

User Manual
Page 18
The ST Mode (for the GA-Z97M-D3H only) provides a fancy and user-friendly BIOS environment where users can use either the GIGABYTE Q-Flash or @BIOS utility. •• Q-Flash allows the user to quickly and easily upgrade or back up BIOS without entering the operating system... system configuration settings or to perform basic system setups more quickly and easily. Inadequately altering the settings may result in the CMOS on the motherboard supplies the necessary power to the CMOS to keep the configuration values in system's failure to accept or enter a sub-menu. When the...
The ST Mode (for the GA-Z97M-D3H only) provides a fancy and user-friendly BIOS environment where users can use either the GIGABYTE Q-Flash or @BIOS utility. •• Q-Flash allows the user to quickly and easily upgrade or back up BIOS without entering the operating system... system configuration settings or to perform basic system setups more quickly and easily. Inadequately altering the settings may result in the CMOS on the motherboard supplies the necessary power to the CMOS to keep the configuration values in system's failure to accept or enter a sub-menu. When the...


