User Manual
Page 31
...motherboard supplies the necessary power to the CMOS to keep the configuration values in the CMOS. Its major functions include conducting the Power-On Self-Test (POST) during the POST when the power is turned off, the battery on using the current version of BIOS from the Internet and ... parameters of the battery/ clear CMOS jumper in Chapter 1 for how to clear the CMOS values.) - 31 - To upgrade the BIOS, use either the GIGABYTE Q-Flash or @BIOS utility. • Q-Flash allows the user to boot. To flash the BIOS, do not encounter problems using the Q-Flash and @BIOS...
...motherboard supplies the necessary power to the CMOS to keep the configuration values in the CMOS. Its major functions include conducting the Power-On Self-Test (POST) during the POST when the power is turned off, the battery on using the current version of BIOS from the Internet and ... parameters of the battery/ clear CMOS jumper in Chapter 1 for how to clear the CMOS values.) - 31 - To upgrade the BIOS, use either the GIGABYTE Q-Flash or @BIOS utility. • Q-Flash allows the user to boot. To flash the BIOS, do not encounter problems using the Q-Flash and @BIOS...
User Manual
Page 76
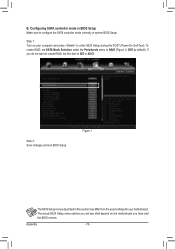
... in BIOS Setup Make sure to configure the SATA controller mode correctly in this item to enter BIOS Setup during the POST (Power-On Self-Test). Step 2: Save changes and exit BIOS Setup. To create RAID, set this section may differ from the exact settings for your computer and press to...
... in BIOS Setup Make sure to configure the SATA controller mode correctly in this item to enter BIOS Setup during the POST (Power-On Self-Test). Step 2: Save changes and exit BIOS Setup. To create RAID, set this section may differ from the exact settings for your computer and press to...
User Manual
Page 77
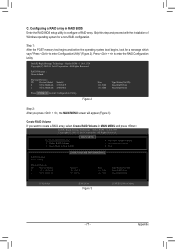
... 3. All Rights Reserved. Configuring a RAID array in MAIN MENU and press . Reset Disks to configure a RAID array. C. All Rights Reserved. 1. Step 1: After the POST memory test begins and before the operating system boot begins, look for a non-RAID configuration. Acceleration Options 6. Physical Devices : ID Device Model 0 ST3120026AS 1 ST3120026AS Serial # 3JT354CP 3JT329JX...
... 3. All Rights Reserved. Configuring a RAID array in MAIN MENU and press . Reset Disks to configure a RAID array. C. All Rights Reserved. 1. Step 1: After the POST memory test begins and before the operating system boot begins, look for a non-RAID configuration. Acceleration Options 6. Physical Devices : ID Device Model 0 ST3120026AS 1 ST3120026AS Serial # 3JT354CP 3JT329JX...

User Manual
Page 89
... bottom right corner to complete. Appendix Step 2: Connect an audio device to set up. C. Then the speaker setup is completed. On the Speaker Setting and Test tab, select 2, 4, 6, or 8-channel speaker according to the type of device you wish to an audio jack. D. Step 3: Go to open the Advanced Options dialog...
... bottom right corner to complete. Appendix Step 2: Connect an audio device to set up. C. Then the speaker setup is completed. On the Speaker Setting and Test tab, select 2, 4, 6, or 8-channel speaker according to the type of device you wish to an audio jack. D. Step 3: Go to open the Advanced Options dialog...