Manual
Page 3
... rights reserved. For example, "REV: 1.0" means the revision of the motherboard is the property of this manual may be made by any form or by GIGABYTE without GIGABYTE's prior written permission. Documentation Classifications In order to their respective owners. No part of... GIGABYTE. Example: Check your motherboard looks like this manual are legally registered to assist in this product, GIGABYTE provides the following types of documentations: For quick set-up of this manual is protected by copyright laws and is ...
... rights reserved. For example, "REV: 1.0" means the revision of the motherboard is the property of this manual may be made by any form or by GIGABYTE without GIGABYTE's prior written permission. Documentation Classifications In order to their respective owners. No part of... GIGABYTE. Example: Check your motherboard looks like this manual are legally registered to assist in this product, GIGABYTE provides the following types of documentations: For quick set-up of this manual is protected by copyright laws and is ...
Manual
Page 5
Chapter 3 Drivers Installation 59 3-1 Installing Chipset Drivers 59 3-2 Application Software 60 3-3 Technical Manuals 60 3-4 Contact...61 3-5 System...61 3-6 Download Center 62 3-7 New Utilities...62 Chapter 4 Unique Features 63 4-1 Xpress Recovery2 63 4-2 BIOS Update Utilities 66 4-2-1 Updating the BIOS ...
Chapter 3 Drivers Installation 59 3-1 Installing Chipset Drivers 59 3-2 Application Software 60 3-3 Technical Manuals 60 3-4 Contact...61 3-5 System...61 3-6 Download Center 62 3-7 New Utilities...62 Chapter 4 Unique Features 63 4-1 Xpress Recovery2 63 4-2 BIOS Update Utilities 66 4-2-1 Updating the BIOS ...
Manual
Page 6
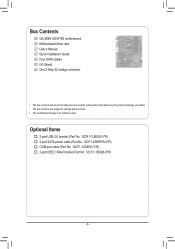
... cable (Part No. 12CF1-1CM001-3*R) 2-port IEEE 1394a bracket (Part No. 12CF1-1IE008-0*R) - 6 - The box contents are for reference only. Box Contents GA-Z68X-UD3P-B3 motherboard Motherboard driver disk User's Manual Quick Installation Guide Four SATA cables I/O Shield One 2-Way SLI bridge connector • The box contents above are subject to change without notice...
... cable (Part No. 12CF1-1CM001-3*R) 2-port IEEE 1394a bracket (Part No. 12CF1-1IE008-0*R) - 6 - The box contents are for reference only. Box Contents GA-Z68X-UD3P-B3 motherboard Motherboard driver disk User's Manual Quick Installation Guide Four SATA cables I/O Shield One 2-Way SLI bridge connector • The box contents above are subject to change without notice...

Manual
Page 9
Prior to installation, carefully read the user's manual and follow these procedures: •• Prior to the use of the product, please consult a certified computer technician. - 9 - If you are connected tightly and securely. &#...
Prior to installation, carefully read the user's manual and follow these procedures: •• Prior to the use of the product, please consult a certified computer technician. - 9 - If you are connected tightly and securely. &#...

Manual
Page 15
Check that the Male and Female push pins are joined closely. (Refer to your CPU cooler installation manual for instructions on the motherboard. Use extreme care when removing the CPU cooler because the thermal grease/tape between the CPU cooler and CPU may ...
Check that the Male and Female push pins are joined closely. (Refer to your CPU cooler installation manual for instructions on the motherboard. Use extreme care when removing the CPU cooler because the thermal grease/tape between the CPU cooler and CPU may ...

Manual
Page 18
Carefully read the manual that supports your computer. 1-5 Installing an Expansion Card Read the following guidelines before installing an expansion card to prevent hardware damage. Example: Installing and Removing a ...
Carefully read the manual that supports your computer. 1-5 Installing an Expansion Card Read the following guidelines before installing an expansion card to prevent hardware damage. Example: Installing and Removing a ...

Manual
Page 19
...) B. Windows 7, Windows Vista or Windows XP operating system - Hardware Installation Connecting the Graphics Cards Step 1: Observe the steps in the operating system, go to the manual of the two cards. Step 2: Insert the CrossFire (Note)/SLI bridge connector in the operating system, go to the... manual that came with two PCI Express x16 slots and correct driver - Step 3: Plug the display cable into the graphics card on the PCI Express x16 ...
...) B. Windows 7, Windows Vista or Windows XP operating system - Hardware Installation Connecting the Graphics Cards Step 1: Observe the steps in the operating system, go to the manual of the two cards. Step 2: Insert the CrossFire (Note)/SLI bridge connector in the operating system, go to the... manual that came with two PCI Express x16 slots and correct driver - Step 3: Plug the display cable into the graphics card on the PCI Express x16 ...

Manual
Page 28
... supports digital S/PDIF Out an1d2 3connects a S/PDIF digital audio cable (provided by default. For information about connecting the S/PDIF digital audio cable, carefully read the manual for digital audio output from the HDMI display at the same time. Incorrect connection between the module connector and the motherboard header will be present...
... supports digital S/PDIF Out an1d2 3connects a S/PDIF digital audio cable (provided by default. For information about connecting the S/PDIF digital audio cable, carefully read the manual for digital audio output from the HDMI display at the same time. Incorrect connection between the module connector and the motherboard header will be present...

Manual
Page 30
... so may cause damage to the motherboard. •• After system restart, go to BIOS Setup to load factory defaults (select Load Optimized Defaults) or manually configure the BIOS settings (refer to turn off your computer and then attach the other end of the device cable to your computer and unplug...
... so may cause damage to the motherboard. •• After system restart, go to BIOS Setup to load factory defaults (select Load Optimized Defaults) or manually configure the BIOS settings (refer to turn off your computer and then attach the other end of the device cable to your computer and unplug...

Manual
Page 39
... you want to enable the Intel CPU Turbo Boost technology. Set this setting. (Default: Auto) CPU Over Current Protection Allows you to determine whether to manually configure CPU Turbo ratios in system halt state.
... you want to enable the Intel CPU Turbo Boost technology. Set this setting. (Default: Auto) CPU Over Current Protection Allows you to determine whether to manually configure CPU Turbo ratios in system halt state.

Manual
Page 40
... the BIOS to read the SPD data on CPU loading, Intel EIST technology can dynamically and effectively lower the CPU voltage and core frequency to manually set the CPU base clock and DMI/PCIe bus frequency. Auto sets memory multiplier according to decrease power consumption. Disabled Disables this feature. BIOS Setup...
... the BIOS to read the SPD data on CPU loading, Intel EIST technology can dynamically and effectively lower the CPU voltage and core frequency to manually set the CPU base clock and DMI/PCIe bus frequency. Auto sets memory multiplier according to decrease power consumption. Disabled Disables this feature. BIOS Setup...

Manual
Page 45
... devices during the POST for faster system startup. • Auto Lets the BIOS automatically detect SATA devices during the POST. (Default) • Manual Allows you to None so the system will skip the detection of the hard drive when the hard drive access mode is set the date... the hard drive access mode. BIOS Setup Select the desired field and use the up arrow or down arrow key to set this item to manually enter the specifications of the device during the POST. (Default) • None If no SATA devices are used , set the time. Options are ...
... devices during the POST for faster system startup. • Auto Lets the BIOS automatically detect SATA devices during the POST. (Default) • Manual Allows you to None so the system will skip the detection of the hard drive when the hard drive access mode is set the date... the hard drive access mode. BIOS Setup Select the desired field and use the up arrow or down arrow key to set this item to manually enter the specifications of the device during the POST. (Default) • None If no SATA devices are used , set the time. Options are ...

Manual
Page 46
.... Sector Number of memory installed on the hard drive. Total Memory The total amount of sectors. Halt On Allows you wish to enter the parameters manually, refer to determine whether the system will not stop for any error. The following fields display your hard drive specifications. Typically, 640 KB will be...
.... Sector Number of memory installed on the hard drive. Total Memory The total amount of sectors. Halt On Allows you wish to enter the parameters manually, refer to determine whether the system will not stop for any error. The following fields display your hard drive specifications. Typically, 640 KB will be...

Manual
Page 55
... the optimal CPU fan control mode. (Default) Voltage Sets Voltage mode for CPU temperature. Current System/CPU Temperature Displays current System/CPU temperature. Manual Allows you to control CPU fan speed. Options are : Disabled (default), 60oC/140oF, 70oC/158oF, 80oC/176oF, 90oC/194oF. PWM Sets PWM...fan speed with EasyTune based on your system requirements. (Default) Silent Allows the CPU fan to run at different speeds according to Manual. When CPU temperature exceeds the threshold, BIOS will emit warning sound. CPU/SYSTEM/POWER FAN Fail Warning Allows the system to ...
... the optimal CPU fan control mode. (Default) Voltage Sets Voltage mode for CPU temperature. Current System/CPU Temperature Displays current System/CPU temperature. Manual Allows you to control CPU fan speed. Options are : Disabled (default), 60oC/140oF, 70oC/158oF, 80oC/176oF, 90oC/194oF. PWM Sets PWM...fan speed with EasyTune based on your system requirements. (Default) Silent Allows the CPU fan to run at different speeds according to Manual. When CPU temperature exceeds the threshold, BIOS will emit warning sound. CPU/SYSTEM/POWER FAN Fail Warning Allows the system to ...

Manual
Page 59
... XP operating system, please install the Windows XP Service Pack 1 or later. Or click Install Single Items to manually select the drivers you want to manually select the utilities to My Computer, double-click the optical drive and execute the Run.exe program.) 3-1 Installing ...install the USB 2.0 driver.) - 59 - Failure to install. • Please ignore the popup dialog box(es) (e.g. Click Yes to install new GIGABYTE utilities. Chapter 3 Drivers Installation • Before installing the drivers, first install the operating system. • After installing the operating system, insert the ...
... XP operating system, please install the Windows XP Service Pack 1 or later. Or click Install Single Items to manually select the drivers you want to manually select the utilities to My Computer, double-click the optical drive and execute the Run.exe program.) 3-1 Installing ...install the USB 2.0 driver.) - 59 - Failure to install. • Please ignore the popup dialog box(es) (e.g. Click Yes to install new GIGABYTE utilities. Chapter 3 Drivers Installation • Before installing the drivers, first install the operating system. • After installing the operating system, insert the ...

Manual
Page 60
You can click the Install button on the right of an item to install it. 3-3 Technical Manuals This page provides GIGABYTE's application guides, content descriptions for this driver disk, and the motherboard manuals. Drivers Installation - 60 - 3-2 Application Software This page displays all the utilities and applications that GIGABYTE develops and some free software.
You can click the Install button on the right of an item to install it. 3-3 Technical Manuals This page provides GIGABYTE's application guides, content descriptions for this driver disk, and the motherboard manuals. Drivers Installation - 60 - 3-2 Application Software This page displays all the utilities and applications that GIGABYTE develops and some free software.

Manual
Page 66
...ensure normal system operation. Z68XUD3P.F1) to enter Q-Flash. Restart the system. Award Modular BIOS v6.00PG Copyright (C) 1984-2011, Award Software, Inc. Z68X-UD3P-B3 F1e . . . . : BIOS Setup : XpressRecovery2 : Boot Menu : Qflash 03/23/2011-Z68-7A89VG0VC-00 Because BIOS flashing is Q-Flash™? ...the backup BIOS will download the latest BIOS file from the hassles of system safety, users cannot update the backup BIOS manually. 4-2 BIOS Update Utilities GIGABYTE motherboards provide two unique BIOS update tools, Q-Flash™ and @BIOS™. For the sake of going through ...
...ensure normal system operation. Z68XUD3P.F1) to enter Q-Flash. Restart the system. Award Modular BIOS v6.00PG Copyright (C) 1984-2011, Award Software, Inc. Z68X-UD3P-B3 F1e . . . . : BIOS Setup : XpressRecovery2 : Boot Menu : Qflash 03/23/2011-Z68-7A89VG0VC-00 Because BIOS flashing is Q-Flash™? ...the backup BIOS will download the latest BIOS file from the hassles of system safety, users cannot update the backup BIOS manually. 4-2 BIOS Update Utilities GIGABYTE motherboards provide two unique BIOS update tools, Q-Flash™ and @BIOS™. For the sake of going through ...

Manual
Page 69
... Restart your motherboard model. Unique Features C. Make sure that is not present on the @BIOS server site, please manually download the BIOS update file from GIGABYTE Server, select the @BIOS server site closest to your location and then download the BIOS file that matches your motherboard... the @BIOS Utility A. Failure to start. 3. Before You Begin 1. Update the BIOS Using the Internet Update Function: Click Update BIOS from GIGABYTE's website and follow the instructions in a corrupted BIOS or a system that the BIOS file to save the BIOS update file obtained from an ...
... Restart your motherboard model. Unique Features C. Make sure that is not present on the @BIOS server site, please manually download the BIOS update file from GIGABYTE Server, select the @BIOS server site closest to your location and then download the BIOS file that matches your motherboard... the @BIOS Utility A. Failure to start. 3. Before You Begin 1. Update the BIOS Using the Internet Update Function: Click Update BIOS from GIGABYTE's website and follow the instructions in a corrupted BIOS or a system that the BIOS file to save the BIOS update file obtained from an ...

Manual
Page 79
... to enable RAID for complex and time-consuming configurations. To manually set eXtreme Hard Drive (X.H.D) under the Integrated Peripherals menu to Enabled to individually install the X.H.D utility later. Using GIGABYTE eXtreme Hard Drive (X.H.D) Instructions: (Note 2) Before launching X.H.D,...Step 2: Install the RAID driver and operating system The X.H.D utility supports Windows 7/Vista/XP. 4-8 eXtreme Hard Drive (X.H.D) With GIGABYTE eXtreme Hard Drive (X.H.D) (Note 1), users can quickly configure a RAIDready system for RAID 0. The following procedure details the steps to...
... to enable RAID for complex and time-consuming configurations. To manually set eXtreme Hard Drive (X.H.D) under the Integrated Peripherals menu to Enabled to individually install the X.H.D utility later. Using GIGABYTE eXtreme Hard Drive (X.H.D) Instructions: (Note 2) Before launching X.H.D,...Step 2: Install the RAID driver and operating system The X.H.D utility supports Windows 7/Vista/XP. 4-8 eXtreme Hard Drive (X.H.D) With GIGABYTE eXtreme Hard Drive (X.H.D) (Note 1), users can quickly configure a RAIDready system for RAID 0. The following procedure details the steps to...

Manual
Page 87
...Disks : Select Disks Strip Size : N/A Capacity : 0.0 GB Sync : Continuous Create Volume [ HELP ] Select a sync option: On Request: volume is updated manually Continuous: volume is updated automatically [hi]-Change [TAB]-Next [ESC]-Previous Menu Figure 11 [ENTER]-Select Step 5: Finally press on the hard drive you want... drive. (Make sure the recovery drive has equal or larger capacity than the master drive.) Then press to the recovery drive manually using the Intel Rapid Storage Technology utility in the system. RAID10: Mirrors data and stripes the mirror. [hi]-Prev/Next [...
...Disks : Select Disks Strip Size : N/A Capacity : 0.0 GB Sync : Continuous Create Volume [ HELP ] Select a sync option: On Request: volume is updated manually Continuous: volume is updated automatically [hi]-Change [TAB]-Next [ESC]-Previous Menu Figure 11 [ENTER]-Select Step 5: Finally press on the hard drive you want... drive. (Make sure the recovery drive has equal or larger capacity than the master drive.) Then press to the recovery drive manually using the Intel Rapid Storage Technology utility in the system. RAID10: Mirrors data and stripes the mirror. [hi]-Prev/Next [...


