Manual
Page 4
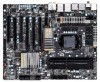
Table of Contents Box Contents...6 Optional Items...6 GA-P67A-UD7-B3 Motherboard Layout 7 GA-P67A-UD7-B3 Motherboard Block Diagram 8 Chapter 1 Hardware Installation 9 1-1 Installation Precautions 9 1-2 Product Specifications 10 1-3 Installing the CPU and CPU Cooler 13 ... 1-8 Back Panel Connectors 21 1-9 Onboard LEDs and Buttons 23 1-10 Internal Connectors 25 Chapter 2 BIOS Setup 35 2-1 Startup Screen 36 2-2 The Main Menu 37 2-3 MB Intelligent Tweaker(M.I.T 39 2-4 Standard CMOS Features 47 2-5 Advanced BIOS Features 49 2-6 Integrated Peripherals 51 2-7 Power Management Setup 55...
Table of Contents Box Contents...6 Optional Items...6 GA-P67A-UD7-B3 Motherboard Layout 7 GA-P67A-UD7-B3 Motherboard Block Diagram 8 Chapter 1 Hardware Installation 9 1-1 Installation Precautions 9 1-2 Product Specifications 10 1-3 Installing the CPU and CPU Cooler 13 ... 1-8 Back Panel Connectors 21 1-9 Onboard LEDs and Buttons 23 1-10 Internal Connectors 25 Chapter 2 BIOS Setup 35 2-1 Startup Screen 36 2-2 The Main Menu 37 2-3 MB Intelligent Tweaker(M.I.T 39 2-4 Standard CMOS Features 47 2-5 Advanced BIOS Features 49 2-6 Integrated Peripherals 51 2-7 Power Management Setup 55...

Manual
Page 11
... to 8 USB 2.0/1.1 ports (4 on the back panel, including 2 eSATA/USB Combo, 4 via the USB brackets connected to the internal IEEE 1394a header) 1 x 24-pin ATX main power connector 1 x 8-pin ATX 12V power connector 4 x SATA 6Gb/s connectors 4 x SATA 3Gb/s connectors 1 x CPU fan header 3 x system fan headers 1 x power fan header 1 x Chipset fan header...
... to 8 USB 2.0/1.1 ports (4 on the back panel, including 2 eSATA/USB Combo, 4 via the USB brackets connected to the internal IEEE 1394a header) 1 x 24-pin ATX main power connector 1 x 8-pin ATX 12V power connector 4 x SATA 6Gb/s connectors 4 x SATA 3Gb/s connectors 1 x CPU fan header 3 x system fan headers 1 x power fan header 1 x Chipset fan header...

Manual
Page 26
...power connector, first make sure the power supply is not connected, the computer will not start. 1/2) ATX_12V_2X/ATX (2x4 12V Power Connector and 2x12 Main Power Connector) With the use of the power connector, the power supply can lead to all devices are properly installed. Definition 1 GND (Only for... power, the result can supply enough stable power to an unstable or unbootable system. 8 4 5 1 ATX_12V_2X ATX_12V_2X: Pin No. The 12V power connector mainly supplies power to the power connector in the correct orientation. Connect the power supply cable to the CPU.
...power connector, first make sure the power supply is not connected, the computer will not start. 1/2) ATX_12V_2X/ATX (2x4 12V Power Connector and 2x12 Main Power Connector) With the use of the power connector, the power supply can lead to all devices are properly installed. Definition 1 GND (Only for... power, the result can supply enough stable power to an unstable or unbootable system. 8 4 5 1 ATX_12V_2X ATX_12V_2X: Pin No. The 12V power connector mainly supplies power to the power connector in the correct orientation. Connect the power supply cable to the CPU.
Manual
Page 30
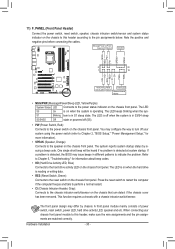
... be heard if no problem is detected, the BIOS may differ by issuing a beep code. If a problem is detected at system startup. A front panel module mainly consists of power switch, reset switch, power LED, hard drive activity LED, speaker and etc. 11) F_PANEL (Front Panel Header) Connect the power switch, reset...
... be heard if no problem is detected, the BIOS may differ by issuing a beep code. If a problem is detected at system startup. A front panel module mainly consists of power switch, reset switch, power LED, hard drive activity LED, speaker and etc. 11) F_PANEL (Front Panel Header) Connect the power switch, reset...

Manual
Page 35
...in Chapter 1 for the beep codes description. • It is recommended that you not alter the default settings (unless you can press + in the main menu of BIOS, it with caution. To see more advanced BIOS Setup menu options, you need to) to Chapter 4, "BIOS Update Utilities." •... version of the system in system malfunction. • BIOS will emit a beep code during the POST. To upgrade the BIOS, use either the GIGABYTE Q-Flash or @BIOS utility. • Q-Flash allows the user to keep the configuration values in system's failure to activate certain system features. When...
...in Chapter 1 for the beep codes description. • It is recommended that you not alter the default settings (unless you can press + in the main menu of BIOS, it with caution. To see more advanced BIOS Setup menu options, you need to) to Chapter 4, "BIOS Update Utilities." •... version of the system in system malfunction. • BIOS will emit a beep code during the POST. To upgrade the BIOS, use either the GIGABYTE Q-Flash or @BIOS utility. • Q-Flash allows the user to keep the configuration values in system's failure to activate certain system features. When...

Manual
Page 37
... Load CMOS from BIOS BIOS Setup Program Function Keys Move the selection bar to select an item Execute command or enter the submenu Main Menu: Exit the BIOS Setup program Submenus: Exit current submenu Increase the numeric value or make changes Decrease the numeric value or ...make changes Show descriptions of the Main Menu. Use arrow keys to move among the items and press to accept or enter a sub-menu. (Sample BIOS Version: F3a) ...
... Load CMOS from BIOS BIOS Setup Program Function Keys Move the selection bar to select an item Execute command or enter the submenu Main Menu: Exit the BIOS Setup program Submenus: Exit current submenu Increase the numeric value or make changes Decrease the numeric value or ...make changes Show descriptions of the Main Menu. Use arrow keys to move among the items and press to accept or enter a sub-menu. (Sample BIOS Version: F3a) ...

Manual
Page 38
... load, then press to complete. MB Intelligent Tweaker(M.I.T.) Use this menu to configure the clock, frequency and voltages of the and keys (For the Main Menu Only) F11: Save CMOS to BIOS This function allows you to save the current BIOS settings to a profile. It allows you to restrict...
... load, then press to complete. MB Intelligent Tweaker(M.I.T.) Use this menu to configure the clock, frequency and voltages of the and keys (For the Main Menu Only) F11: Save CMOS to BIOS This function allows you to save the current BIOS settings to a profile. It allows you to restrict...

Manual
Page 49
... waiting time for entering the operating system and to exit this item, set the password(s) under the Set Supervisor/User Password item in the BIOS Main Menu. HDD S.M.A.R.T.
... waiting time for entering the operating system and to exit this item, set the password(s) under the Set Supervisor/User Password item in the BIOS Main Menu. HDD S.M.A.R.T.

Manual
Page 61
...: Save CMOS to BIOS F12: Load CMOS from BIOS Press on this item and press the key. Press or to return to the BIOS Setup Main Menu. 2-13 Exit Without Saving CMOS Setup Utility-Copyright (C) 1984-2010 Award Software MB Intelligent Tweaker(M.I .T.) Load Fail-Safe Defaults Standard CMOS Features... Status Exit Without Saving ESC: Quit F8: Q-Flash Select Item F10: Save & Exit Setup Save Data to CMOS F11: Save CMOS to the BIOS Setup Main Menu. - 61 - Press or to return to BIOS F12: Load CMOS from BIOS Press on this item and press the key.
...: Save CMOS to BIOS F12: Load CMOS from BIOS Press on this item and press the key. Press or to return to the BIOS Setup Main Menu. 2-13 Exit Without Saving CMOS Setup Utility-Copyright (C) 1984-2010 Award Software MB Intelligent Tweaker(M.I .T.) Load Fail-Safe Defaults Standard CMOS Features... Status Exit Without Saving ESC: Quit F8: Q-Flash Select Item F10: Save & Exit Setup Save Data to CMOS F11: Save CMOS to the BIOS Setup Main Menu. - 61 - Press or to return to BIOS F12: Load CMOS from BIOS Press on this item and press the key.
Manual
Page 70
... with caution. During the POST, press the key to ensure normal system operation. Award Modular BIOS v6.00PG Copyright (C) 1984-2010, Award Software, Inc. P67A-UD7-B3 F3a . . . . : BIOS Setup : XpressRecovery2 : Boot Menu : Qflash 10/28/2010-P67-7A89UG04C-00 Because BIOS flashing is DualBIOS™? Unique... Setup. What is potentially risky, please do it with the Q-Flash Utility A. From GIGABYTE's website, download the latest compressed BIOS update file that support DualBIOS have two BIOS onboard, a main BIOS and a backup BIOS. Extract the file and save the new BIOS file (e.g. ...
... with caution. During the POST, press the key to ensure normal system operation. Award Modular BIOS v6.00PG Copyright (C) 1984-2010, Award Software, Inc. P67A-UD7-B3 F3a . . . . : BIOS Setup : XpressRecovery2 : Boot Menu : Qflash 10/28/2010-P67-7A89UG04C-00 Because BIOS flashing is DualBIOS™? Unique... Setup. What is potentially risky, please do it with the Q-Flash Utility A. From GIGABYTE's website, download the latest compressed BIOS update file that support DualBIOS have two BIOS onboard, a main BIOS and a backup BIOS. Extract the file and save the new BIOS file (e.g. ...

Manual
Page 71
...BIOS file is displayed on the screen. Select the BIOS update file and press . Update BIOS from Drive and press . • The Save Main BIOS to Drive option allows you save the current BIOS file. • Q-Flash only supports USB flash drive or hard drives using FAT32/16/12...model. The following procedure assumes that you to save the BIOS file to access Q-Flash. 2. In the main menu of the system reading the BIOS file from Drive Save BIOS to the main menu. CoaodpyCMBIOOSS DcoemfapuletteEdn-aPbaless !! Q-Flash Utility v2.17 Flash Type/Size MXIC 25L3206E 4M Keep DMI Data...
...BIOS file is displayed on the screen. Select the BIOS update file and press . Update BIOS from Drive and press . • The Save Main BIOS to Drive option allows you save the current BIOS file. • Q-Flash only supports USB flash drive or hard drives using FAT32/16/12...model. The following procedure assumes that you to save the BIOS file to access Q-Flash. 2. In the main menu of the system reading the BIOS file from Drive Save BIOS to the main menu. CoaodpyCMBIOOSS DcoemfapuletteEdn-aPbaless !! Q-Flash Utility v2.17 Flash Type/Size MXIC 25L3206E 4M Keep DMI Data...

Manual
Page 79
The Smart Recovery 2 main menu: Button Function Settings Allows you to select the source and destination partition Backup Now Allows you to recover your files... backup source. The initial backup will start after you log in Windows for ten minutes. Note: By default, all partitions on the main menu. Unique Features Allows you to perform the backup immediately File Recovery... The right pane will be available only after 10 minutes and...time slider on the same partition as an image file every hour. Recovering a file: Click the File Recovery button on the main menu.
The Smart Recovery 2 main menu: Button Function Settings Allows you to select the source and destination partition Backup Now Allows you to recover your files... backup source. The initial backup will start after you log in Windows for ten minutes. Note: By default, all partitions on the main menu. Unique Features Allows you to perform the backup immediately File Recovery... The right pane will be available only after 10 minutes and...time slider on the same partition as an image file every hour. Recovering a file: Click the File Recovery button on the main menu.

Manual
Page 80
...to the Windows recovery environment. Restart your computer to select a time point. 4. You can prevent loss of the data in the main and backup BIOS simultaneously, which can record personal passwords and important dates and set reminders of your files and programs will restart to use.... Select the backup you respond "Yes" the system will be sure to the Help file of the dates. Select a partition backup created on the main menu. 2. Unique Features - 80 - Recovering your system using a system image that can record personal passwords and important dates, and remind users of...
...to the Windows recovery environment. Restart your computer to select a time point. 4. You can prevent loss of the data in the main and backup BIOS simultaneously, which can record personal passwords and important dates and set reminders of your files and programs will restart to use.... Select the backup you respond "Yes" the system will be sure to the Help file of the dates. Select a partition backup created on the main menu. 2. Unique Features - 80 - Recovering your system using a system image that can record personal passwords and important dates, and remind users of...

Manual
Page 82
..., the system will be sure to other Bluetooth device(s) when Auto Green is enabled. Whether the Bluetooth dongle is included depends on the Auto Green main menu and click Save to scan your Bluetooth cell phone key, how many times Auto Green will appear. Before installing the Bluetooth dongle, be turned... keep rescanning according to enable system power savings via a Bluetooth cell phone. Auto Green will enter the specified power saving mode. On the Auto Green main menu, click Configure and then click Configure BT devices.
..., the system will be sure to other Bluetooth device(s) when Auto Green is enabled. Whether the Bluetooth dongle is included depends on the Auto Green main menu and click Save to scan your Bluetooth cell phone key, how many times Auto Green will appear. Before installing the Bluetooth dongle, be turned... keep rescanning according to enable system power savings via a Bluetooth cell phone. Auto Green will enter the specified power saving mode. On the Auto Green main menu, click Configure and then click Configure BT devices.
Manual
Page 89
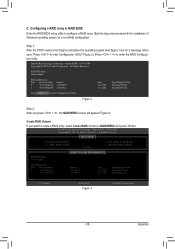
....0.0.1046 Copyright(C) 2003-10 Intel Corporation. Reset Disks to enter the RAID Configuration Utility. Create RAID Volume If you press + , the MAIN MENU screen will appear (Figure 3). Create RAID Volume 2. Recovery Volume Options RAID Volumes : None defined. [ DISK/VOLUME INFORMATION ] Physical...and before the operating system boot begins, look for a non-RAID configuration. RAID Volumes : None defined. Configuring a RAID array in MAIN MENU and press . All Rights Reserved. Figure 2 Step 2: After you want to enter Configuration Utility" (Figure 2). Intel(R) Rapid ...
....0.0.1046 Copyright(C) 2003-10 Intel Corporation. Reset Disks to enter the RAID Configuration Utility. Create RAID Volume If you press + , the MAIN MENU screen will appear (Figure 3). Create RAID Volume 2. Recovery Volume Options RAID Volumes : None defined. [ DISK/VOLUME INFORMATION ] Physical...and before the operating system boot begins, look for a non-RAID configuration. RAID Volumes : None defined. Configuring a RAID array in MAIN MENU and press . All Rights Reserved. Figure 2 Step 2: After you want to enter Configuration Utility" (Figure 2). Intel(R) Rapid ...

Manual
Page 91
..., press or select 5. Finally press on the Create Volume item to Non-RAID 4. Option ROM - 10.0.0.1046 Copyright(C) 2003-10 Intel Corporation. All Rights Reserved. [ MAIN MENU ] 1. Step 5: Enter the array capacity and press . Exit in the DISK/VOLUME INFORMATION section, including the RAID level, stripe block size, array name, and... : N/A Create Volume WARNING : ALL DATA ON SELECTED DISKS WILL BE LOST. [ HELP ] Are you sure you can see detailed information about the RAID array in MAIN MENU. Appendix
..., press or select 5. Finally press on the Create Volume item to Non-RAID 4. Option ROM - 10.0.0.1046 Copyright(C) 2003-10 Intel Corporation. All Rights Reserved. [ MAIN MENU ] 1. Step 5: Enter the array capacity and press . Exit in the DISK/VOLUME INFORMATION section, including the RAID level, stripe block size, array name, and... : N/A Create Volume WARNING : ALL DATA ON SELECTED DISKS WILL BE LOST. [ HELP ] Are you sure you can see detailed information about the RAID array in MAIN MENU. Appendix

Manual
Page 92
... the master drive. • A recovery volume can be viewed in the operating system; A recovery volume and a RAID array cannot co-exist in MAIN MENU and press (Figure 8). Intel(R) Rapid Storage Technology - Option ROM - 10.0.0.1046 Copyright(C) 2003-10 Intel Corporation. Option ROM - 10.0.0.1046 ... Menu Figure 8 Step 2: After entering the volume name, select Recovery under the RAID Level item and press (Figure 9). All Rights Reserved. [ MAIN MENU ] 1. Create RAID Volume 2. Exit 3. if needed, the data on the recovery drive can copy the data from the master drive to ...
... the master drive. • A recovery volume can be viewed in the operating system; A recovery volume and a RAID array cannot co-exist in MAIN MENU and press (Figure 8). Intel(R) Rapid Storage Technology - Option ROM - 10.0.0.1046 Copyright(C) 2003-10 Intel Corporation. Option ROM - 10.0.0.1046 ... Menu Figure 8 Step 2: After entering the volume name, select Recovery under the RAID Level item and press (Figure 9). All Rights Reserved. [ MAIN MENU ] 1. Create RAID Volume 2. Exit 3. if needed, the data on the recovery drive can copy the data from the master drive to ...

Manual
Page 94
Delete RAID Volume To delete a RAID array, select Delete RAID Volume in MAIN MENU and press . Name Volume0 Level RAID0(Stripe) [ DELETE VOLUME MENU ] Drives 2 Capacity 223.6GB Status Normal Bootable Yes [ DELETE VOLUME VERIFICATION ] ALL DATA IN ...
Delete RAID Volume To delete a RAID array, select Delete RAID Volume in MAIN MENU and press . Name Volume0 Level RAID0(Stripe) [ DELETE VOLUME MENU ] Drives 2 Capacity 223.6GB Status Normal Bootable Yes [ DELETE VOLUME VERIFICATION ] ALL DATA IN ...

Manual
Page 98
... Topology\Virtual Disks (Figure 6). Marvell BIOS Setup (c) 2009 Marvell Technology Group Ltd. When completed, you exit the configuration screen, be sure to press in the main screen.
... Topology\Virtual Disks (Figure 6). Marvell BIOS Setup (c) 2009 Marvell Technology Group Ltd. When completed, you exit the configuration screen, be sure to press in the main screen.

Manual
Page 99
When prompted, press to confirm or to install. Yes No 1B4B 91A3 B1 0.0.0.0000 2.1.0.1512 5.0Gbps IDE Mode Help Marvell RAID on the main menu (example: VD 0: New_VD) and press to the installation of the SATA driver and operating system. To install the utility, insert the motherboard driver disk, ...
When prompted, press to confirm or to install. Yes No 1B4B 91A3 B1 0.0.0.0000 2.1.0.1512 5.0Gbps IDE Mode Help Marvell RAID on the main menu (example: VD 0: New_VD) and press to the installation of the SATA driver and operating system. To install the utility, insert the motherboard driver disk, ...