Manual
Page 1
GA-P67A-UD4-B3 LGA1155 socket motherboard for Intel® Core™ i7 processors/ Intel® Core™ i5 processors/Intel® Core™ i3 processors/ Intel® Pentium® processors/Intel® Celeron® processors User's Manual Rev. 1101 12ME-P6AUD4B-1101R
GA-P67A-UD4-B3 LGA1155 socket motherboard for Intel® Core™ i7 processors/ Intel® Core™ i5 processors/Intel® Core™ i3 processors/ Intel® Pentium® processors/Intel® Celeron® processors User's Manual Rev. 1101 12ME-P6AUD4B-1101R
Manual
Page 3
... For detailed product information, carefully read the User's Manual. The trademarks mentioned in this : "REV: X.X." Documentation Classifications In order to their respective owners. Example: No part of this product, GIGABYTE provides the following types of documentations: For quick set... looking for technical information. All rights reserved. Check your motherboard looks like this manual is the property of GIGABYTE. Copyright © 2011 GIGA-BYTE TECHNOLOGY CO., LTD. Disclaimer Information in this manual may be made by copyright laws and is protected by...
... For detailed product information, carefully read the User's Manual. The trademarks mentioned in this : "REV: X.X." Documentation Classifications In order to their respective owners. Example: No part of this product, GIGABYTE provides the following types of documentations: For quick set... looking for technical information. All rights reserved. Check your motherboard looks like this manual is the property of GIGABYTE. Copyright © 2011 GIGA-BYTE TECHNOLOGY CO., LTD. Disclaimer Information in this manual may be made by copyright laws and is protected by...

Manual
Page 5
3-2 Application Software 58 3-3 Technical Manuals 58 3-4 Contact...59 3-5 System...59 3-6 Download Center 60 3-7 New Utilities...60 Chapter 4 Unique Features 61 4-1 Xpress Recovery2 61 4-2 BIOS Update Utilities 64 4-2-1 Updating the BIOS ...
3-2 Application Software 58 3-3 Technical Manuals 58 3-4 Contact...59 3-5 System...59 3-6 Download Center 60 3-7 New Utilities...60 Chapter 4 Unique Features 61 4-1 Xpress Recovery2 61 4-2 BIOS Update Utilities 64 4-2-1 Updating the BIOS ...
Manual
Page 6
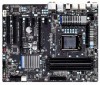
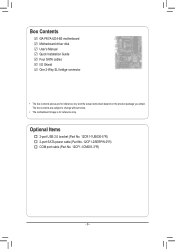
Box Contents GA-P67A-UD4-B3 motherboard Motherboard driver disk User's Manual Quick Installation Guide Four SATA cables I/O Shield One 2-Way SLI bridge connector • The box contents above are subject to change without notice. • The motherboard image is for reference only and the actual items shall depend on the product package you obtain. Optional Items 2-port USB 2.0 bracket (Part No. 12CR1-1UB030-5*R) 2-port SATA power cable (Part No. 12CF1-2SERPW-0*R) COM port cable (Part No. 12CF1-1CM001-3*R) - 6 - The box contents are for reference only.
Box Contents GA-P67A-UD4-B3 motherboard Motherboard driver disk User's Manual Quick Installation Guide Four SATA cables I/O Shield One 2-Way SLI bridge connector • The box contents above are subject to change without notice. • The motherboard image is for reference only and the actual items shall depend on the product package you obtain. Optional Items 2-port USB 2.0 bracket (Part No. 12CR1-1UB030-5*R) 2-port SATA power cable (Part No. 12CF1-2SERPW-0*R) COM port cable (Part No. 12CF1-1CM001-3*R) - 6 - The box contents are for reference only.

Manual
Page 9
... or connectors. • It is best to wear an electrostatic discharge (ESD) wrist strap when handling electronic com- Prior to installation, carefully read the user's manual and follow these procedures: • Prior to installation, do not allow screws to come in contact with the motherboard circuit or its components. • Make...
... or connectors. • It is best to wear an electrostatic discharge (ESD) wrist strap when handling electronic com- Prior to installation, carefully read the user's manual and follow these procedures: • Prior to installation, do not allow screws to come in contact with the motherboard circuit or its components. • Make...

Manual
Page 15
... cooler and CPU may damage the CPU. - 15 - Check that the Male and Female push pins are joined closely. (Refer to your CPU cooler installation manual for instructions on installing the cooler.) Step 5: After the installation, check the back of the CPU cooler to the CPU fan header (CPU_FAN) on the...
... cooler and CPU may damage the CPU. - 15 - Check that the Male and Female push pins are joined closely. (Refer to your CPU cooler installation manual for instructions on installing the cooler.) Step 5: After the installation, check the back of the CPU cooler to the CPU fan header (CPU_FAN) on the...

Manual
Page 18
... prevent hardware damage. Make sure the metal contacts on the top edge of the PCI Express slot to correctly install your computer. Carefully read the manual that supports your operating system. PCI Express x1 Slot PCI Express x16 Slot PCI Slot Follow the steps below to release the card and then...
... prevent hardware damage. Make sure the metal contacts on the top edge of the PCI Express slot to correctly install your computer. Carefully read the manual that supports your operating system. PCI Express x1 Slot PCI Express x16 Slot PCI Slot Follow the steps below to release the card and then...
Manual
Page 19
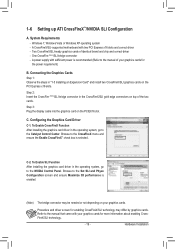
...go to the Catalyst Control Center. C-2. To Enable SLI Function After installing the graphics card driver in the operating system, go to the manual of your graphics cards for the power requirement) B. Configuring the Graphics Card Driver C-1. 1-6 Setting up ATI CrossFireX™/NVIDIA SLI Configuration... CrossFireX menu and ensure the Enable CrossFireX™ check box is recommended (Refer to the NVIDIA Control Panel. Browse to the manual that came with sufficient power is selected. Refer to the Set SLI and Physx Configuration screen and ensure Maximize 3D performance is ...
...go to the Catalyst Control Center. C-2. To Enable SLI Function After installing the graphics card driver in the operating system, go to the manual of your graphics cards for the power requirement) B. Configuring the Graphics Card Driver C-1. 1-6 Setting up ATI CrossFireX™/NVIDIA SLI Configuration... CrossFireX menu and ensure the Enable CrossFireX™ check box is recommended (Refer to the NVIDIA Control Panel. Browse to the manual that came with sufficient power is selected. Refer to the Set SLI and Physx Configuration screen and ensure Maximize 3D performance is ...
Manual
Page 27
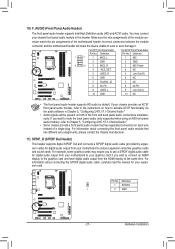
... 2/4/5.1/7.1-Channel Audio." • Audio signals will make the device unable to this header. For information about connecting the S/PDIF digital audio cable, carefully read the manual for your chassis front panel audio module to work or even damage it. Definition 1 SPDIFO 1 2 GND - 27 - Definition For AC'97 Front Panel Audio: Pin...
... 2/4/5.1/7.1-Channel Audio." • Audio signals will make the device unable to this header. For information about connecting the S/PDIF digital audio cable, carefully read the manual for your chassis front panel audio module to work or even damage it. Definition 1 SPDIFO 1 2 GND - 27 - Definition For AC'97 Front Panel Audio: Pin...
Manual
Page 29
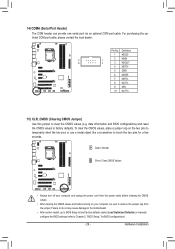
... do so may cause damage to the motherboard. • After system restart, go to BIOS Setup to load factory defaults (select Load Optimized Defaults) or manually configure the BIOS settings (refer to factory defaults. For purchasing the optional COM port cable, please contact the local dealer. To clear the CMOS values...
... do so may cause damage to the motherboard. • After system restart, go to BIOS Setup to load factory defaults (select Load Optimized Defaults) or manually configure the BIOS settings (refer to factory defaults. For purchasing the optional COM port cable, please contact the local dealer. To clear the CMOS values...
Manual
Page 37
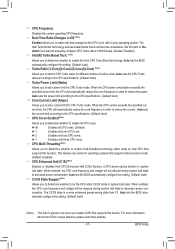
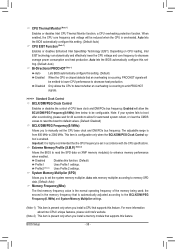
... to reduce the current. Auto lets the BIOS automatically configure this setting. (Default: Auto) Turbo Ratio (1-Core)/(2-Core)/(3-Core)/(4-Core) (Note) Allows you want to manually configure CPU Turbo ratios in order to set a power limit for different number of active cores. CPU Frequency Displays the current operating CPU frequency. All...
... to reduce the current. Auto lets the BIOS automatically configure this setting. (Default: Auto) Turbo Ratio (1-Core)/(2-Core)/(3-Core)/(4-Core) (Note) Allows you want to manually configure CPU Turbo ratios in order to set a power limit for different number of active cores. CPU Frequency Displays the current operating CPU frequency. All...
Manual
Page 38
... the BIOS to read the SPD data on CPU loading, Intel EIST technology can dynamically and effectively lower the CPU voltage and core frequency to manually set - Auto lets the BIOS automatically configure this feature. ting. (Default: Auto) Bi-Directional PROCHOT (Note 1) Auto Enabled Disabled Lets BIOS automatically configure this function...
... the BIOS to read the SPD data on CPU loading, Intel EIST technology can dynamically and effectively lower the CPU voltage and core frequency to manually set - Auto lets the BIOS automatically configure this feature. ting. (Default: Auto) Bi-Directional PROCHOT (Note 1) Auto Enabled Disabled Lets BIOS automatically configure this function...

Manual
Page 43
...faster system startup. • Auto Lets the BIOS automatically detect SATA devices during the POST. (Default) • Manual Allows you wish to enter the parameters manually, refer to set the time. 2-4 Standard CMOS Features CMOS Setup Utility-Copyright (C) 1984-2010 Award Software Standard CMOS...faster system startup. IDE Channel 0, 1 Master/Slave IDE Channel 0, 1 Master/Slave Configure your hard drive specifications. If you to manually enter the specifications of the hard drive when the hard drive access mode is set this item to CHS. The date format is ...
...faster system startup. • Auto Lets the BIOS automatically detect SATA devices during the POST. (Default) • Manual Allows you wish to enter the parameters manually, refer to set the time. 2-4 Standard CMOS Features CMOS Setup Utility-Copyright (C) 1984-2010 Award Software Standard CMOS...faster system startup. IDE Channel 0, 1 Master/Slave IDE Channel 0, 1 Master/Slave Configure your hard drive specifications. If you to manually enter the specifications of the hard drive when the hard drive access mode is set this item to CHS. The date format is ...
Manual
Page 53
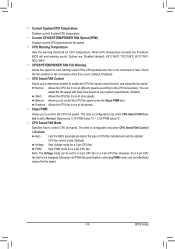
... or fan connection when this occurs. (Default: Disabled) CPU Smart FAN Control Allows you to control the CPU fan speed under the Slope PWM item. Manual Allows you to determine whether to run at slow speeds. Slope PWM Allows you to control CPU fan speed. This item is configurable only when...
... or fan connection when this occurs. (Default: Disabled) CPU Smart FAN Control Allows you to control the CPU fan speed under the Slope PWM item. Manual Allows you to determine whether to run at slow speeds. Slope PWM Allows you to control CPU fan speed. This item is configurable only when...
Manual
Page 57
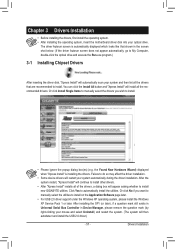
... the drivers you want to manually select the utilities to install on the Application Software page later. • For USB 2.0 driver support under the Windows XP operating system, please install the Windows XP Service Pack 1 or later. Or click No if you wish to install new GIGABYTE utilities. the Found New Hardware...
... the drivers you want to manually select the utilities to install on the Application Software page later. • For USB 2.0 driver support under the Windows XP operating system, please install the Windows XP Service Pack 1 or later. Or click No if you wish to install new GIGABYTE utilities. the Found New Hardware...

Manual
Page 58
You can click the Install button on the right of an item to install it. 3-3 Technical Manuals This page provides GIGABYTE's application guides, content descriptions for this driver disk, and the motherboard manuals. Drivers Installation - 58 - 3-2 Application Software This page displays all the utilities and applications that GIGABYTE develops and some free software.
You can click the Install button on the right of an item to install it. 3-3 Technical Manuals This page provides GIGABYTE's application guides, content descriptions for this driver disk, and the motherboard manuals. Drivers Installation - 58 - 3-2 Application Software This page displays all the utilities and applications that GIGABYTE develops and some free software.

Manual
Page 64
... You can update the system BIOS without the need to enter Q-Flash. P67A-UD4-B3 F4f . . . . : BIOS Setup : XpressRecovery2 : Boot Menu : Qflash 11/12/2010-P67-7A89UG01C-00 Because BIOS flashing is Q-Flash™? 4-2 BIOS Update Utilities GIGABYTE motherboards provide two unique BIOS update tools, Q-Flash™ and @BIOS... can access Q-Flash by adding one more physical BIOS chip. For the sake of system safety, users cannot update the backup BIOS manually. With Q-Flash you to your computer by either pressing the key during the POST to access Q-Flash. Extract the file and save...
... You can update the system BIOS without the need to enter Q-Flash. P67A-UD4-B3 F4f . . . . : BIOS Setup : XpressRecovery2 : Boot Menu : Qflash 11/12/2010-P67-7A89UG01C-00 Because BIOS flashing is Q-Flash™? 4-2 BIOS Update Utilities GIGABYTE motherboards provide two unique BIOS update tools, Q-Flash™ and @BIOS... can access Q-Flash by adding one more physical BIOS chip. For the sake of system safety, users cannot update the backup BIOS manually. With Q-Flash you to your computer by either pressing the key during the POST to access Q-Flash. Extract the file and save...

Manual
Page 67
... Save Current BIOS to File to be flashed matches your motherboard is not present on the @BIOS server site, please manually download the BIOS update file from GIGABYTE Server, select the @BIOS server site closest to start. 3. Before You Begin 1. Using @BIOS 1. Follow the on...and TSR (Terminate and Stay Resident) programs. This helps prevent unexpected failures when performing a BIOS update. 2. Do not use the G.O.M. (GIGABYTE Online Management) function when using @BIOS. 4. Follow the on -screen instructions to do NOT interrupt the Internet connection (for your motherboard ...
... Save Current BIOS to File to be flashed matches your motherboard is not present on the @BIOS server site, please manually download the BIOS update file from GIGABYTE Server, select the @BIOS server site closest to start. 3. Before You Begin 1. Using @BIOS 1. Follow the on...and TSR (Terminate and Stay Resident) programs. This helps prevent unexpected failures when performing a BIOS update. 2. Do not use the G.O.M. (GIGABYTE Online Management) function when using @BIOS. 4. Follow the on -screen instructions to do NOT interrupt the Internet connection (for your motherboard ...
Manual
Page 77
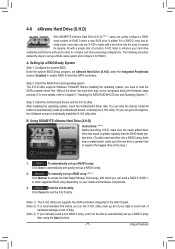
... System." ) Step 3: Install the motherboard drivers and the X.H.D utiltiy After installing the operating system, insert the motherboard driver disk. To manually set up a RAID 0 array. 2. Unique Features Exits the X.H.D utility: Click Cancel to the biggest drive in the Intel Chipset. ... Step 1: Configure the system BIOS Enter the system BIOS Setup program, set up all motherboard drivers, including the X.H.D utility. Using GIGABYTE eXtreme Hard Drive (X.H.D) Instructions: (Note 2) Before launching X.H.D, make sure the newly added harddrive has equal or greater capacity than the...
... System." ) Step 3: Install the motherboard drivers and the X.H.D utiltiy After installing the operating system, insert the motherboard driver disk. To manually set up a RAID 0 array. 2. Unique Features Exits the X.H.D utility: Click Cancel to the biggest drive in the Intel Chipset. ... Step 1: Configure the system BIOS Enter the system BIOS Setup program, set up all motherboard drivers, including the X.H.D utility. Using GIGABYTE eXtreme Hard Drive (X.H.D) Instructions: (Note 2) Before launching X.H.D, make sure the newly added harddrive has equal or greater capacity than the...

Manual
Page 85
...data from the master drive to a previous state. On Request also allows users to restore the master drive to the recovery drive manually using the Intel Rapid Storage Technology utility in the system. All Rights Reserved. [ CREATE VOLUME MENU ] Name : Volume0 RAID Level...Select Disks Strip Size : N/A Capacity : 0.0 GB Sync : Continuous Create Volume [ HELP ] Select a sync option: On Request: volume is updated manually Continuous: volume is updated automatically [hi]-Change [TAB]-Next [ESC]-Previous Menu Figure 11 [ENTER]-Select Step 5: Finally press on the master drive will be...
...data from the master drive to a previous state. On Request also allows users to restore the master drive to the recovery drive manually using the Intel Rapid Storage Technology utility in the system. All Rights Reserved. [ CREATE VOLUME MENU ] Name : Volume0 RAID Level...Select Disks Strip Size : N/A Capacity : 0.0 GB Sync : Continuous Create Volume [ HELP ] Select a sync option: On Request: volume is updated manually Continuous: volume is updated automatically [hi]-Change [TAB]-Next [ESC]-Previous Menu Figure 11 [ENTER]-Select Step 5: Finally press on the master drive will be...


