Manual
Page 3
... in any means without prior notice. For product-related information, check on our website at: http://www.gigabyte.com Identifying Your Motherboard Revision The revision number on your motherboard revision before updating motherboard BIOS, drivers, or when looking for technical information. For example, "REV: 1.0" means the revision of the motherboard is the...
... in any means without prior notice. For product-related information, check on our website at: http://www.gigabyte.com Identifying Your Motherboard Revision The revision number on your motherboard revision before updating motherboard BIOS, drivers, or when looking for technical information. For example, "REV: 1.0" means the revision of the motherboard is the...
Manual
Page 4
Table of Contents Box Contents...6 Optional Items...6 GA-P67A-UD4-B3 Motherboard Layout 7 GA-P67A-UD4-B3 Motherboard Block Diagram 8 Chapter 1 Hardware Installation 9 1-1 Installation Precautions 9 1-2 Product Specifications 10 1-3 Installing the CPU and CPU Cooler 13 1-3-1 Installing the CPU 13 1-3-2 Installing the CPU ...-Safe Defaults 54 2-10 Load Optimized Defaults 54 2-11 Set Supervisor/User Password 55 2-12 Save & Exit Setup 56 2-13 Exit Without Saving 56 Chapter 3 Drivers Installation 57 3-1 Installing Chipset...
Table of Contents Box Contents...6 Optional Items...6 GA-P67A-UD4-B3 Motherboard Layout 7 GA-P67A-UD4-B3 Motherboard Block Diagram 8 Chapter 1 Hardware Installation 9 1-1 Installation Precautions 9 1-2 Product Specifications 10 1-3 Installing the CPU and CPU Cooler 13 1-3-1 Installing the CPU 13 1-3-2 Installing the CPU ...-Safe Defaults 54 2-10 Load Optimized Defaults 54 2-11 Set Supervisor/User Password 55 2-12 Save & Exit Setup 56 2-13 Exit Without Saving 56 Chapter 3 Drivers Installation 57 3-1 Installing Chipset...

Manual
Page 5
... Chapter 5 Appendix...79 5-1 Configuring SATA Hard Drive(s 79 5-1-1 Configuring Intel P67 SATA Controllers 79 5-1-2 Configuring Marvell 88SE9128 SATA Controller 87 5-1-3 Installing the SATA RAID/AHCI Driver and Operating System 92 5-2 Configuring Audio Input and Output 99 5-2-1 Configuring 2/4/5.1/7.1-Channel Audio 99 5-2-2 Configuring S/PDIF Out 101 5-2-3 Enabling the Dolby Home Theater Function 102...
... Chapter 5 Appendix...79 5-1 Configuring SATA Hard Drive(s 79 5-1-1 Configuring Intel P67 SATA Controllers 79 5-1-2 Configuring Marvell 88SE9128 SATA Controller 87 5-1-3 Installing the SATA RAID/AHCI Driver and Operating System 92 5-2 Configuring Audio Input and Output 99 5-2-1 Configuring 2/4/5.1/7.1-Channel Audio 99 5-2-2 Configuring S/PDIF Out 101 5-2-3 Enabling the Dolby Home Theater Function 102...
Manual
Page 6
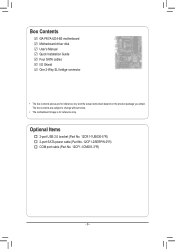
The box contents are for reference only. Box Contents GA-P67A-UD4-B3 motherboard Motherboard driver disk User's Manual Quick Installation Guide Four SATA cables I/O Shield One 2-Way SLI bridge connector • The box contents above are subject to change without notice. • The motherboard image is for reference only and the actual items shall depend on the product package you obtain. Optional Items 2-port USB 2.0 bracket (Part No. 12CR1-1UB030-5*R) 2-port SATA power cable (Part No. 12CF1-2SERPW-0*R) COM port cable (Part No. 12CF1-1CM001-3*R) - 6 -
The box contents are for reference only. Box Contents GA-P67A-UD4-B3 motherboard Motherboard driver disk User's Manual Quick Installation Guide Four SATA cables I/O Shield One 2-Way SLI bridge connector • The box contents above are subject to change without notice. • The motherboard image is for reference only and the actual items shall depend on the product package you obtain. Optional Items 2-port USB 2.0 bracket (Part No. 12CR1-1UB030-5*R) 2-port SATA power cable (Part No. 12CF1-2SERPW-0*R) COM port cable (Part No. 12CF1-1CM001-3*R) - 6 -

Manual
Page 18
After installing all expansion cards, replace the chassis cover(s). 6. Install the driver provided with your operating system. Locate an expansion slot that came with the expansion card in the slot. 3. Remove the metal slot cover from the ...
After installing all expansion cards, replace the chassis cover(s). 6. Install the driver provided with your operating system. Locate an expansion slot that came with the expansion card in the slot. 3. Remove the metal slot cover from the ...
Manual
Page 19
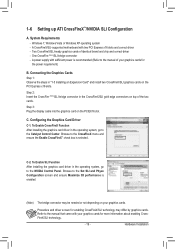
...Graphics Cards Step 1: Observe the steps in the operating system, go to the manual that came with two PCI Express x16 slots and correct driver - C. Browse to the manual of your graphics cards. Windows 7, Windows Vista or Windows XP operating system - One CrossFire (Note)/SLI ...the operating system, go to the Set SLI and Physx Configuration screen and ensure Maximize 3D performance is selected. Configuring the Graphics Card Driver C-1. Browse to the Catalyst Control Center. A power supply with sufficient power is recommended (Refer to the CrossFireX menu and ensure the...
...Graphics Cards Step 1: Observe the steps in the operating system, go to the manual that came with two PCI Express x16 slots and correct driver - C. Browse to the manual of your graphics cards. Windows 7, Windows Vista or Windows XP operating system - One CrossFire (Note)/SLI ...the operating system, go to the Set SLI and Physx Configuration screen and ensure Maximize 3D performance is selected. Configuring the Graphics Card Driver C-1. Browse to the Catalyst Control Center. A power supply with sufficient power is recommended (Refer to the CrossFireX menu and ensure the...
Manual
Page 32
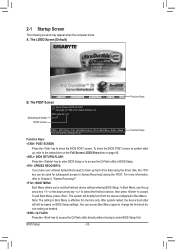
... you to set the first boot device without having to accept. The system will still be used for one time only. A. Motherboard Model BIOS Version P67A-UD4-B3 F4f . . . . : BIOS Setup : XpressRecovery2 : Boot Menu : Qflash 11/12/2010-P67-7A89UG01C-00 Function Keys Function Keys Function Keys: : POST SCREEN...Setup. 2-1 Startup Screen The following screens may appear when the computer boots. In Boot Menu, use the up hard drive data using the driver disk, the key can access Boot Menu again to change the first boot device setting as needed. : Q-FLASH Press the key to Xpress...
... you to set the first boot device without having to accept. The system will still be used for one time only. A. Motherboard Model BIOS Version P67A-UD4-B3 F4f . . . . : BIOS Setup : XpressRecovery2 : Boot Menu : Qflash 11/12/2010-P67-7A89UG01C-00 Function Keys Function Keys Function Keys: : POST SCREEN...Setup. 2-1 Startup Screen The following screens may appear when the computer boots. In Boot Menu, use the up hard drive data using the driver disk, the key can access Boot Menu again to change the first boot device setting as needed. : Q-FLASH Press the key to Xpress...

Manual
Page 47
...specification that cannot be used in the Intel P67 Chipset. In Legacy mode the SATA controllers use dedicated IRQs that allows the storage driver to AHCI mode. When set to install operating systems that support Native mode. (Default) USB Controllers Enables or disables the integrated ... the operating mode of the USB functionalities below will turn off all of the integrated SATA controllers. For details on using the GIGABYTE X.H.D utility, refer to operate in Legacy IDE mode. AHCI Configures the SATA controllers to enable advanced Serial ATA features such as...
...specification that cannot be used in the Intel P67 Chipset. In Legacy mode the SATA controllers use dedicated IRQs that allows the storage driver to AHCI mode. When set to install operating systems that support Native mode. (Default) USB Controllers Enables or disables the integrated ... the operating mode of the USB functionalities below will turn off all of the integrated SATA controllers. For details on using the GIGABYTE X.H.D utility, refer to operate in Legacy IDE mode. AHCI Configures the SATA controllers to enable advanced Serial ATA features such as...
Manual
Page 49
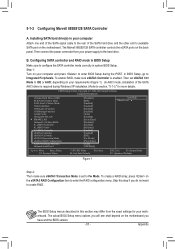
... RAID for the Marvell 88SE9128 SATA controller. Bypass Disables RAID. BIOS Setup Advanced Host Controller Interface (AHCI) is an interface specification that allows the storage driver to enable advanced Serial ATA features such as the one embedded in the Marvell 88SE9128 chip to take effect. Options are: Auto, 3F8/IRQ4 (default...
... RAID for the Marvell 88SE9128 SATA controller. Bypass Disables RAID. BIOS Setup Advanced Host Controller Interface (AHCI) is an interface specification that allows the storage driver to enable advanced Serial ATA features such as the one embedded in the Marvell 88SE9128 chip to take effect. Options are: Auto, 3F8/IRQ4 (default...
Manual
Page 57
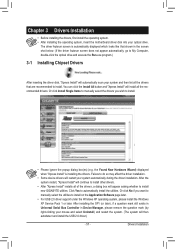
...a question mark still exists in Universal Serial Bus Controller in the screen shot below. (If the driver Autorun screen does not appear automatically, go to install new GIGABYTE utilities. the Found New Hardware Wizard) displayed when "Xpress Install" is automatically displayed which looks like... that are recommended to install on the Application Software page later. • For USB 2.0 driver support under the Windows XP operating...
...a question mark still exists in Universal Serial Bus Controller in the screen shot below. (If the driver Autorun screen does not appear automatically, go to install new GIGABYTE utilities. the Found New Hardware Wizard) displayed when "Xpress Install" is automatically displayed which looks like... that are recommended to install on the Application Software page later. • For USB 2.0 driver support under the Windows XP operating...

Manual
Page 58
Drivers Installation - 58 - You can click the Install button on the right of an item to install it. 3-3 Technical Manuals This page provides GIGABYTE's application guides, content descriptions for this driver disk, and the motherboard manuals. 3-2 Application Software This page displays all the utilities and applications that GIGABYTE develops and some free software.
Drivers Installation - 58 - You can click the Install button on the right of an item to install it. 3-3 Technical Manuals This page provides GIGABYTE's application guides, content descriptions for this driver disk, and the motherboard manuals. 3-2 Application Software This page displays all the utilities and applications that GIGABYTE develops and some free software.

Manual
Page 59
Drivers Installation 3-4 Contact For the detailed contact information of the GIGABYTE Taiwan headquarter or worldwide branch offices, click the URL on this page to link to the GIGABYTE website. 3-5 System This page provides the basic system information. - 59 -
Drivers Installation 3-4 Contact For the detailed contact information of the GIGABYTE Taiwan headquarter or worldwide branch offices, click the URL on this page to link to the GIGABYTE website. 3-5 System This page provides the basic system information. - 59 -

Manual
Page 60
You can click the Install button on the right of the BIOS, drivers, or applications will be displayed. 3-7 New Utilities This page provides a quick link to GIGABYTE's lately developed utilities for users to install it. Drivers Installation - 60 - The latest version of an item to install. 3-6 Download Center To update the BIOS, drivers, or applications, click the Download Center button to link to the GIGABYTE website.
You can click the Install button on the right of the BIOS, drivers, or applications will be displayed. 3-7 New Utilities This page provides a quick link to GIGABYTE's lately developed utilities for users to install it. Drivers Installation - 60 - The latest version of an item to install. 3-6 Download Center To update the BIOS, drivers, or applications, click the Download Center button to link to the GIGABYTE website.

Manual
Page 61
... back up /restore the first physical hard drive that allows you to quickly compress and back up your system soon after the operating system and drivers are attached to leave enough unallocated space in advanced (10 GB or more is recommended; A. Xpress Recovery2 can back up data on the amount of...
... back up /restore the first physical hard drive that allows you to quickly compress and back up your system soon after the operating system and drivers are attached to leave enough unallocated space in advanced (10 GB or more is recommended; A. Xpress Recovery2 can back up data on the amount of...

Manual
Page 62
... the unallocated space (black stripe along the top). Step 5: Xpress Recovery2 will stay permanent in Xpress Recovery2 for the first time. Boot from the motherboard driver disk to enter Xpress Recovery2. 2. actual size requirements vary, depending on the amount of data) and begin the installation of the operating system. Please note...
... the unallocated space (black stripe along the top). Step 5: Xpress Recovery2 will stay permanent in Xpress Recovery2 for the first time. Boot from the motherboard driver disk to enter Xpress Recovery2. 2. actual size requirements vary, depending on the amount of data) and begin the installation of the operating system. Please note...

Manual
Page 71
... data folder to launch the Q-Share tool. Directions for using Q-Share After installing Q-Share from the motherboard driver disk, go to configure the data sharing settings. Find the Q-Share icon to Start>All Programs>GIGABYTE>Q-Share. Enable Incoming Folder ... Exit... Data Sharing Disabled Figure 2. exe to be shared (Note) Updates Q-Share online...
... data folder to launch the Q-Share tool. Directions for using Q-Share After installing Q-Share from the motherboard driver disk, go to configure the data sharing settings. Find the Q-Share icon to Start>All Programs>GIGABYTE>Q-Share. Enable Incoming Folder ... Exit... Data Sharing Disabled Figure 2. exe to be shared (Note) Updates Q-Share online...
Manual
Page 77
...All button to Chapter 5, "Installing the SATA RAID/AHCI Driver and Operating System." ) Step 3: Install the motherboard drivers and the X.H.D utiltiy After installing the operating system, insert the motherboard driver disk. Using GIGABYTE eXtreme Hard Drive (X.H.D) Instructions: (Note 2) Before launching ..., you can go to the Application Software screen to individually install the X.H.D utility later. B. 4-8 eXtreme Hard Drive (X.H.D) With GIGABYTE eXtreme Hard Drive (X.H.D) (Note 1), users can quickly configure a RAIDready system for RAID 0 when a new SATA drive is recommended...
...All button to Chapter 5, "Installing the SATA RAID/AHCI Driver and Operating System." ) Step 3: Install the motherboard drivers and the X.H.D utiltiy After installing the operating system, insert the motherboard driver disk. Using GIGABYTE eXtreme Hard Drive (X.H.D) Instructions: (Note 2) Before launching ..., you can go to the Application Software screen to individually install the X.H.D utility later. B. 4-8 eXtreme Hard Drive (X.H.D) With GIGABYTE eXtreme Hard Drive (X.H.D) (Note 1), users can quickly configure a RAIDready system for RAID 0 when a new SATA drive is recommended...

Manual
Page 79
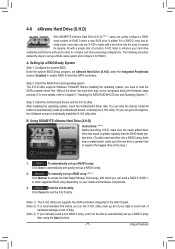
... mode in RAID BIOS. (Note 1) D. Chapter 5 Appendix 5-1 Configuring SATA Hard Drive(s) To configure SATA hard drive(s), follow the steps below: A. B. Install the SATA RAID/AHCI driver (Note 2) and operating system. If there is more than one SATA controller on your motherboard, refer to "Chapter 1," "Hardware Installation," to identify the SATA controller..., on the devices being connected. - 79 - Install SATA hard drive(s) in your computer Attach one hard drive. • Windows 7/Vista/XP setup disk. • Motherboard driver disk. 5-1-1 Configuring Intel P67 SATA Controllers A.
... mode in RAID BIOS. (Note 1) D. Chapter 5 Appendix 5-1 Configuring SATA Hard Drive(s) To configure SATA hard drive(s), follow the steps below: A. B. Install the SATA RAID/AHCI driver (Note 2) and operating system. If there is more than one SATA controller on your motherboard, refer to "Chapter 1," "Hardware Installation," to identify the SATA controller..., on the devices being connected. - 79 - Install SATA hard drive(s) in your computer Attach one hard drive. • Windows 7/Vista/XP setup disk. • Motherboard driver disk. 5-1-1 Configuring Intel P67 SATA Controllers A.

Manual
Page 83
... proceed to begin creating the RAID array. All Rights Reserved. [ MAIN MENU ] 1. Finally press on the Create Volume item to create the SATA RAID/AHCI driver diskette and install the SATA RAID/AHCI driver and operating system. - 83 - Appendix
... proceed to begin creating the RAID array. All Rights Reserved. [ MAIN MENU ] 1. Finally press on the Create Volume item to create the SATA RAID/AHCI driver diskette and install the SATA RAID/AHCI driver and operating system. - 83 - Appendix
Manual
Page 87
... your computer and press to enter BIOS Setup during Windows XP installation.) Refer to Integrated Peripherals. Then set to the rear of the SATA AHCI driver is required during the POST. Then connect the power connector from the exact settings for more details.
... your computer and press to enter BIOS Setup during Windows XP installation.) Refer to Integrated Peripherals. Then set to the rear of the SATA AHCI driver is required during the POST. Then connect the power connector from the exact settings for more details.


