Manual
Page 5
...Smart 6™...78 4-7 Smart TPM j 81 4-8 Auto Green...82 4-9 eXtreme Hard Drive (X.H.D 83 Chapter 5 Appendix...85 5-1 Configuring SATA Hard Drive(s 85 5-1-1 Configuring Intel P55 SATA Controllers 85 5-1-2 Configuring JMB362 SATA Controller 93 5-1-3 Configuring Marvell 9128 SATA Controller 99 5-1-4 Making a SATA RAID/AHCI Driver Diskette 104 5-1-5 Installing the SATA RAID... Recording 124 5-2-5 Using the Sound Recorder 126 5-3 Troubleshooting 127 5-3-1 Frequently Asked Questions 127 5-3-2 Troubleshooting Procedure 128 5-4 Regulatory Statements 130 j Only for GA-P55A-UD3P. - 5 -
...Smart 6™...78 4-7 Smart TPM j 81 4-8 Auto Green...82 4-9 eXtreme Hard Drive (X.H.D 83 Chapter 5 Appendix...85 5-1 Configuring SATA Hard Drive(s 85 5-1-1 Configuring Intel P55 SATA Controllers 85 5-1-2 Configuring JMB362 SATA Controller 93 5-1-3 Configuring Marvell 9128 SATA Controller 99 5-1-4 Making a SATA RAID/AHCI Driver Diskette 104 5-1-5 Installing the SATA RAID... Recording 124 5-2-5 Using the Sound Recorder 126 5-3 Troubleshooting 127 5-3-1 Frequently Asked Questions 127 5-3-2 Troubleshooting Procedure 128 5-4 Regulatory Statements 130 j Only for GA-P55A-UD3P. - 5 -
Manual
Page 7
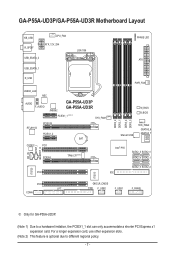
...AUDIO F_AUDIO JMB362 GA-P55A-UD3P GA-P55A-UD3R PCIEX1_1 (Note 1) SYS_FAN1 RTL8111D PCIEX16 PCIEX1_2 BAT CODEC PCI1 CD_IN SPDIF_I SPDIF_O PCIEX4 TPM ICj(Note 2) DDR3_2 DDR3_1 DDR3_4 DDR3_3 PWR_FAN M_BIOS B_BIOS Marvell 9128 SYS_FAN2 GSATA3_6 GSATA3_7 Intel® P55 SATA2_3 SATA2_0 ...SATA2_4 SATA2_1 SATA2_5 SATA2_2 PCI2 IDE IT8720 IT8213 PCI3 LPT COMA CLR_CMOS FDD F_USB2 F_USB1 F_PANEL j Only for GA-P55A-UD3P. (Note 1) Due to different regional policy. - 7 -
...AUDIO F_AUDIO JMB362 GA-P55A-UD3P GA-P55A-UD3R PCIEX1_1 (Note 1) SYS_FAN1 RTL8111D PCIEX16 PCIEX1_2 BAT CODEC PCI1 CD_IN SPDIF_I SPDIF_O PCIEX4 TPM ICj(Note 2) DDR3_2 DDR3_1 DDR3_4 DDR3_3 PWR_FAN M_BIOS B_BIOS Marvell 9128 SYS_FAN2 GSATA3_6 GSATA3_7 Intel® P55 SATA2_3 SATA2_0 ...SATA2_4 SATA2_1 SATA2_5 SATA2_2 PCI2 IDE IT8720 IT8213 PCI3 LPT COMA CLR_CMOS FDD F_USB2 F_USB1 F_PANEL j Only for GA-P55A-UD3P. (Note 1) Due to different regional policy. - 7 -
Manual
Page 8
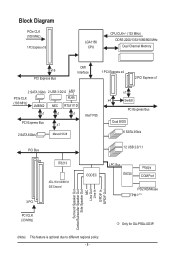
... 2 SATA 3Gb/s 2 USB 3.0/2.0 LAN PCIe CLK (100 MHz) JMB362 RJ45 NEC RTL8111D x1 x1 x1 PCI Express Bus x1 2 SATA 6Gb/s Marvell 9128 Intel® P55 x1 x4 Switch PCI Express Bus Dual BIOS 6 SATA 3Gb/s PCI Bus 12 USB 2.0/1.1 IT8213 3 PCI ATA-133/100/66/33 IDE Channel CODEC LPC...) Surround Speaker Out Center/Subwoofer Speaker Out Side Speaker Out MIC Line Out Line In S/PDIF In S/PDIF Out PCI CLK (33 MHz) j Only for GA-P55A-UD3P. (Note) This feature is optional due to different regional policy. - 8 -
... 2 SATA 3Gb/s 2 USB 3.0/2.0 LAN PCIe CLK (100 MHz) JMB362 RJ45 NEC RTL8111D x1 x1 x1 PCI Express Bus x1 2 SATA 6Gb/s Marvell 9128 Intel® P55 x1 x4 Switch PCI Express Bus Dual BIOS 6 SATA 3Gb/s PCI Bus 12 USB 2.0/1.1 IT8213 3 PCI ATA-133/100/66/33 IDE Channel CODEC LPC...) Surround Speaker Out Center/Subwoofer Speaker Out Side Speaker Out MIC Line Out Line In S/PDIF In S/PDIF Out PCI CLK (33 MHz) j Only for GA-P55A-UD3P. (Note) This feature is optional due to different regional policy. - 8 -
Manual
Page 10
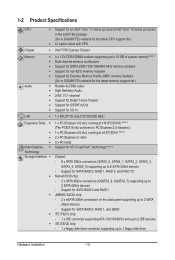
... processor/Intel® Core™ i5 series processor in the LGA1156 package (Go to GIGABYTE's website for the latest CPU support list.) L3 cache varies with CPU Chipset Intel® P55 Express Chipset Memory Audio 4 x 1.5V DDR3 DIMM sockets supporting up to ...1066/800 MHz memory modules Support for non-ECC memory modules Support for Extreme Memory Profile (XMP) memory modules (Go to GIGABYTE's website for the latest memory support list.) Realtek ALC889 codec High Definition Audio 2/4/5.1/7.1-channel Support for ...
... processor/Intel® Core™ i5 series processor in the LGA1156 package (Go to GIGABYTE's website for the latest CPU support list.) L3 cache varies with CPU Chipset Intel® P55 Express Chipset Memory Audio 4 x 1.5V DDR3 DIMM sockets supporting up to ...1066/800 MHz memory modules Support for non-ECC memory modules Support for Extreme Memory Profile (XMP) memory modules (Go to GIGABYTE's website for the latest memory support list.) Realtek ALC889 codec High Definition Audio 2/4/5.1/7.1-channel Support for ...
Manual
Page 24
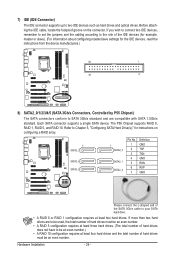
...Chapter 5, "Configuring SATA Hard Drive(s)," for instructions on the connector. Hardware Installation - 24 - Each SATA connector supports a single SATA device. The P55 Chipset supports RAID 0, RAID 1, RAID 5, and RAID 10. If you wish to connect two IDE devices, remember to set the jumpers and the ... for the IDE devices, read the instructions from the device manufacturers.) 39 1 40 2 8) SATA2_0/1/2/3/4/5 (SATA 3Gb/s Connectors, Controlled by P55 Chipset) The SATA connectors conform to SATA 3Gb/s standard and are to be used, the total number of hard drives must be an even...
...Chapter 5, "Configuring SATA Hard Drive(s)," for instructions on the connector. Hardware Installation - 24 - Each SATA connector supports a single SATA device. The P55 Chipset supports RAID 0, RAID 1, RAID 5, and RAID 10. If you wish to connect two IDE devices, remember to set the jumpers and the ... for the IDE devices, read the instructions from the device manufacturers.) 39 1 40 2 8) SATA2_0/1/2/3/4/5 (SATA 3Gb/s Connectors, Controlled by P55 Chipset) The SATA connectors conform to SATA 3Gb/s standard and are to be used, the total number of hard drives must be an even...
Manual
Page 34
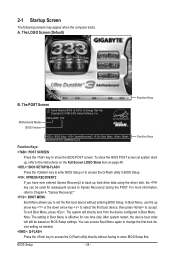
Motherboard Model BIOS Version P55A-UD3P D12 . . . . : BIOS Setup : XpressRecovery2 : Boot Menu : Qflash 09/23/2009-P55-7A89RG0TC-00 Function Keys Function Keys Function Keys: : POST SCREEN Press the key to show the BIOS POST screen at system startup, refer to the ...
Motherboard Model BIOS Version P55A-UD3P D12 . . . . : BIOS Setup : XpressRecovery2 : Boot Menu : Qflash 09/23/2009-P55-7A89RG0TC-00 Function Keys Function Keys Function Keys: : POST SCREEN Press the key to show the BIOS POST screen at system startup, refer to the ...
Manual
Page 50
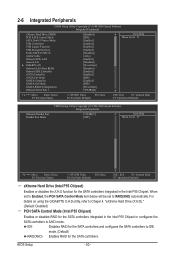
... Help F7: Optimized Defaults eXtreme Hard Drive (Intel P55 Chipset) Enables or disables the X.H.D function for the SATA controllers integrated in the Intel P55 Chipset or configures the SATA controllers to AHCI mode. For details on using the GIGABYTE X.H.D utility, refer to Chaper 4, "eXtreme Hard ...Drive (X.H.D)." (Default: Disabled) PCH SATA Control Mode (Intel P55 Chipset) Enables or disables RAID for...
... Help F7: Optimized Defaults eXtreme Hard Drive (Intel P55 Chipset) Enables or disables the X.H.D function for the SATA controllers integrated in the Intel P55 Chipset or configures the SATA controllers to AHCI mode. For details on using the GIGABYTE X.H.D utility, refer to Chaper 4, "eXtreme Hard ...Drive (X.H.D)." (Default: Disabled) PCH SATA Control Mode (Intel P55 Chipset) Enables or disables RAID for...
Manual
Page 51
... turn off all of the two controllers is set the PCIe speed of the Marvell 9128 controller to PCIe Gen 2. SATA Port0-3 Native Mode (Intel P55 Chipset) Specifies the operating mode of using the onboard LAN, set this option to Disabled if you wish to install a 3rd party add-in MS...
... turn off all of the two controllers is set the PCIe speed of the Marvell 9128 controller to PCIe Gen 2. SATA Port0-3 Native Mode (Intel P55 Chipset) Specifies the operating mode of using the onboard LAN, set this option to Disabled if you wish to install a 3rd party add-in MS...

Manual
Page 70
...P55A-UD3P D12 . . . . : BIOS Setup : XpressRecovery2 : Boot Menu : Qflash 09/23/2009-P55-7A89RG0TC-00 Because BIOS flashing is corrupted or damaged, the backup BIOS will download the latest BIOS file from the hassles of system safety, users cannot update the backup BIOS manually. 4-2 BIOS Update Utilities GIGABYTE...™ design, which enhances protection for the safety and stability of your floppy disk, USB flash drive, or hard drive. From GIGABYTE's website, download the latest compressed BIOS update file that support DualBIOS have two BIOS onboard, a main BIOS and a backup BIOS....
...P55A-UD3P D12 . . . . : BIOS Setup : XpressRecovery2 : Boot Menu : Qflash 09/23/2009-P55-7A89RG0TC-00 Because BIOS flashing is corrupted or damaged, the backup BIOS will download the latest BIOS file from the hassles of system safety, users cannot update the backup BIOS manually. 4-2 BIOS Update Utilities GIGABYTE...™ design, which enhances protection for the safety and stability of your floppy disk, USB flash drive, or hard drive. From GIGABYTE's website, download the latest compressed BIOS update file that support DualBIOS have two BIOS onboard, a main BIOS and a backup BIOS....
Manual
Page 85
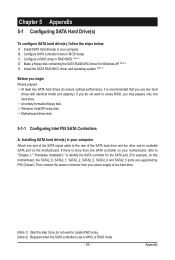
...computer Attach one hard drive. • An empty formatted floppy disk. • Windows Vista/XP setup disk. • Motherboard driver disk. 5-1-1 Configuring Intel P55 SATA Controllers A. B. Configure a RAID array in BIOS Setup. Make a floppy disk containing the SATA RAID/AHCI driver for the SATA port. (For example, ... end to available SATA port on this motherboard, the SATA2_0, SATA2_1, SATA2_2, SATA2_3, SATA2_4 and SATA2_5 ports are supported by P55 Chipset.) Then connect the power connector from your power supply to identify the SATA controller for Windows XP. (Note 2) E.
...computer Attach one hard drive. • An empty formatted floppy disk. • Windows Vista/XP setup disk. • Motherboard driver disk. 5-1-1 Configuring Intel P55 SATA Controllers A. B. Configure a RAID array in BIOS Setup. Make a floppy disk containing the SATA RAID/AHCI driver for the SATA port. (For example, ... end to available SATA port on this motherboard, the SATA2_0, SATA2_1, SATA2_2, SATA2_3, SATA2_4 and SATA2_5 ports are supported by P55 Chipset.) Then connect the power connector from your power supply to identify the SATA controller for Windows XP. (Note 2) E.

Manual
Page 87
... Disk Non-RAID Disk Press to create a RAID array, select Create RAID Volume in RAID BIOS Enter the RAID BIOS setup utility to enter the P55 RAID Configuration Utility. Create RAID Volume If you press + , the MAIN MENU screen will appear (Figure 3). Skip this step and proceed with the installation of...
... Disk Non-RAID Disk Press to create a RAID array, select Create RAID Volume in RAID BIOS Enter the RAID BIOS setup utility to enter the P55 RAID Configuration Utility. Create RAID Volume If you press + , the MAIN MENU screen will appear (Figure 3). Skip this step and proceed with the installation of...
Manual
Page 104
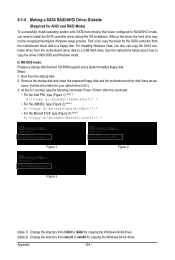
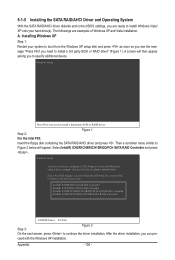
First of all, copy the driver for the SATA controller from \win32 to a floppy disk. Press after the command: • For the Intel P55, type (Figure 1): (Note 1) A:\>copy d:\bootdrv\imsm\32bit\*.* • For the JMB362, type (Figure 2): (Note 1) A:\>copy d:\bootdrv\gsata\32bit\*.* • For the Marvell 9128, type (Figure 3): (...
First of all, copy the driver for the SATA controller from \win32 to a floppy disk. Press after the command: • For the Intel P55, type (Figure 1): (Note 1) A:\>copy d:\bootdrv\imsm\32bit\*.* • For the JMB362, type (Figure 2): (Note 1) A:\>copy d:\bootdrv\gsata\32bit\*.* • For the Marvell 9128, type (Figure 3): (...
Manual
Page 105
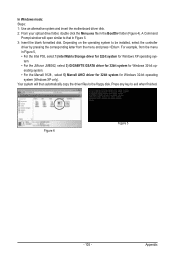
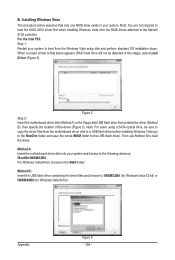
tem. • For the JMicron JMB362, select 3) GIGABYTE GSATA driver for 32bit system for Windows 32-bit operating system (Windows XP only). Figure 4 Figure 5 - 105 - Appendix In Windows mode: Steps: 1: Use an alternative ... system will open similar to be installed, select the controller driver by pressing the corresponding letter from the menu in Figure 5, • For the Intel P55, select 1) Intel Matrix Storage driver for 32bit system for Windows XP operating sys- For example, from the menu and press . A Command Prompt window will then...
tem. • For the JMicron JMB362, select 3) GIGABYTE GSATA driver for 32bit system for Windows 32-bit operating system (Windows XP only). Figure 4 Figure 5 - 105 - Appendix In Windows mode: Steps: 1: Use an alternative ... system will open similar to be installed, select the controller driver by pressing the corresponding letter from the menu in Figure 5, • For the Intel P55, select 1) Intel Matrix Storage driver for 32bit system for Windows XP operating sys- For example, from the menu and press . A Command Prompt window will then...
Manual
Page 106
... to install a 3rd party SCSI or RAID driver" (Figure 1). A screen will appear. Then a controller menu similar to specify additional device. Step 2: Figure 1 For the Intel P55: Insert the floppy disk containing the SATA RAID/AHCI driver and press . After the driver installation, you to Figure 2 below will then appear asking you...
... to install a 3rd party SCSI or RAID driver" (Figure 1). A screen will appear. Then a controller menu similar to specify additional device. Step 2: Figure 1 For the Intel P55: Insert the floppy disk containing the SATA RAID/AHCI driver and press . After the driver installation, you to Figure 2 below will then appear asking you...
Manual
Page 108
... that only one RAID array exists in your system. Method A: Insert the motherboard driver disk into your system to the 64Bit folder. For the Intel P55: Step 1: Restart your system and browse to the following directory: \BootDrv\iMSM\32Bit For Windows Vista 64-bit, browse to boot from the motherboard driver...
... that only one RAID array exists in your system. Method A: Insert the motherboard driver disk into your system to the 64Bit folder. For the Intel P55: Step 1: Restart your system and browse to the following directory: \BootDrv\iMSM\32Bit For Windows Vista 64-bit, browse to boot from the motherboard driver...
Manual
Page 112
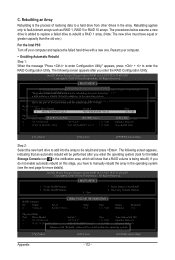
... to Non-RAID 4. Exit a disk initiates a rebuild. The following screen appears after you have equal or greater capacity than the old one.) For the Intel P55: Turn off your computer. • Enabling Automatic Rebuild Step 1: When the message "Press to enter Configuration Utility" appears, press + to enter the RAID Configuration Utility...
... to Non-RAID 4. Exit a disk initiates a rebuild. The following screen appears after you have equal or greater capacity than the old one.) For the Intel P55: Turn off your computer. • Enabling Automatic Rebuild Step 1: When the message "Press to enter Configuration Utility" appears, press + to enter the RAID Configuration Utility...
Manual
Page 114
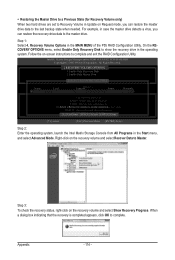
... [ESC]-Previous Menu [ENTER]-Select Step 2: Enter the operating system, launch the Intel Matrix Storage Console from All Programs in the MAIN MENU of the P55 RAID Configuration Utility. When a dialog box indicating that the recovery is completed appears, click OK to the master drive. Enable Only Master Disk [ SELECT RECOVERY...
... [ESC]-Previous Menu [ENTER]-Select Step 2: Enter the operating system, launch the Intel Matrix Storage Console from All Programs in the MAIN MENU of the P55 RAID Configuration Utility. When a dialog box indicating that the recovery is completed appears, click OK to the master drive. Enable Only Master Disk [ SELECT RECOVERY...