Manual
Page 5
... 5 Appendix ...73 5-1 Configuring SATA Hard Drive(s 73 5-1-1 Configuring Intel® ICH9R SATA Controllers 73 5-1-2 Configuring GIGABYTE SATA2 SATA Controller 79 5-1-3 Making a SATA RAID/AHCI Driver Diskette 85 (Required for AHCI and RAID Mode 85 5-1-4 Installing the SATA RAID/AHCI Driver and Operating System 86 5-2 Configuring Audio Input and Output 94 5-2-1 Configuring 2/4/5.1/7.1-Channel Audio 94...
... 5 Appendix ...73 5-1 Configuring SATA Hard Drive(s 73 5-1-1 Configuring Intel® ICH9R SATA Controllers 73 5-1-2 Configuring GIGABYTE SATA2 SATA Controller 79 5-1-3 Making a SATA RAID/AHCI Driver Diskette 85 (Required for AHCI and RAID Mode 85 5-1-4 Installing the SATA RAID/AHCI Driver and Operating System 86 5-2 Configuring Audio Input and Output 94 5-2-1 Configuring 2/4/5.1/7.1-Channel Audio 94...
Manual
Page 43
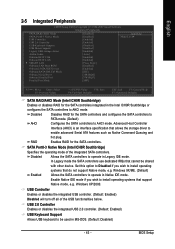
...DOS. (Default: Disabled) - 43 - English 2-5 Integrated Peripherals CMOS Setup Utility-Copyright (C) 1984-2007 Award Software Integrated Peripherals SATA RAID/AHCI Mode SATA Port0-3 Native Mode USB Controller USB 2.0 Controller USB Keyboard Support USB Mouse Support Legacy USB storage detect Azalia Codec Onboard H/W...Values +/-/PU/PD: Value F10: Save F6: Fail-Safe Defaults ESC: Exit F1: General Help F7: Optimized Defaults SATA RAID/AHCI Mode (Intel ICH9R Southbridge) Enables or disables RAID for the SATA controllers. SATA Port0-3 Native Mode (Intel ICH9R Southbridge) Specifies the...
...DOS. (Default: Disabled) - 43 - English 2-5 Integrated Peripherals CMOS Setup Utility-Copyright (C) 1984-2007 Award Software Integrated Peripherals SATA RAID/AHCI Mode SATA Port0-3 Native Mode USB Controller USB 2.0 Controller USB Keyboard Support USB Mouse Support Legacy USB storage detect Azalia Codec Onboard H/W...Values +/-/PU/PD: Value F10: Save F6: Fail-Safe Defaults ESC: Exit F1: General Help F7: Optimized Defaults SATA RAID/AHCI Mode (Intel ICH9R Southbridge) Enables or disables RAID for the SATA controllers. SATA Port0-3 Native Mode (Intel ICH9R Southbridge) Specifies the...
Manual
Page 45
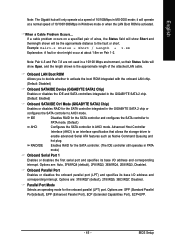
... and SATA controllers integrated in the GIGABYTE SATA 2 chip. (Default: Enabled) Onboard SATA/IDE Ctrl Mode (GIGABYTE SATA2 Chip) Enables or disables RAID for the SATA controller and configures the SATA controller to PATA mode. (Default) Configures the SATA controller to AHCI mode. Options are : 378/IRQ7...specification that allows the storage driver to enable advanced Serial ATA features such as Native Command Queuing and RAID/IDE hot plug. IDE AHCI Disables RAID for the SATA controller integrated in a 10/100 Mbps environment, so their Status fields will operate at about 1.6m ...
... and SATA controllers integrated in the GIGABYTE SATA 2 chip. (Default: Enabled) Onboard SATA/IDE Ctrl Mode (GIGABYTE SATA2 Chip) Enables or disables RAID for the SATA controller and configures the SATA controller to PATA mode. (Default) Configures the SATA controller to AHCI mode. Options are : 378/IRQ7...specification that allows the storage driver to enable advanced Serial ATA features such as Native Command Queuing and RAID/IDE hot plug. IDE AHCI Disables RAID for the SATA controller integrated in a 10/100 Mbps environment, so their Status fields will operate at about 1.6m ...
Manual
Page 61
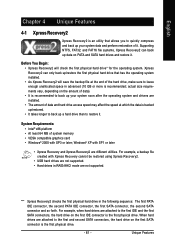
... • Windows® 2000 with Xpress Recovery cannot be restored using Xpress Recovery2. • USB hard drives are not supported. • Hard drives in RAID/AHCI mode are attached to the first IDE and the first SATA connectors, the hard drive on the amount of data). • It is recommended to...
... • Windows® 2000 with Xpress Recovery cannot be restored using Xpress Recovery2. • USB hard drives are not supported. • Hard drives in RAID/AHCI mode are attached to the first IDE and the first SATA connectors, the hard drive on the amount of data). • It is recommended to...
Manual
Page 66
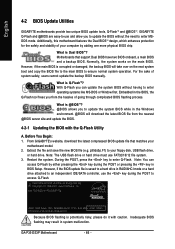
...or hard drive must use the key during the POST or pressing the key in BIOS Setup. GA-P35-DS3P Motherboard - 66 - English 4-2 BIOS Update Utilities GIGABYTE motherboards provide two unique BIOS update tools, Q-FlashTM and @BIOS .TM GIGABYTE Q-Flash and @BIOS are easy-to-use and allow you can access Q-Flash by adding one..., the system works on the next system boot and copy the BIOS file to the main BIOS to update the system BIOS while in RAID/AHCI mode or a hard drive attached to an independent IDE/SATA controller, use FAT32/16/12 file system. 3. However, if the main BIOS is saved...
...or hard drive must use the key during the POST or pressing the key in BIOS Setup. GA-P35-DS3P Motherboard - 66 - English 4-2 BIOS Update Utilities GIGABYTE motherboards provide two unique BIOS update tools, Q-FlashTM and @BIOS .TM GIGABYTE Q-Flash and @BIOS are easy-to-use and allow you can access Q-Flash by adding one..., the system works on the next system boot and copy the BIOS file to the main BIOS to update the system BIOS while in RAID/AHCI mode or a hard drive attached to an independent IDE/SATA controller, use FAT32/16/12 file system. 3. However, if the main BIOS is saved...
Manual
Page 67
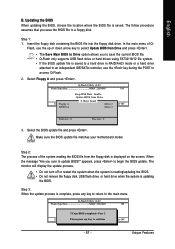
... Type/Size MXIC 25L8005 1M EnteFr l:oRppuyn A HDD 0-0 Keep DMI Data Enable Update BIOS from the floppy disk is saved to a hard drive in RAID/AHCI mode or a hard drive attached to an independent IDE/SATA controller, use the up or down arrow key to select Update BIOS from Drive and...
... Type/Size MXIC 25L8005 1M EnteFr l:oRppuyn A HDD 0-0 Keep DMI Data Enable Update BIOS from the floppy disk is saved to a hard drive in RAID/AHCI mode or a hard drive attached to an independent IDE/SATA controller, use the up or down arrow key to select Update BIOS from Drive and...
Manual
Page 73
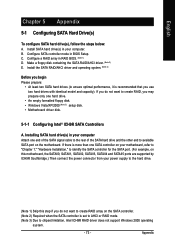
... signal cable to the rear of the SATA hard drive and the other end to create RAID array on the motherboard. C . Install the SATA RAID/AHCI driver and operating system. (Note 2) Before you begin Please prepare: • At least two SATA hard drives (to ensure optimal performance, it is ... array in your power supply to chipset limitation, Intel ICH9R RAID driver does not support Windows 2000 operating system. - 73 - If there is set to AHCI or RAID mode. (Note 3) Due to the hard drive. (Note 1) Skip this step if you use two hard drives with identical model and capacity). B....
... signal cable to the rear of the SATA hard drive and the other end to create RAID array on the motherboard. C . Install the SATA RAID/AHCI driver and operating system. (Note 2) Before you begin Please prepare: • At least two SATA hard drives (to ensure optimal performance, it is ... array in your power supply to chipset limitation, Intel ICH9R RAID driver does not support Windows 2000 operating system. - 73 - If there is set to AHCI or RAID mode. (Note 3) Due to the hard drive. (Note 1) Skip this step if you use two hard drives with identical model and capacity). B....
Manual
Page 74
... the SATA controller mode correctly in BIOS Setup Make sure to Disabled or AHCI. The actual BIOS Setup menu options you will see shall depend on your motherboard. English B. If you have and the BIOS version. GA-P35-DS3P Motherboard - 74 - Step 1: Turn on the motherboard you do not ...want to create RAID, set SATA RAID/AHCI Mode under the Integrated Peripherals menu to enter BIOS Setup during the POST (Power-On ...
... the SATA controller mode correctly in BIOS Setup Make sure to Disabled or AHCI. The actual BIOS Setup menu options you will see shall depend on your motherboard. English B. If you have and the BIOS version. GA-P35-DS3P Motherboard - 74 - Step 1: Turn on the motherboard you do not ...want to create RAID, set SATA RAID/AHCI Mode under the Integrated Peripherals menu to enter BIOS Setup during the POST (Power-On ...
Manual
Page 77
... ICH9R wRAID5 Copyright(C) 2003-07 Intel Corporation. Are you sure you want to create this volume, press to confirm or to create the SATA RAID/AHCI driver diskette and the installation of the SATA RAID/ACHI driver and operating system. - 77 - Create RAID Volume 2. Exit RAID Volumes : ID Name 0 Volume0 Physical...
... ICH9R wRAID5 Copyright(C) 2003-07 Intel Corporation. Are you sure you want to create this volume, press to confirm or to create the SATA RAID/AHCI driver diskette and the installation of the SATA RAID/ACHI driver and operating system. - 77 - Create RAID Volume 2. Exit RAID Volumes : ID Name 0 Volume0 Physical...
Manual
Page 79
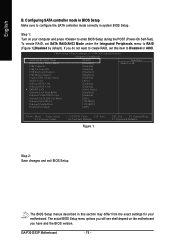
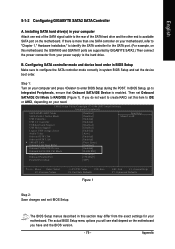
...For example, on this motherboard, the GSATAII0 and GSATAII1 ports are supported by GIGABYTE SATA2.) Then connect the power connector from your motherboard. English 5-1-2 Configuring GIGABYTE SATA2 SATA Controller A. Installing SATA hard drive(s) in your computer Attach one... SATA controller on your computer and press to the hard drive. B. Configuring SATA controller mode and device boot order in BIOS Setup Make sure to configure the SATA controller mode correctly in this item to IDE or AHCI...
...For example, on this motherboard, the GSATAII0 and GSATAII1 ports are supported by GIGABYTE SATA2.) Then connect the power connector from your motherboard. English 5-1-2 Configuring GIGABYTE SATA2 SATA Controller A. Installing SATA hard drive(s) in your computer Attach one... SATA controller on your computer and press to the hard drive. B. Configuring SATA controller mode and device boot order in BIOS Setup Make sure to configure the SATA controller mode correctly in this item to IDE or AHCI...
Manual
Page 84
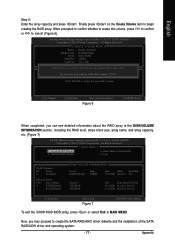
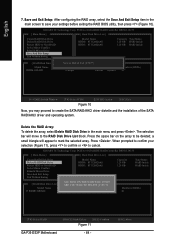
GIGABYTE Technology Corp. PCIE-to-SATAII/IDE RAID Controller BIOSv1.06.59 [ Main Menu ] [ Hard Disk Drive List ] Create RAID Disk Drive Delete RAID Disk Drive Revert HDD to create the SATA RAID/AHCI driver diskette and the installation of the SATA RAID/AHCI driver and operating ...system. Save and Exit Setup: After configuring the RAID array, select the Save And Exit Setup item in the main menu and press . ARE YOU SURE TO DELETE (Y/N)? English 7. N RAID Level Capacity Status 0-Stripe 240 GB Normal Members(HDDx) 01 [KL]-Select RAID GA-P35-DS3P...
GIGABYTE Technology Corp. PCIE-to-SATAII/IDE RAID Controller BIOSv1.06.59 [ Main Menu ] [ Hard Disk Drive List ] Create RAID Disk Drive Delete RAID Disk Drive Revert HDD to create the SATA RAID/AHCI driver diskette and the installation of the SATA RAID/AHCI driver and operating ...system. Save and Exit Setup: After configuring the RAID array, select the Save And Exit Setup item in the main menu and press . ARE YOU SURE TO DELETE (Y/N)? English 7. N RAID Level Capacity Status 0-Stripe 240 GB Normal Members(HDDx) 01 [KL]-Select RAID GA-P35-DS3P...

Manual
Page 85
...Intel Matrix Storage Manager 64 bit for Windows 64-bit. • For GIGABYTE SATA2 SATA controller, select E) GIGABYTE SATA-RAID Driver 32Bit for Windows 32-bit operating system or F) GIGABYTE SATA-RAID Driver 64Bit for AHCI and RAID Mode) To successfully install operating system onto SATA hard drive(s) ...that has CD-ROM support and a blank formatted floppy disk. Prepare a startup disk that is/are configured to RAID/AHCI mode, you need to ...
...Intel Matrix Storage Manager 64 bit for Windows 64-bit. • For GIGABYTE SATA2 SATA controller, select E) GIGABYTE SATA-RAID Driver 32Bit for Windows 32-bit operating system or F) GIGABYTE SATA-RAID Driver 64Bit for AHCI and RAID Mode) To successfully install operating system onto SATA hard drive(s) ...that has CD-ROM support and a blank formatted floppy disk. Prepare a startup disk that is/are configured to RAID/AHCI mode, you need to ...
Manual
Page 86
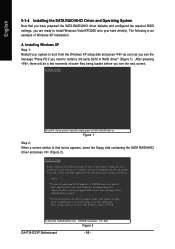
... Device ENTER=Continue F3=Exit Figure 2 GA-P35-DS3P Motherboard - 86 - After pressing , there will load support for use with Windows, press ENTER. Currently, Setup will be a few moments of one or more mass storage devices installed in your hard drive(s). English 5-1-4 Installing the SATA RAID/AHCI Driver and Operating System Now that below...
... Device ENTER=Continue F3=Exit Figure 2 GA-P35-DS3P Motherboard - 86 - After pressing , there will load support for use with Windows, press ENTER. Currently, Setup will be a few moments of one or more mass storage devices installed in your hard drive(s). English 5-1-4 Installing the SATA RAID/AHCI Driver and Operating System Now that below...

Manual
Page 87
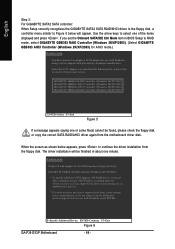
...items displayed and press . When the screen as shown below will be found, please check the floppy disk or copy the correct SATA RAID/AHCI driver again from the floppy disk. S=Specify Additional Device ENTER=Continue F3=Exit Figure 4 - 87 - Use the arrow keys to specify additional...some file(s) cannot be finished in BIOS Setup to RAID mode, select Intel(R) ICH8R/ICH9R SATA RAID Controller. (Select ICH9 SATA AHCI Controller (Desktop ICH9R) for AHCI mode.) Windows Setup You have any device support disks from the following mass storage device(s): Intel(R) ICH8R/ICH9R SATA RAID Controller *...
...items displayed and press . When the screen as shown below will be found, please check the floppy disk or copy the correct SATA RAID/AHCI driver again from the floppy disk. S=Specify Additional Device ENTER=Continue F3=Exit Figure 4 - 87 - Use the arrow keys to specify additional...some file(s) cannot be finished in BIOS Setup to RAID mode, select Intel(R) ICH8R/ICH9R SATA RAID Controller. (Select ICH9 SATA AHCI Controller (Desktop ICH9R) for AHCI mode.) Windows Setup You have any device support disks from the following mass storage device(s): Intel(R) ICH8R/ICH9R SATA RAID Controller *...
Manual
Page 88
... ENTER=Continue F3=Exit Figure 6 GA-P35-DS3P Motherboard - 88 - English Step 3: For GIGABYTE SATA2 SATA controller: When Setup correctly recognizes the GIGABYTE SATA2 SATA RAID/AHCI driver in BIOS Setup to RAID mode, select GIGABYTE GBB363 RAID Controller (Windows 2K/XP/2003). (Select GIGABYTE GBB363 AHCI Controller (Windows 2K/XP/2003) for AHCI mode.) Windows Setup You have a device...
... ENTER=Continue F3=Exit Figure 6 GA-P35-DS3P Motherboard - 88 - English Step 3: For GIGABYTE SATA2 SATA controller: When Setup correctly recognizes the GIGABYTE SATA2 SATA RAID/AHCI driver in BIOS Setup to RAID mode, select GIGABYTE GBB363 RAID Controller (Windows 2K/XP/2003). (Select GIGABYTE GBB363 AHCI Controller (Windows 2K/XP/2003) for AHCI mode.) Windows Setup You have a device...

Manual
Page 89
WindowsXP Professional Setup Welcome to run on your computer. English Step 4: After the SATA RAID/AHCI driver installation is completed, you can proceed with the Windows XP installation. This port of the Setup program prepares Microsoft(R) Windows (R) XP to Setup. To repair a Windows XP installation using Recovery Console, press R. Appendix To quit Setup without installing Windows XP, press F3. Enter= Continue R=Repair F3=Exit Figure 7 - 89 - To set up Windows XP now, press ENTER.
WindowsXP Professional Setup Welcome to run on your computer. English Step 4: After the SATA RAID/AHCI driver installation is completed, you can proceed with the Windows XP installation. This port of the Setup program prepares Microsoft(R) Windows (R) XP to Setup. To repair a Windows XP installation using Recovery Console, press R. Appendix To quit Setup without installing Windows XP, press F3. Enter= Continue R=Repair F3=Exit Figure 7 - 89 - To set up Windows XP now, press ENTER.

Manual
Page 91
Appendix Figure 11 (Note) The item displayed in Figure 10 will be shown as shown in Figure 10 appears, select Intel(R) ICH8R/ICH9R SATA RAID Controller (Note) and press Next. English Step 3: When a screen as Intel(R) ICH9 SATA AHCI Controller when the SATA controllers are set to continue the OS installation (Figure 11). Figure 10 Step 4: After the driver is loaded, select the RAID/AHCI drive(s) where you want to install the operating system and then press Next to AHCI mode. - 91 -
Appendix Figure 11 (Note) The item displayed in Figure 10 will be shown as shown in Figure 10 appears, select Intel(R) ICH8R/ICH9R SATA RAID Controller (Note) and press Next. English Step 3: When a screen as Intel(R) ICH9 SATA AHCI Controller when the SATA controllers are set to continue the OS installation (Figure 11). Figure 10 Step 4: After the driver is loaded, select the RAID/AHCI drive(s) where you want to install the operating system and then press Next to AHCI mode. - 91 -
Manual
Page 92
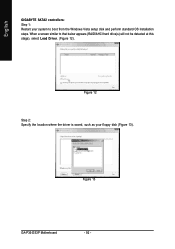
English GIGABYTE SATA2 controllers: Step 1: Restart your floppy disk (Figure 13). When a screen similar to boot from the Windows Vista setup disk and perform standard OS installation steps. Figure 12 Step 2: Specify the location where the driver is saved, such as your system to that below appears (RAID/AHCI hard drive(s) will not be detected at this stage), select Load Driver. (Figure 12). Figure 13 GA-P35-DS3P Motherboard - 92 -
English GIGABYTE SATA2 controllers: Step 1: Restart your floppy disk (Figure 13). When a screen similar to boot from the Windows Vista setup disk and perform standard OS installation steps. Figure 12 Step 2: Specify the location where the driver is saved, such as your system to that below appears (RAID/AHCI hard drive(s) will not be detected at this stage), select Load Driver. (Figure 12). Figure 13 GA-P35-DS3P Motherboard - 92 -

Manual
Page 93
Figure 15 - 93 - Figure 14 Step 4: After the driver is loaded, select the RAID/AHCI drive(s) where you want to install the operating system and then press Next to continue the OS installation (Figure 15). Appendix English Step 3: When a screen as shown in Figure 14 appears, select GIGABYTE GBB36X Controller and press Next.
Figure 15 - 93 - Figure 14 Step 4: After the driver is loaded, select the RAID/AHCI drive(s) where you want to install the operating system and then press Next to continue the OS installation (Figure 15). Appendix English Step 3: When a screen as shown in Figure 14 appears, select GIGABYTE GBB36X Controller and press Next.

