Manual
Page 61
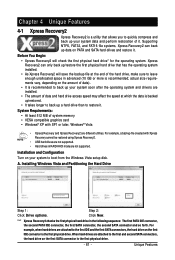
...recommended to back up a hard drive than to leave enough unallocated space in advanced (10 GB or more is recommended; Installation and Configuration Turn on the first IDE connector is the first physical drive. Installing Windows Vista and Partitioning the Hard Drive Step 1: Click Drive options. "*" Xpress Recovery2 ...drives are attached to the first IDE and the first SATA connectors, the hard drive on your system soon after the operating system and drivers are installed. • The amount of data and hard drive access speed may affect the speed at the end of system memory &#...
...recommended to back up a hard drive than to leave enough unallocated space in advanced (10 GB or more is recommended; Installation and Configuration Turn on the first IDE connector is the first physical drive. Installing Windows Vista and Partitioning the Hard Drive Step 1: Click Drive options. "*" Xpress Recovery2 ...drives are attached to the first IDE and the first SATA connectors, the hard drive on your system soon after the operating system and drivers are installed. • The amount of data and hard drive access speed may affect the speed at the end of system memory &#...
Manual
Page 84
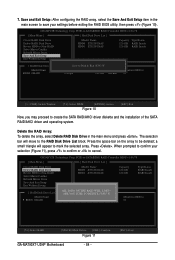
...GA-MA790XT-UD4P Motherboard - 84 - [ESC]-Abort When prompted to create the SATA RAID/AHCI driver diskette and the installation of the SATA RAID/AHCI driver and operating system. Save and Exit Setup: After configuring the RAID array, select the Save And Exit Setup item in the main menu and press . GIGABYTE...& Exit (Y/N)?Y RAID Level 0-Stripe Capacity Status 240 GB Normal Members(HDDx) 01 [TAB]-Switch Window []-Select ITEM [ENTER]-Action Figure 10 [ESC]-Exit Now, you may proceed to confirm your settings before exiting the RAID BIOS utility, then press...
...GA-MA790XT-UD4P Motherboard - 84 - [ESC]-Abort When prompted to create the SATA RAID/AHCI driver diskette and the installation of the SATA RAID/AHCI driver and operating system. Save and Exit Setup: After configuring the RAID array, select the Save And Exit Setup item in the main menu and press . GIGABYTE...& Exit (Y/N)?Y RAID Level 0-Stripe Capacity Status 240 GB Normal Members(HDDx) 01 [TAB]-Switch Window []-Select ITEM [ENTER]-Action Figure 10 [ESC]-Exit Now, you may proceed to confirm your settings before exiting the RAID BIOS utility, then press...


