Manual
Page 3
... detailed product information, carefully read the User's Manual. „ For instructions on your motherboard revision before updating motherboard BIOS, drivers, or when looking for technical information. For example, "REV: 1.0" means the revision of GIGABYTE branded motherboards. Check your motherboard looks like this manual are legally registered to use of this manual is...
... detailed product information, carefully read the User's Manual. „ For instructions on your motherboard revision before updating motherboard BIOS, drivers, or when looking for technical information. For example, "REV: 1.0" means the revision of GIGABYTE branded motherboards. Check your motherboard looks like this manual are legally registered to use of this manual is...
Manual
Page 4
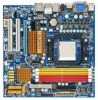
Table of Contents Box Contents ...6 OptionalItems ...6 GA-MA78GPM-DS2H/GA-MA78GM-DS2H Motherboard Layout 7 Block Diagram ...8 Chapter 1 Hardware Installation 9 1-1 Installation Precautions 9 1-2 Product Specifications 10 1-3 Installing the CPU and ...Hybrid CrossFireX Function 19 1-7 Back Panel Connectors 20 1-8 Internal Connectors 23 Chapter 2 BIOS Setup 35 2-1 Startup Screen 36 2-2 The Main Menu 37 2-3 MB Intelligent Tweaker(M.I.T 39 2-4 Standard CMOS Features 43 2-5 Advanced BIOS Features 45 2-6 IntegratedPeripherals 47 2-7 Power Management Setup 50 2-8 PnP/PCI Configurations ...
Table of Contents Box Contents ...6 OptionalItems ...6 GA-MA78GPM-DS2H/GA-MA78GM-DS2H Motherboard Layout 7 Block Diagram ...8 Chapter 1 Hardware Installation 9 1-1 Installation Precautions 9 1-2 Product Specifications 10 1-3 Installing the CPU and ...Hybrid CrossFireX Function 19 1-7 Back Panel Connectors 20 1-8 Internal Connectors 23 Chapter 2 BIOS Setup 35 2-1 Startup Screen 36 2-2 The Main Menu 37 2-3 MB Intelligent Tweaker(M.I.T 39 2-4 Standard CMOS Features 43 2-5 Advanced BIOS Features 45 2-6 IntegratedPeripherals 47 2-7 Power Management Setup 50 2-8 PnP/PCI Configurations ...
Manual
Page 5
... 60 3-3 Driver CD Information 60 3-4 Hardware Information 61 3-5 Contact Us ...61 Chapter 4 Unique Features 63 4-1 Xpress Recovery2 63 4-2 BIOS Update Utilities 68 4-2-1 Updating the BIOS with the Q-Flash Utility 68 4-2-2 Updating the BIOS with the @BIOS Utility 71 4-3 EasyTune 5 Pro 72 Chapter 5 Appendix ...73 5-1 Configuring SATA Hard Drive(s 73 5-1-1 Configuring the Onboard SATA Controller...
... 60 3-3 Driver CD Information 60 3-4 Hardware Information 61 3-5 Contact Us ...61 Chapter 4 Unique Features 63 4-1 Xpress Recovery2 63 4-2 BIOS Update Utilities 68 4-2-1 Updating the BIOS with the Q-Flash Utility 68 4-2-2 Updating the BIOS with the @BIOS Utility 71 4-3 EasyTune 5 Pro 72 Chapter 5 Appendix ...73 5-1 Configuring SATA Hard Drive(s 73 5-1-1 Configuring the Onboard SATA Controller...
Manual
Page 8
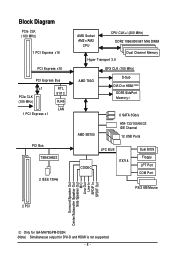
...-D or HDMI (Note) DDR3 SidePort Memory AMD SB700 6 SATA 3Gb/s ATA-133/100/66/33 IDE Channel 12 USB Ports CODEC LPC BUS IT8718 Dual BIOS Floppy LPT Port COM Port PS/2 KB/Mouse 2 PCI Surround Speaker Out Center/Subwoofer Speaker Out Side Speaker Out MIC Line-Out Line-In SPDIF...
...-D or HDMI (Note) DDR3 SidePort Memory AMD SB700 6 SATA 3Gb/s ATA-133/100/66/33 IDE Channel 12 USB Ports CODEC LPC BUS IT8718 Dual BIOS Floppy LPT Port COM Port PS/2 KB/Mouse 2 PCI Surround Speaker Out Center/Subwoofer Speaker Out Side Speaker Out MIC Line-Out Line-In SPDIF...
Manual
Page 11
... temperature detection Š CPU/System fan speed detection Š CPU overheating warning Š CPU/System fan fail warning Š CPU/System fan speed control (Note 5) BIOS Š 2 x 8 Mbit flash Š Use of licensed AWARD BIOS Š Support for DualBIOSTM Š PnP 1.0a, DMI 2.0, SM...
... temperature detection Š CPU/System fan speed detection Š CPU overheating warning Š CPU/System fan fail warning Š CPU/System fan speed control (Note 5) BIOS Š 2 x 8 Mbit flash Š Use of licensed AWARD BIOS Š Support for DualBIOSTM Š PnP 1.0a, DMI 2.0, SM...
Manual
Page 12
... Center Š Support for Q-Flash Š Support for EasyTune (Note 6) Š Support for Xpress Install Š Support for Xpress Recovery2 Š Support for Virtual Dual BIOS Š Norton Internet Security (OEM version) Š Support for Microsoft® Windows® Vista/XP Š Micro ATX Form Factor; 24.4cm x 24.4cm (Note... fan speed control function is supported will depend on the CPU/ system cooler you install. (Note 6) Available functions in EasyTune may differ by motherboard model. GA-MA78G(P)M-DS2H Motherboard - 12 -
... Center Š Support for Q-Flash Š Support for EasyTune (Note 6) Š Support for Xpress Install Š Support for Xpress Recovery2 Š Support for Virtual Dual BIOS Š Norton Internet Security (OEM version) Š Support for Microsoft® Windows® Vista/XP Š Micro ATX Form Factor; 24.4cm x 24.4cm (Note... fan speed control function is supported will depend on the CPU/ system cooler you install. (Note 6) Available functions in EasyTune may differ by motherboard model. GA-MA78G(P)M-DS2H Motherboard - 12 -
Manual
Page 16
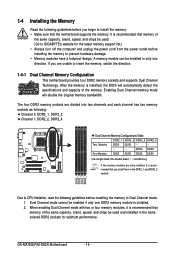
... Configurations Table DDR2_1 DDR2_2 DDR2_3 DDR2_4 Two Modules DS/SS DS/SS - - - - - - - - GA-MA78G(P)M-DS2H Motherboard - 16 - The four DDR2 memory sockets are unable to insert the memory, switch the direction. 1-4-1 ...=Single-Sided, DS=Double-Sided, "- -"=No Memory) If two memory modules are to GIGABYTE's website for optimum performance. Dual Channel mode cannot be used . (Go to be installed...After the memory is recommended that memory of the memory. It is installed, the BIOS will double the original memory bandwidth. Enabling Dual Channel memory mode will automatically detect...
... Configurations Table DDR2_1 DDR2_2 DDR2_3 DDR2_4 Two Modules DS/SS DS/SS - - - - - - - - GA-MA78G(P)M-DS2H Motherboard - 16 - The four DDR2 memory sockets are unable to insert the memory, switch the direction. 1-4-1 ...=Single-Sided, DS=Double-Sided, "- -"=No Memory) If two memory modules are to GIGABYTE's website for optimum performance. Dual Channel mode cannot be used . (Go to be installed...After the memory is recommended that memory of the memory. It is installed, the BIOS will double the original memory bandwidth. Enabling Dual Channel memory mode will automatically detect...

Manual
Page 18
...(s). 6. If necessary, go to BIOS Setup to the chassis back panel with the expansion card in the expansion slot. 1. Remove the metal slot cover from the slot. Turn on the slot and then lift the card straight out from the chassis back panel. 2. GA-MA78G(P)M-DS2H Motherboard - 18 - PCI Express ... back on the lever on your card. Align the card with your expansion card(s). 7. Secure the card's metal bracket to make any required BIOS changes for your expansion card. • Always turn off the computer and unplug the power cord from the power outlet before you begin to install...
...(s). 6. If necessary, go to BIOS Setup to the chassis back panel with the expansion card in the expansion slot. 1. Remove the metal slot cover from the slot. Turn on the slot and then lift the card straight out from the chassis back panel. 2. GA-MA78G(P)M-DS2H Motherboard - 18 - PCI Express ... back on the lever on your card. Align the card with your expansion card(s). 7. Secure the card's metal bracket to make any required BIOS changes for your expansion card. • Always turn off the computer and unplug the power cord from the power outlet before you begin to install...
Manual
Page 19
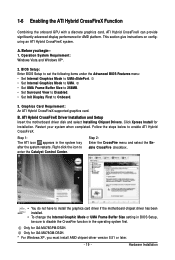
...when completed. Graphics Card Requirement: An ATI Hybrid CrossFireX-supported graphics card. Only for GA-MA78GM-DS2H. * For Windows XP, you begin-1. BIOS Setup: Enter BIOS Setup to set the following items under the Advanced BIOS Features menu: • Set Internal Graphics Mode to UMA+SidePort. • Set.... • Set Init Display First to disable the CrossFire function in the system tray after the system restarts. Only for GA-MA78GPM-DS2H. Follow the steps below to enter the Catalyst Control Center. Step 1: The ATI icon appears in the operating system first....
...when completed. Graphics Card Requirement: An ATI Hybrid CrossFireX-supported graphics card. Only for GA-MA78GM-DS2H. * For Windows XP, you begin-1. BIOS Setup: Enter BIOS Setup to set the following items under the Advanced BIOS Features menu: • Set Internal Graphics Mode to UMA+SidePort. • Set.... • Set Init Display First to disable the CrossFire function in the system tray after the system restarts. Only for GA-MA78GPM-DS2H. Follow the steps below to enter the Catalyst Control Center. Step 1: The ATI icon appears in the operating system first....

Manual
Page 20
... Port The D-Sub port supports a 15-pin D-Sub connector. Refer the figures below for details.), and enter BIOS Setup, then set Onboard VGA output connect to D-SUB/ HDMI under Advanced BIOS Features. • Please note the HDMI audio output only supports AC3, DTS and 2-channel-LPCM formats. (AC3...default device for sound playback to transmit the uncompressed audio/video signals and is the HDMI device. (The item name may differ by operating system. GA-MA78G(P)M-DS2H Motherboard - 20 - 1-7 Back Panel Connectors PS/2 Keyboard and PS/2 Mouse Port Use the upper port (green) to connect a PS/2 ...
... Port The D-Sub port supports a 15-pin D-Sub connector. Refer the figures below for details.), and enter BIOS Setup, then set Onboard VGA output connect to D-SUB/ HDMI under Advanced BIOS Features. • Please note the HDMI audio output only supports AC3, DTS and 2-channel-LPCM formats. (AC3...default device for sound playback to transmit the uncompressed audio/video signals and is the HDMI device. (The item name may differ by operating system. GA-MA78G(P)M-DS2H Motherboard - 20 - 1-7 Back Panel Connectors PS/2 Keyboard and PS/2 Mouse Port Use the upper port (green) to connect a PS/2 ...

Manual
Page 22
... information) • Playback software: CyberLink PowerDVD 7.3 or above ) • Memory: Two 1 GB DDR2 800 memory modules with dual channel mode enabled • BIOS Setup: At least 256 MB of HD DVD and Blu-ray Discs: In order to get better playback quality, when playing the HD DVD or... HD-DVD Blu-ray Suitable Resolution Windows XP Windows Vista 1920 x 1080p 1920 x 1080p 1920 x 1080p 1920 x 1080p 1920 x 1080p 1920 x 1080p GA-MA78G(P)M-DS2H Motherboard - 22 - In addition to the default speakers settings, the ~ audio jacks can be connected to the default Mic in jack. Playback of UMA ...
... information) • Playback software: CyberLink PowerDVD 7.3 or above ) • Memory: Two 1 GB DDR2 800 memory modules with dual channel mode enabled • BIOS Setup: At least 256 MB of HD DVD and Blu-ray Discs: In order to get better playback quality, when playing the HD DVD or... HD-DVD Blu-ray Suitable Resolution Windows XP Windows Vista 1920 x 1080p 1920 x 1080p 1920 x 1080p 1920 x 1080p 1920 x 1080p 1920 x 1080p GA-MA78G(P)M-DS2H Motherboard - 22 - In addition to the default speakers settings, the ~ audio jacks can be connected to the default Mic in jack. Playback of UMA ...
Manual
Page 28
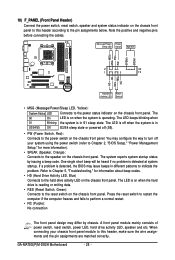
... state. Message/Power/ Power Sleep LED Switch Speaker MSG+ MSG- When connecting your system using the power switch (refer to Chapter 2, "BIOS Setup," "Power Management Setup," for information about beep codes. • HD (Hard Drive Activity LED, Blue) Connects to the hard drive...to the speaker on the chassis front panel. The system reports system startup status by chassis. If a problem is detected at system startup. GA-MA78G(P)M-DS2H Motherboard - 28 - Press the reset switch to restart the computer if the computer freezes and fails to perform a normal restart. •...
... state. Message/Power/ Power Sleep LED Switch Speaker MSG+ MSG- When connecting your system using the power switch (refer to Chapter 2, "BIOS Setup," "Power Management Setup," for information about beep codes. • HD (Hard Drive Activity LED, Blue) Connects to the hard drive...to the speaker on the chassis front panel. The system reports system startup status by chassis. If a problem is detected at system startup. GA-MA78G(P)M-DS2H Motherboard - 28 - Press the reset switch to restart the computer if the computer freezes and fails to perform a normal restart. •...
Manual
Page 33
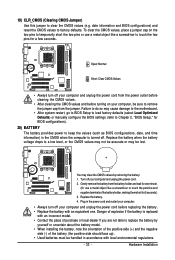
... cause damage to the motherboard. • After system restart, go to BIOS Setup to load factory defaults (select Load Optimized Defaults) or manually configure the BIOS settings (refer to Chapter 2, "BIOS Setup," for BIOS configurations). 20) BATTERY The battery provides power to keep the values (such... regulations. - 33 - Replace the battery when the battery voltage drops to replace the battery by removing the battery: 1. date information and BIOS configurations) and reset the CMOS values to clear the CMOS values (e.g. Replace the battery. 4. 19) CLR_CMOS (Clearing CMOS Jumper) Use this...
... cause damage to the motherboard. • After system restart, go to BIOS Setup to load factory defaults (select Load Optimized Defaults) or manually configure the BIOS settings (refer to Chapter 2, "BIOS Setup," for BIOS configurations). 20) BATTERY The battery provides power to keep the values (such... regulations. - 33 - Replace the battery when the battery voltage drops to replace the battery by removing the battery: 1. date information and BIOS configurations) and reset the CMOS values to clear the CMOS values (e.g. Replace the battery. 4. 19) CLR_CMOS (Clearing CMOS Jumper) Use this...
Manual
Page 35
When the power is turned on using the current version of BIOS, it with caution. To upgrade the BIOS, use either the GIGABYTE Q-Flash or @BIOS utility. • Q-Flash allows the user to quickly and easily upgrade or back up BIOS without entering the operating system. • @BIOS is a Windows-based utility that you do it is...
When the power is turned on using the current version of BIOS, it with caution. To upgrade the BIOS, use either the GIGABYTE Q-Flash or @BIOS utility. • Q-Flash allows the user to quickly and easily upgrade or back up BIOS without entering the operating system. • @BIOS is a Windows-based utility that you do it is...

Manual
Page 36
To exit Boot Menu, press . After system restart, the device boot order will display a message during the POST. GA-MA78G(P)M-DS2H Motherboard - 36 - When the motherboard is set the first boot device without having to XpressRecovery2 during the POST, telling you want to...." : Boot Menu Boot Menu allows you have ever entered Xpress Recovery2 to AHCI mode and enable hot plug functionality for one time only. GA-MA78GPM-DS2H E6 . . . . : BIOS Setup : XpressRecovery2 : Boot Menu : Qflash 05/28/2008-RS780-SB700-6A66AG0CC-00 Function Keys SATA Mode Message: "SATA is running at ...
To exit Boot Menu, press . After system restart, the device boot order will display a message during the POST. GA-MA78G(P)M-DS2H Motherboard - 36 - When the motherboard is set the first boot device without having to XpressRecovery2 during the POST, telling you want to...." : Boot Menu Boot Menu allows you have ever entered Xpress Recovery2 to AHCI mode and enable hot plug functionality for one time only. GA-MA78GPM-DS2H E6 . . . . : BIOS Setup : XpressRecovery2 : Boot Menu : Qflash 05/28/2008-RS780-SB700-6A66AG0CC-00 Function Keys SATA Mode Message: "SATA is running at ...
Manual
Page 37
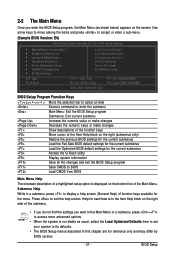
... the Q-Flash utility Display system information Save all the changes and exit the BIOS Setup program Save CMOS to its defaults. • The BIOS Setup menus described in a submenu, press to BIOS F12: Load CMOS from BIOS Main Menu Help The onscreen description of a highlighted setup option is not stable... as shown below) appears on the bottom line of the Main Menu. BIOS Setup 2-2 The Main Menu Once you want in the Main Menu or a submenu, press + to access more advanced options. • When the...
... the Q-Flash utility Display system information Save all the changes and exit the BIOS Setup program Save CMOS to its defaults. • The BIOS Setup menus described in a submenu, press to BIOS F12: Load CMOS from BIOS Main Menu Help The onscreen description of a highlighted setup option is not stable... as shown below) appears on the bottom line of the Main Menu. BIOS Setup 2-2 The Main Menu Once you want in the Main Menu or a submenu, press + to access more advanced options. • When the...
Manual
Page 38
You can create up to the CMOS and exit BIOS Setup. (Pressing can also carry out this task.) GA-MA78G(P)M-DS2H Motherboard - 38 - An user password only allows you to view the BIOS settings but not to make changes in the BIOS Setup program to 8 profiles (Profile 1-8) and name each profile. „ The Functions of the...
You can create up to the CMOS and exit BIOS Setup. (Pressing can also carry out this task.) GA-MA78G(P)M-DS2H Motherboard - 38 - An user password only allows you to view the BIOS settings but not to make changes in the BIOS Setup program to 8 profiles (Profile 1-8) and name each profile. „ The Functions of the...

Manual
Page 39
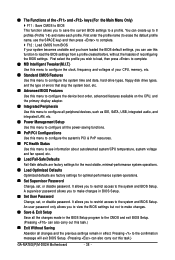
BIOS Setup Only for advanced users only and we recommend you made is recommended that supports this feature. - 39 - Incorrectly doing overclock/overvoltage may result in system's failure to CPU, chipset, or memory and reduce the useful life of these components. This page is for GA-MA78GPM-DS2H. (Note) This item is present only...
BIOS Setup Only for advanced users only and we recommend you made is recommended that supports this feature. - 39 - Incorrectly doing overclock/overvoltage may result in system's failure to CPU, chipset, or memory and reduce the useful life of these components. This page is for GA-MA78GPM-DS2H. (Note) This item is present only...
Manual
Page 40
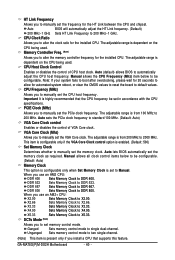
...mode. DCTs Mode (Note) Allows you use an AM2+ CPU: X2.00 Sets Memory Clock to X2.00. Auto BIOS will automatically adjust the HT Link frequency. (Default) 200 MHz~1 GHz Sets HT Link Frequency to default values. CPU ... enabled. (Default: 500) Set Memory Clock Determines whether to manually set the CPU host frequency. Auto (default) allows BIOS to standard 100 MHz. (Default: Auto) VGA Core Clock control Enables or disables the control of CPU host clock. ... set the memory clock as required. X5.33 Sets Memory Clock to X2.66. GA-MA78G(P)M-DS2H Motherboard - 40 -
...mode. DCTs Mode (Note) Allows you use an AM2+ CPU: X2.00 Sets Memory Clock to X2.00. Auto BIOS will automatically adjust the HT Link frequency. (Default) 200 MHz~1 GHz Sets HT Link Frequency to default values. CPU ... enabled. (Default: 500) Set Memory Clock Determines whether to manually set the CPU host frequency. Auto (default) allows BIOS to standard 100 MHz. (Default: Auto) VGA Core Clock control Enables or disables the control of CPU host clock. ... set the memory clock as required. X5.33 Sets Memory Clock to X2.66. GA-MA78G(P)M-DS2H Motherboard - 40 -
Manual
Page 41
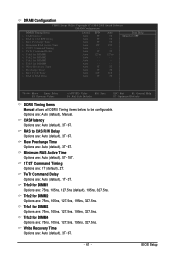
... are : Auto (default), 3T~6T. - 41 - Options are : Auto (default), 3T~6T. Trfc0 for DIMM2 Options are : 75ns, 105ns, 127.5ns (default), 195ns, 327.5ns. BIOS Setup Trfc2 for DIMM1 Options are : 75ns, 105ns, 127.5ns, 195ns, 327.5ns. Write Recovery Time Options are : 75ns, 105ns, 127.5ns, 195ns, 327.5ns...
... are : Auto (default), 3T~6T. - 41 - Options are : Auto (default), 3T~6T. Trfc0 for DIMM2 Options are : 75ns, 105ns, 127.5ns (default), 195ns, 327.5ns. BIOS Setup Trfc2 for DIMM1 Options are : 75ns, 105ns, 127.5ns, 195ns, 327.5ns. Write Recovery Time Options are : 75ns, 105ns, 127.5ns, 195ns, 327.5ns...


