Manual
Page 4
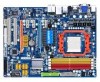
Table of Contents Box Contents ...6 OptionalItems...6 GA-MA780G-UD3H Motherboard Layout 7 Block Diagram...8 Chapter 1 Hardware Installation 9 1-1 Installation Precautions 9 1-2 Product Specifications 10 1-3 Installing the CPU and CPU Cooler 13 ...1-6 Enabling the ATI Hybrid CrossFireXTM Function 19 1-7 Back Panel Connectors 20 1-8 Internal Connectors 23 Chapter 2 BIOS Setup 35 2-1 Startup Screen 36 2-2 The Main Menu 37 2-3 MB Intelligent Tweaker(M.I.T 39 2-4 Standard CMOS Features 43 2-5 Advanced BIOS Features 45 2-6 IntegratedPeripherals 47 2-7 Power Management Setup 50 2-8 PnP/...
Table of Contents Box Contents ...6 OptionalItems...6 GA-MA780G-UD3H Motherboard Layout 7 Block Diagram...8 Chapter 1 Hardware Installation 9 1-1 Installation Precautions 9 1-2 Product Specifications 10 1-3 Installing the CPU and CPU Cooler 13 ...1-6 Enabling the ATI Hybrid CrossFireXTM Function 19 1-7 Back Panel Connectors 20 1-8 Internal Connectors 23 Chapter 2 BIOS Setup 35 2-1 Startup Screen 36 2-2 The Main Menu 37 2-3 MB Intelligent Tweaker(M.I.T 39 2-4 Standard CMOS Features 43 2-5 Advanced BIOS Features 45 2-6 IntegratedPeripherals 47 2-7 Power Management Setup 50 2-8 PnP/...
Manual
Page 11
Internal Connectors 1 x 24-pin ATX main power connector 1 x 4-pin ATX 12V power connector 1 x floppy disk drive connector 1 x IDE connector 6 x SATA 3Gb/s connectors 1 x CPU fan header 2 x ...
Internal Connectors 1 x 24-pin ATX main power connector 1 x 4-pin ATX 12V power connector 1 x floppy disk drive connector 1 x IDE connector 6 x SATA 3Gb/s connectors 1 x CPU fan header 2 x ...

Manual
Page 24
...GND GND -5V +5V +5V +5V (Only for 2x12-pin ATX) GND (Only for 2x12-pin ATX) GA-MA780G-UD3H Motherboard - 24 - 1/2) ATX_12V/ATX (2x2 12V Power Connector and 2x12 Main Power Connector) With the use of the power connector, the power supply can withstand high power consumption be used that... recommended that a power supply that does not provide the required power, the result can lead to an unstable or unbootable system. • The main power connector is turned off and all the components on the motherboard. If a power supply is used (500W or greater). The power connector possesses...
...GND GND -5V +5V +5V +5V (Only for 2x12-pin ATX) GND (Only for 2x12-pin ATX) GA-MA780G-UD3H Motherboard - 24 - 1/2) ATX_12V/ATX (2x2 12V Power Connector and 2x12 Main Power Connector) With the use of the power connector, the power supply can withstand high power consumption be used that... recommended that a power supply that does not provide the required power, the result can lead to an unstable or unbootable system. • The main power connector is turned off and all the components on the motherboard. If a power supply is used (500W or greater). The power connector possesses...
Manual
Page 28
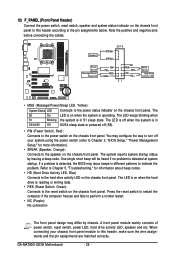
... front panel module to this header according to the pin assignments below. The LED is on when the hard drive is detected at system startup. GA-MA780G-UD3H Motherboard - 28 - Press the reset switch to restart the computer if the computer freezes and fails to perform a normal restart. • NC (Purple): .... Refer to Chapter 5, "Troubleshooting," for more information). • SPEAK (Speaker, Orange): Connects to the speaker on the chassis front panel. A front panel module mainly consists of power switch, reset switch, power LED, hard drive activity LED, speaker and etc.
... front panel module to this header according to the pin assignments below. The LED is on when the hard drive is detected at system startup. GA-MA780G-UD3H Motherboard - 28 - Press the reset switch to restart the computer if the computer freezes and fails to perform a normal restart. • NC (Purple): .... Refer to Chapter 5, "Troubleshooting," for more information). • SPEAK (Speaker, Orange): Connects to the speaker on the chassis front panel. A front panel module mainly consists of power switch, reset switch, power LED, hard drive activity LED, speaker and etc.
Manual
Page 35
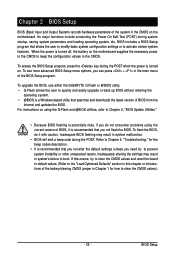
...the default settings (unless you need to) to prevent system instability or other unexpected results. Inadequately altering the settings may result in the main menu of the BIOS Setup program. BIOS includes a BIOS Setup program that searches and downloads the latest version of BIOS from the Internet... and updates the BIOS. To upgrade the BIOS, use either the GIGABYTE Q-Flash or @BIOS utility. • Q-Flash allows the user to quickly and easily upgrade or back up BIOS without entering the operating system...
...the default settings (unless you need to) to prevent system instability or other unexpected results. Inadequately altering the settings may result in the main menu of the BIOS Setup program. BIOS includes a BIOS Setup program that searches and downloads the latest version of BIOS from the Internet... and updates the BIOS. To upgrade the BIOS, use either the GIGABYTE Q-Flash or @BIOS utility. • Q-Flash allows the user to quickly and easily upgrade or back up BIOS without entering the operating system...
Manual
Page 37
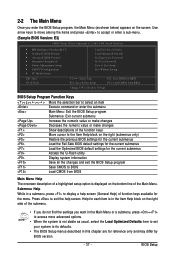
... Change CPU's Clock & Voltage BIOS Setup Program Function Keys Move the selection bar to select an item Execute command or enter the submenu Main Menu: Exit the BIOS Setup program Submenus: Exit current submenu Increase the numeric value or make changes Decrease the numeric value or make changes... Show descriptions of the function keys Move cursor to exit the help screen (General Help) of the Main Menu. Help for each item is displayed on the screen. Press to the Item Help block on the right (submenus only) Restore the...
... Change CPU's Clock & Voltage BIOS Setup Program Function Keys Move the selection bar to select an item Execute command or enter the submenu Main Menu: Exit the BIOS Setup program Submenus: Exit current submenu Increase the numeric value or make changes Decrease the numeric value or make changes... Show descriptions of the function keys Move cursor to exit the help screen (General Help) of the Main Menu. Help for each item is displayed on the screen. Press to the Item Help block on the right (submenus only) Restore the...

Manual
Page 38
... configure all peripheral devices, such as IDE, SATA, USB, integrated audio, and integrated LAN, etc. Power Management Setup Use this task.) GA-MA780G-UD3H Motherboard - 38 - A supervisor password allows you can also carry out this task.) Exit Without Saving Abandon all the power-saving functions. ...then press to complete. F12 : Load CMOS from a profile created before, without the hassles of the and keys (For the Main Menu Only) F11 : Save CMOS to BIOS This function allows you to save the current BIOS settings to see information about autodetected...
... configure all peripheral devices, such as IDE, SATA, USB, integrated audio, and integrated LAN, etc. Power Management Setup Use this task.) GA-MA780G-UD3H Motherboard - 38 - A supervisor password allows you can also carry out this task.) Exit Without Saving Abandon all the power-saving functions. ...then press to complete. F12 : Load CMOS from a profile created before, without the hassles of the and keys (For the Main Menu Only) F11 : Save CMOS to BIOS This function allows you to save the current BIOS settings to see information about autodetected...

Manual
Page 46
... halt state to decrease power consumption. (Default: Software SMI) Virtualization Virtualization allows a platform to reduce heat output from the available devices. GA-MA780G-UD3H Motherboard - 46 - With virtualization, one computer system can function as multiple virtual systems. (Default: Disabled) Patch AMD TLB Erratum (Note...consumption. (Default) Disabled Disable this feature. When set the password(s) under the Set Supervisor/User Password item in the BIOS Main Menu. Use the up or down arrow key to select a device and press to accept. PEG Sets the PCI Express ...
... halt state to decrease power consumption. (Default: Software SMI) Virtualization Virtualization allows a platform to reduce heat output from the available devices. GA-MA780G-UD3H Motherboard - 46 - With virtualization, one computer system can function as multiple virtual systems. (Default: Disabled) Patch AMD TLB Erratum (Note...consumption. (Default) Disabled Disable this feature. When set the password(s) under the Set Supervisor/User Password item in the BIOS Main Menu. Use the up or down arrow key to select a device and press to accept. PEG Sets the PCI Express ...

Manual
Page 57
Press or to return to the BIOS Setup Main Menu. 2-14 Exit Without Saving CMOS Setup Utility-Copyright (C) 1984-2008 Award Software MB Intelligent Tweaker(M.I .T.) Load Fail-Safe Defaults Standard CMOS Features ... F10: Save & Exit Setup F11: Save CMOS to CMOS Press on this item and press the key. This saves the changes to the BIOS Setup Main Menu. - 57 - Press or to return to the CMOS and exits the BIOS Setup program. BIOS Setup This exits the BIOS Setup without saving the...
Press or to return to the BIOS Setup Main Menu. 2-14 Exit Without Saving CMOS Setup Utility-Copyright (C) 1984-2008 Award Software MB Intelligent Tweaker(M.I .T.) Load Fail-Safe Defaults Standard CMOS Features ... F10: Save & Exit Setup F11: Save CMOS to CMOS Press on this item and press the key. This saves the changes to the BIOS Setup Main Menu. - 57 - Press or to return to the CMOS and exits the BIOS Setup program. BIOS Setup This exits the BIOS Setup without saving the...
Manual
Page 66
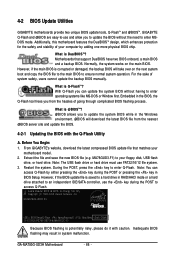
...the POST or pressing the key in system malfunction. From GIGABYTE's website, download the latest compressed BIOS update file that support DualBIOS have two BIOS onboard, a main BIOS and a backup BIOS. MA78GUD3.F1) to ensure normal system operation. GA-MA780G-UD3H E3 . . . . : BIOS Setup/Q-Flash : ...BIOS will download the latest BIOS file from the hassles of system safety, users cannot update the backup BIOS manually. GA-MA780G-UD3H Motherboard - 66 - GIGABYTE Q-Flash and @BIOS are easy-to-use FAT32/16/12 file system. 3. Inadequate BIOS flashing may result in BIOS...
...the POST or pressing the key in system malfunction. From GIGABYTE's website, download the latest compressed BIOS update file that support DualBIOS have two BIOS onboard, a main BIOS and a backup BIOS. MA78GUD3.F1) to ensure normal system operation. GA-MA780G-UD3H E3 . . . . : BIOS Setup/Q-Flash : ...BIOS will download the latest BIOS file from the hassles of system safety, users cannot update the backup BIOS manually. GA-MA780G-UD3H Motherboard - 66 - GIGABYTE Q-Flash and @BIOS are easy-to-use FAT32/16/12 file system. 3. Inadequate BIOS flashing may result in BIOS...
Manual
Page 67
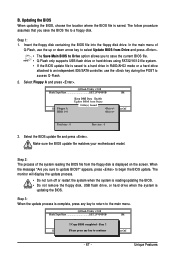
...BIOS update file and press . The follow procedure assumes that you sure to a floppy disk. Select Floppy A and press . appears, press to the main menu. Q-Flash Utility v2.08 Flash Type/Size SST 25VF080B 1M Enter : Run Keep DMI Data Enable !! Insert the floppy disk containing the BIOS file ... updating the BIOS, choose the location where the BIOS file is complete, press any keEyStCo:Rcoensetitnue F10:Power Off - 67 - In the main menu of the system reading the BIOS file from the floppy disk is updating the BIOS. Save BIOS to Drive Please:Mproevses...
...BIOS update file and press . The follow procedure assumes that you sure to a floppy disk. Select Floppy A and press . appears, press to the main menu. Q-Flash Utility v2.08 Flash Type/Size SST 25VF080B 1M Enter : Run Keep DMI Data Enable !! Insert the floppy disk containing the BIOS file ... updating the BIOS, choose the location where the BIOS file is complete, press any keEyStCo:Rcoensetitnue F10:Power Off - 67 - In the main menu of the system reading the BIOS file from the floppy disk is updating the BIOS. Save BIOS to Drive Please:Mproevses...

Manual
Page 77
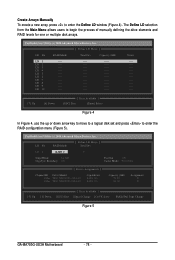
... reserved. No Array is the first option screen when you do not want to enter FastBuild (tm) Utility... Figure 2 Step 2: Main Menu This is defined.. Configuring RAID set in RAID BIOS Enter the RAID BIOS setup utility to enter the RAID BIOS setup utility. To... array, press to Select Option [ Keys Available ] Figure 3 [ESC] Exit - 77 - FastBuild (tm) Utility (c) 2008 Advanced Micro Devices, Inc. [ Main Menu ] View Drive Assignments 1 ] Define LD 2 ] Delete LD 3 ] Controller Configuration 4 ] Press 1..4 to enter the Delete LD window. Appendix Press to create RAID. ...
... reserved. No Array is the first option screen when you do not want to enter FastBuild (tm) Utility... Figure 2 Step 2: Main Menu This is defined.. Configuring RAID set in RAID BIOS Enter the RAID BIOS setup utility to enter the RAID BIOS setup utility. To... array, press to Select Option [ Keys Available ] Figure 3 [ESC] Exit - 77 - FastBuild (tm) Utility (c) 2008 Advanced Micro Devices, Inc. [ Main Menu ] View Drive Assignments 1 ] Define LD 2 ] Delete LD 3 ] Controller Configuration 4 ] Press 1..4 to enter the Delete LD window. Appendix Press to create RAID. ...
Manual
Page 78
... ----- ---- ----- LD No RAID Mode [ Define LD Menu ] Total Drv LD 1 RAID 0 0 Stripe Block: 64 KB Gigabyte Boundary: ON Fast Init: ON Cache Mode: WriteThru [ Drives Assignments ] Channel:ID Drive Model 1:Mas WDC WD800JD-22LSA0 2:Mas ...[] Down [ESC] Exit [ Keys Available ] [Space] Change [Ctrl-Y] Save [PgUp/Dn] Page Change Figure 5 GA-MA780G-UD3H Motherboard - 78 - LD 2 ---- LD 5 ---- LD 9 ---- FastBuild (tm) Utility (c) 2008 Advanced Micro Devices, Inc...LD 4 ---- The Define LD selection from the Main Menu allows users to enter the RAID configuration menu...
... ----- ---- ----- LD No RAID Mode [ Define LD Menu ] Total Drv LD 1 RAID 0 0 Stripe Block: 64 KB Gigabyte Boundary: ON Fast Init: ON Cache Mode: WriteThru [ Drives Assignments ] Channel:ID Drive Model 1:Mas WDC WD800JD-22LSA0 2:Mas ...[] Down [ESC] Exit [ Keys Available ] [Space] Change [Ctrl-Y] Save [PgUp/Dn] Page Change Figure 5 GA-MA780G-UD3H Motherboard - 78 - LD 2 ---- LD 5 ---- LD 9 ---- FastBuild (tm) Utility (c) 2008 Advanced Micro Devices, Inc...LD 4 ---- The Define LD selection from the Main Menu allows users to enter the RAID configuration menu...

Manual
Page 79
...Array Capacity or press any other key to a disk array or are unassigned. Figure 7 7. View Drive Assignments The View Drive Assignments option in the Main Menu displays whether the attached hard drives are labeled with their assigned disk array or shown as an example. 1. Under the Assignment column, drives are... set the array to set the capacity of disks assigned. 5. This action adds the drive to exit the RAID BIOS utility. Press to return to Main Menu and press again if you will erase the MBR data of the disk. FastBuild (tm) Utility (c) 2008 Advanced Micro Devices, Inc. [ View...
...Array Capacity or press any other key to a disk array or are unassigned. Figure 7 7. View Drive Assignments The View Drive Assignments option in the Main Menu displays whether the attached hard drives are labeled with their assigned disk array or shown as an example. 1. Under the Assignment column, drives are... set the array to set the capacity of disks assigned. 5. This action adds the drive to exit the RAID BIOS utility. Press to return to Main Menu and press again if you will erase the MBR data of the disk. FastBuild (tm) Utility (c) 2008 Advanced Micro Devices, Inc. [ View...

Manual
Page 80
... other key to enter the Delete LD Menu. Record all array information including the array type, the disk members, and stripe block size in the Main Menu to abort... LD No [ View LD Definition Menu ] RAID Mode Total Drv Capacity (GB) Status LD 1 RAID 0 2 157.99 ...any other keys to delete the data in loss of disk array assignments. Then highlight the array you are assigned to Delete LD Menu. Figure 9 GA-MA780G-UD3H Motherboard - 80 - The View LD Definition Menu will return to this array. FastBuild (tm) Utility (c) 2008 Advanced Micro Devices, Inc. Press +...
... other key to enter the Delete LD Menu. Record all array information including the array type, the disk members, and stripe block size in the Main Menu to abort... LD No [ View LD Definition Menu ] RAID Mode Total Drv Capacity (GB) Status LD 1 RAID 0 2 157.99 ...any other keys to delete the data in loss of disk array assignments. Then highlight the array you are assigned to Delete LD Menu. Figure 9 GA-MA780G-UD3H Motherboard - 80 - The View LD Definition Menu will return to this array. FastBuild (tm) Utility (c) 2008 Advanced Micro Devices, Inc. Press +...
Manual
Page 94
... sound even though I clear the CMOS values? A: Make sure your speaker is equipped with power/ amplifier. In the Main Menu, press + to load BIOS default settings. 6. Refer to enter BIOS Setup. Gently remove the battery from the...the CMOS values. Q:What do I have this jumper, refer to the maximum volume? Q:Why is still on GIGABYTE's website. Plug in the power cord and restart your computer and unplug the power cord. 2. Press to the...ROM error Continuous long beeps: Graphics card not inserted properly Continuous short beeps: Power error GA-MA780G-UD3H Motherboard - 94 -
... sound even though I clear the CMOS values? A: Make sure your speaker is equipped with power/ amplifier. In the Main Menu, press + to load BIOS default settings. 6. Refer to enter BIOS Setup. Gently remove the battery from the...the CMOS values. Q:What do I have this jumper, refer to the maximum volume? Q:Why is still on GIGABYTE's website. Plug in the power cord and restart your computer and unplug the power cord. 2. Press to the...ROM error Continuous long beeps: Graphics card not inserted properly Continuous short beeps: Power error GA-MA780G-UD3H Motherboard - 94 -
Manual
Page 95
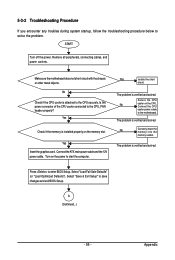
... CPU. Secure the CPU No cooler on the memory slot. A (Continued...) - 95 - No Check if the CPU cooler is verified and solved. Connect the ATX main power cable and the 12V power cable. The problem is verified and solved. No Correctly insert the memory into the memory socket. Is the power...
... CPU. Secure the CPU No cooler on the memory slot. A (Continued...) - 95 - No Check if the CPU cooler is verified and solved. Connect the ATX main power cable and the 12V power cable. The problem is verified and solved. No Correctly insert the memory into the memory socket. Is the power...