Manual
Page 1
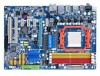
GA-MA770-UD3/ GA-MA770-US3 AM2+/AM2 socket motherboard for AMD PhenomTM FX processor/AMD PhenomTM X4 processor/ AMD PhenomTM X3 processor/AMD AthlonTM X2 processor/ AMD AthlonTM processor/AMD SempronTM X2 processor/ AMD SempronTM processor User's Manual Rev. 1001 12ME-MA77UDS3-1001R
GA-MA770-UD3/ GA-MA770-US3 AM2+/AM2 socket motherboard for AMD PhenomTM FX processor/AMD PhenomTM X4 processor/ AMD PhenomTM X3 processor/AMD AthlonTM X2 processor/ AMD AthlonTM processor/AMD SempronTM X2 processor/ AMD SempronTM processor User's Manual Rev. 1001 12ME-MA77UDS3-1001R
Manual
Page 3
...information, check on our website at: http://www.gigabyte.com.tw Identifying Your Motherboard Revision The revision number on our website. Check your motherboard looks like this manual may be made by any form or by GIGABYTE without GIGABYTE's prior written permission. For example, "REV: ...1.0" means the revision of the motherboard is the property of GIGABYTE. Documentation Classifications In order to assist in this manual may be reproduced, copied, translated, transmitted, or published in any means without prior notice. Example: ...
...information, check on our website at: http://www.gigabyte.com.tw Identifying Your Motherboard Revision The revision number on our website. Check your motherboard looks like this manual may be made by any form or by GIGABYTE without GIGABYTE's prior written permission. For example, "REV: ...1.0" means the revision of the motherboard is the property of GIGABYTE. Documentation Classifications In order to assist in this manual may be reproduced, copied, translated, transmitted, or published in any means without prior notice. Example: ...
Manual
Page 5
Chapter 3 Drivers Installation 57 3-1 Installing Chipset Drivers 57 3-2 Application Software 58 3-3 Technical Manuals 58 3-4 Contact ...59 3-5 System ...59 3-6 Download Center 60 Chapter 4 Unique Features 61 4-1 Xpress Recovery2 61 4-2 BIOS Update Utilities 66 4-2-1 Updating the BIOS with the Q-Flash ...
Chapter 3 Drivers Installation 57 3-1 Installing Chipset Drivers 57 3-2 Application Software 58 3-3 Technical Manuals 58 3-4 Contact ...59 3-5 System ...59 3-6 Download Center 60 Chapter 4 Unique Features 61 4-1 Xpress Recovery2 61 4-2 BIOS Update Utilities 66 4-2-1 Updating the BIOS with the Q-Flash ...
Manual
Page 6
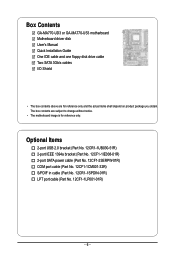
Box Contents GA-MA770-UD3 or GA-MA770-US3 motherboard Motherboard driver disk User's Manual Quick Installation Guide One IDE cable and one floppy disk drive cable Two SATA 3Gb/s cables I/O Shield • The box contents above are subject to ...
Box Contents GA-MA770-UD3 or GA-MA770-US3 motherboard Motherboard driver disk User's Manual Quick Installation Guide One IDE cable and one floppy disk drive cable Two SATA 3Gb/s cables I/O Shield • The box contents above are subject to ...
Manual
Page 9
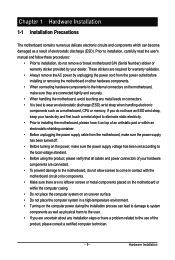
... wear an electrostatic discharge (ESD) wrist strap when handling electronic components such as a result of electrostatic discharge (ESD). Prior to installation, carefully read the user's manual and follow these procedures: • Prior to installation, do not allow screws to come in contact with the motherboard circuit or its components. • Make...
... wear an electrostatic discharge (ESD) wrist strap when handling electronic components such as a result of electrostatic discharge (ESD). Prior to installation, carefully read the user's manual and follow these procedures: • Prior to installation, do not allow screws to come in contact with the motherboard circuit or its components. • Make...
Manual
Page 15
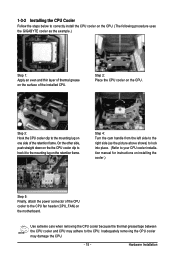
... Follow the steps below to correctly install the CPU cooler on the CPU. (The following procedure uses the GIGABYTE cooler as the picture above shows) to lock into place. (Refer to your CPU cooler installation manual for instructions on installing the cooler.) Step 5: Finally, attach the power connector of the retention frame.
... Follow the steps below to correctly install the CPU cooler on the CPU. (The following procedure uses the GIGABYTE cooler as the picture above shows) to lock into place. (Refer to your CPU cooler installation manual for instructions on installing the cooler.) Step 5: Finally, attach the power connector of the retention frame.
Manual
Page 18
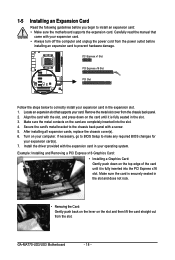
Carefully read the manual that supports your computer. Align the card with the expansion card in the slot. 3. Install the driver provided with the slot, and press down on the top edge of the card until it is fully inserted into the slot. 4. GA-MA770-UD3/US3 Motherboard - 18 - Example: Installing and Removing a PCI Express...
Carefully read the manual that supports your computer. Align the card with the expansion card in the slot. 3. Install the driver provided with the slot, and press down on the top edge of the card until it is fully inserted into the slot. 4. GA-MA770-UD3/US3 Motherboard - 18 - Example: Installing and Removing a PCI Express...

Manual
Page 28
...audio cable (provided by expansion cards) for digital audio output from the HDMI display at the same time. Pin No. Definition 1 1 SPDIFO 2 GND GA-MA770-UD3/US3 Motherboard - 28 - 14) SPDIF_IN (S/PDIF In Header, Red) This header supports digital S/PDIF in and can connect to an audio device that ... digital audio output from your expansion card. Pin No. For information about connecting the S/PDIF digital audio cable, carefully read the manual for digital audio output from your motherboard to your graphics card if you wish to connect an HDMI display to certain expansion cards ...
...audio cable (provided by expansion cards) for digital audio output from the HDMI display at the same time. Pin No. Definition 1 1 SPDIFO 2 GND GA-MA770-UD3/US3 Motherboard - 28 - 14) SPDIF_IN (S/PDIF In Header, Red) This header supports digital S/PDIF in and can connect to an audio device that ... digital audio output from your expansion card. Pin No. For information about connecting the S/PDIF digital audio cable, carefully read the manual for digital audio output from your motherboard to your graphics card if you wish to connect an HDMI display to certain expansion cards ...
Manual
Page 32
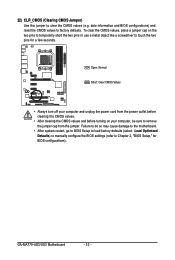
... the CMOS values to Chapter 2, "BIOS Setup," for a few seconds. GA-MA770-UD3/US3 Motherboard - 32 - Failure to do so may cause damage to the motherboard. • After system restart, go to BIOS Setup to load factory defaults (select Load Optimized Defaults) or manually configure the BIOS settings (refer to factory defaults. 22) CLR_CMOS...
... the CMOS values to Chapter 2, "BIOS Setup," for a few seconds. GA-MA770-UD3/US3 Motherboard - 32 - Failure to do so may cause damage to the motherboard. • After system restart, go to BIOS Setup to load factory defaults (select Load Optimized Defaults) or manually configure the BIOS settings (refer to factory defaults. 22) CLR_CMOS...
Manual
Page 37
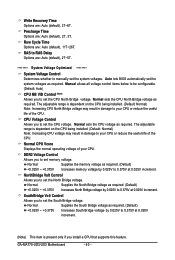
... the installed CPU. CPU NorthBridge Freq. (Note) Allows you to alter the North Bridge controller frequency for advanced users only and we recommend you to manually set the System Voltage Control item to Auto to CPU, chipset, or memory and reduce the useful life of CPU host clock.... Manual allows the CPU Frequency (Mhz) item below to default values.) • When the System Voltage Optimized item blinks in accordance with the overclock/overvoltage settings ...
... the installed CPU. CPU NorthBridge Freq. (Note) Allows you to alter the North Bridge controller frequency for advanced users only and we recommend you to manually set the System Voltage Control item to Auto to CPU, chipset, or memory and reduce the useful life of CPU host clock.... Manual allows the CPU Frequency (Mhz) item below to default values.) • When the System Voltage Optimized item blinks in accordance with the overclock/overvoltage settings ...
Manual
Page 38
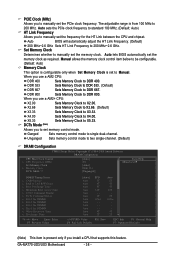
...you use a AM2 CPU: DDR 400 Sets Memory Clock to DDR 400. DDR 800 Sets Memory Clock to Manual. Manual allows the memory clock control item below to be configurable. (Default: Auto) Memory Clock This option is configurable...Help F7: Optimized Defaults (Note) This item is from 100 MHz to single dual-channel. When you to manually set to DDR 800. Allows you install a CPU that supports this feature. Auto lets BIOS automatically set ...to DDR 533. (Default) DDR 667 Sets Memory Clock to manually set the memory clock as required. GA-MA770-UD3/US3 Motherboard - 38 -
...you use a AM2 CPU: DDR 400 Sets Memory Clock to DDR 400. DDR 800 Sets Memory Clock to Manual. Manual allows the memory clock control item below to be configurable. (Default: Auto) Memory Clock This option is configurable...Help F7: Optimized Defaults (Note) This item is from 100 MHz to single dual-channel. When you to manually set to DDR 800. Allows you install a CPU that supports this feature. Auto lets BIOS automatically set ...to DDR 533. (Default) DDR 667 Sets Memory Clock to manually set the memory clock as required. GA-MA770-UD3/US3 Motherboard - 38 -
Manual
Page 39
... DIMM1 Options are : 75ns, 105ns, 127.5ns, 195ns, 327.5ns. Options are : Auto (default), 3T~7T. CAS# latency Options are : Auto (default), Manual. TwTr Command Delay Options are : 1T (default), 2T. Trfc3 for DIMM2 Options are : 75ns, 105ns (default), 127.5ns, 195ns, 327.5ns. DDRII Timing Items... Manual allows all DDRII Timing items below to CAS R/W Delay Options are : 75ns, 105ns, 127.5ns, 195ns, 327.5ns. - 39 - Minimum RAS Active ...
... DIMM1 Options are : 75ns, 105ns, 127.5ns, 195ns, 327.5ns. Options are : Auto (default), 3T~7T. CAS# latency Options are : Auto (default), Manual. TwTr Command Delay Options are : 1T (default), 2T. Trfc3 for DIMM2 Options are : 75ns, 105ns (default), 127.5ns, 195ns, 327.5ns. DDRII Timing Items... Manual allows all DDRII Timing items below to CAS R/W Delay Options are : 75ns, 105ns, 127.5ns, 195ns, 327.5ns. - 39 - Minimum RAS Active ...
Manual
Page 40
...NorthBridge Volt Control Allows you install a CPU that supports this feature. Write Recovery Time Options are : Auto (default), 2T, 3T. GA-MA770-UD3/US3 Motherboard - 40 - Auto lets BIOS automatically set the CPU North Bridge voltage. Normal Supplies the South Bridge voltage as required....are : Auto (default), 2T~5T. ******** System Voltage Optimized ******** System Voltage Control Determines whether to set the North Bridge voltage. Manual allows all voltage control items below to be configurable. (Default: Auto) CPU NB VID Control (Note) Allows you to 0.375V at...
...NorthBridge Volt Control Allows you install a CPU that supports this feature. Write Recovery Time Options are : Auto (default), 2T, 3T. GA-MA770-UD3/US3 Motherboard - 40 - Auto lets BIOS automatically set the CPU North Bridge voltage. Normal Supplies the South Bridge voltage as required....are : Auto (default), 2T~5T. ******** System Voltage Optimized ******** System Voltage Control Determines whether to set the North Bridge voltage. Manual allows all voltage control items below to be configurable. (Default: Auto) CPU NB VID Control (Note) Allows you to 0.375V at...

Manual
Page 41
... no IDE/SATA devices are used , set this item to autodetect the parameters of the device during the POST for faster system startup. • Manual Allows you to manually enter the specifications of the hard drive when the hard drive access mode is set the date. IDE Channel 2, 3 Master/Slave IDE Auto...
... no IDE/SATA devices are used , set this item to autodetect the parameters of the device during the POST for faster system startup. • Manual Allows you to manually enter the specifications of the hard drive when the hard drive access mode is set the date. IDE Channel 2, 3 Master/Slave IDE Auto...
Manual
Page 42
... hard drive. Capacity Approximate capacity of heads. Head Number of the currently installed hard drive. If you wish to enter the parameters manually, refer to None. Options are : Disabled (default), Drive A. All, But Disk/Key The system boot will stop for the ...drive error but Memory it will not stop . Precomp Write precompensation cylinder. Sector Drive A Number of cylinders. Cylinder Number of sectors. GA-MA770-UD3/US3 Motherboard - 42 - Extended Memory The amount of floppy disk drive installed in your hard drive specifications. No Errors The system ...
... hard drive. Capacity Approximate capacity of heads. Head Number of the currently installed hard drive. If you wish to enter the parameters manually, refer to None. Options are : Disabled (default), Drive A. All, But Disk/Key The system boot will stop for the ...drive error but Memory it will not stop . Precomp Write precompensation cylinder. Sector Drive A Number of cylinders. Cylinder Number of sectors. GA-MA770-UD3/US3 Motherboard - 42 - Extended Memory The amount of floppy disk drive installed in your hard drive specifications. No Errors The system ...

Manual
Page 57
... install other applications included in Device Manager, please remove the question mark (by right-clicking your opti cal drive. Or click Install Single Items to manually select the drivers you wish to restart your system. the Found New Hardware Wizard) displayed when "Xpress Install" is automatically displayed which looks like that...
... install other applications included in Device Manager, please remove the question mark (by right-clicking your opti cal drive. Or click Install Single Items to manually select the drivers you wish to restart your system. the Found New Hardware Wizard) displayed when "Xpress Install" is automatically displayed which looks like that...
Manual
Page 58
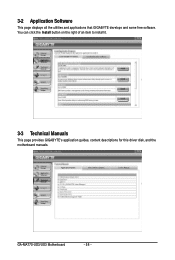
You can click the Install button on the right of an item to install it. 3-3 Technical Manuals This page provides GIGABYTE's application guides, content descriptions for this driver disk, and the motherboard manuals. GA-MA770-UD3/US3 Motherboard - 58 - 3-2 Application Software This page displays all the utilities and applications that GIGABYTE develops and some free software.
You can click the Install button on the right of an item to install it. 3-3 Technical Manuals This page provides GIGABYTE's application guides, content descriptions for this driver disk, and the motherboard manuals. GA-MA770-UD3/US3 Motherboard - 58 - 3-2 Application Software This page displays all the utilities and applications that GIGABYTE develops and some free software.
Manual
Page 59
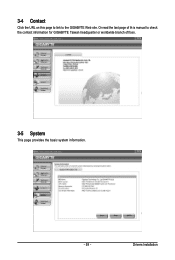
3-4 Contact Click the URL on this page to link to check the contact information for GIGABYTE Taiwan headquarter or worldwide branch of th is manual to the GIGABYTE Web site. Drivers Installation Or read the last page of fices. 3-5 System This page provides the basic system information. - 59 -
3-4 Contact Click the URL on this page to link to check the contact information for GIGABYTE Taiwan headquarter or worldwide branch of th is manual to the GIGABYTE Web site. Drivers Installation Or read the last page of fices. 3-5 System This page provides the basic system information. - 59 -

Manual
Page 66
...the hassles of system safety, users cannot update the backup BIOS manually. Embedded in system malfunction. 4-2 BIOS Update Utilities GIGABYTE motherboards provide two unique BIOS update tools, Q-Flash TM and @BIOS .TM GIGABYTE Q-Flash and @BIOS are easy-to-use and allow you ... protection for GA-MA770-UD3 E1 . . . . : BIOS Setup : XpressRecovery2 : Boot Menu : Qflash 11/06/2008-RD780-SB700-6A66AG09C-00 Because BIOS flashing is Q-Flash ? What is @BIOS ? What is potentially risky, please do it with the Q-Flash Utility A. Before You Begin: 1. From GIGABYTE's website, ...
...the hassles of system safety, users cannot update the backup BIOS manually. Embedded in system malfunction. 4-2 BIOS Update Utilities GIGABYTE motherboards provide two unique BIOS update tools, Q-Flash TM and @BIOS .TM GIGABYTE Q-Flash and @BIOS are easy-to-use and allow you ... protection for GA-MA770-UD3 E1 . . . . : BIOS Setup : XpressRecovery2 : Boot Menu : Qflash 11/06/2008-RD780-SB700-6A66AG09C-00 Because BIOS flashing is Q-Flash ? What is @BIOS ? What is potentially risky, please do it with the Q-Flash Utility A. Before You Begin: 1. From GIGABYTE's website, ...
Manual
Page 69
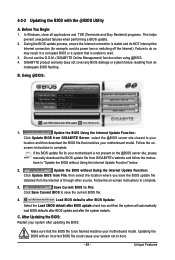
... the BIOS: Restart your system after the system restarts. Do not use the G.O.M. (GIGABYTE Online Management) function when using @BIOS. 4. GIGABYTE product warranty does not cover any BIOS damage or system failure resulting from GIGABYTE's website and follow the instruc- B. Load BIOS defaults after BIOS Update: Select the Load.... 3. During the BIOS update process, ensure the Internet connection is not present on the @BIOS server site, please manually download the BIOS update file from an inadequate BIOS flashing. Before You Begin: 1. Follow the on -
... the BIOS: Restart your system after the system restarts. Do not use the G.O.M. (GIGABYTE Online Management) function when using @BIOS. 4. GIGABYTE product warranty does not cover any BIOS damage or system failure resulting from GIGABYTE's website and follow the instruc- B. Load BIOS defaults after BIOS Update: Select the Load.... 3. During the BIOS update process, ensure the Internet connection is not present on the @BIOS server site, please manually download the BIOS update file from an inadequate BIOS flashing. Before You Begin: 1. Follow the on -


