
Manual
Page 3
... on our website at: http://www.gigabyte.com.tw Identifying Your Motherboard Revision The revision number on your motherboard revision before updating motherboard BIOS, drivers, or when looking for technical information. The logo is 1.0. Changes to the specifications and features in this manual may be... respective owners. by GIGA-BYTE TECHNOLOGY CO., LTD as the exclu- Copyright © 2008 GIGA-BYTE TECHNOLOGY CO., LTD. GIGABYTE UNITED INC. All rights reserved. Example: Check your motherboard looks like this manual is protected by copyright laws and is designated by...
... on our website at: http://www.gigabyte.com.tw Identifying Your Motherboard Revision The revision number on your motherboard revision before updating motherboard BIOS, drivers, or when looking for technical information. The logo is 1.0. Changes to the specifications and features in this manual may be... respective owners. by GIGA-BYTE TECHNOLOGY CO., LTD as the exclu- Copyright © 2008 GIGA-BYTE TECHNOLOGY CO., LTD. GIGABYTE UNITED INC. All rights reserved. Example: Check your motherboard looks like this manual is protected by copyright laws and is designated by...
Manual
Page 4
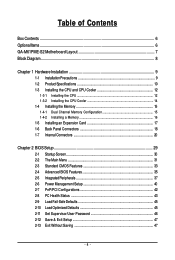
Table of Contents Box Contents ...6 OptionalItems...6 GA-M61PME-S2 Motherboard Layout 7 Block Diagram...8 Chapter 1 Hardware Installation 9 1-1 Installation Precautions 9 1-2 Product Specifications 10 1-3 Installing the CPU and CPU Cooler 12 1-3-1 Installing the CPU 12 1-3-2 Installing the CPU Cooler 14 1-4 Installing the Memory 15 1-4-1 Dual Channel Memory Configuration ...
Table of Contents Box Contents ...6 OptionalItems...6 GA-M61PME-S2 Motherboard Layout 7 Block Diagram...8 Chapter 1 Hardware Installation 9 1-1 Installation Precautions 9 1-2 Product Specifications 10 1-3 Installing the CPU and CPU Cooler 12 1-3-1 Installing the CPU 12 1-3-2 Installing the CPU Cooler 14 1-4 Installing the Memory 15 1-4-1 Dual Channel Memory Configuration ...
Manual
Page 10
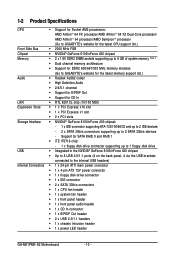
... on the back panel, 4 via the USB brackets connected to 2 SATA 3Gb/s devices - 1-2 Product Specifications CPU Support for Socket AM2 processors: AMD AthlonTM 64 FX processor/AMD AthlonTM 64 X2 Dual-Core... Dual channel memory architecture Support for DDR2 800/667/533 MHz memory modules (Go to GIGABYTE's website for the latest memory support list.) Audio Realtek AL662 codec High Definition Audio ...header 2 x USB 2.0/1.1 headers 1 x chassis intrusion header 1 x power LED header GA-M61PME-S2 Motherboard - 10 -
... on the back panel, 4 via the USB brackets connected to 2 SATA 3Gb/s devices - 1-2 Product Specifications CPU Support for Socket AM2 processors: AMD AthlonTM 64 FX processor/AMD AthlonTM 64 X2 Dual-Core... Dual channel memory architecture Support for DDR2 800/667/533 MHz memory modules (Go to GIGABYTE's website for the latest memory support list.) Audio Realtek AL662 codec High Definition Audio ...header 2 x USB 2.0/1.1 headers 1 x chassis intrusion header 1 x power LED header GA-M61PME-S2 Motherboard - 10 -

Manual
Page 12
...CPU. mended that the motherboard supports the CPU. (Go to GIGABYTE's website for the peripherals. A Small Triangle Mark Denotes Pin One of the Socket AM2 CPU Socket A Small Triangle Marking Denotes CPU Pin One AM2 CPU GA-M61PME-S2 Motherboard - 12 - It is not installed, otherwise overheating ...and damage of the CPU may occur. • Set the CPU host frequency in accordance with the CPU specifications. If you begin to install the CPU: •...
...CPU. mended that the motherboard supports the CPU. (Go to GIGABYTE's website for the peripherals. A Small Triangle Mark Denotes Pin One of the Socket AM2 CPU Socket A Small Triangle Marking Denotes CPU Pin One AM2 CPU GA-M61PME-S2 Motherboard - 12 - It is not installed, otherwise overheating ...and damage of the CPU may occur. • Set the CPU host frequency in accordance with the CPU specifications. If you begin to install the CPU: •...
Manual
Page 15
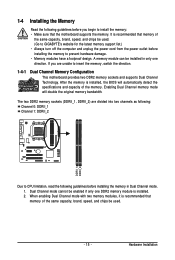
... the same capacity, brand, speed, and chips be installed in Dual Channel mode. 1. A memory module can be used . (Go to GIGABYTE's website for the latest memory support list.) • Always turn off the computer and unplug the power cord from the power outlet before installing ... it is recommended that the motherboard supports the memory. After the memory is installed. 2. Enabling Dual Channel memory mode will automatically detect the specifications and capacity of the same capacity, brand, speed, and chips be enabled if only one direction. The two DDR2 memory sockets (DDRII_1, ...
... the same capacity, brand, speed, and chips be installed in Dual Channel mode. 1. A memory module can be used . (Go to GIGABYTE's website for the latest memory support list.) • Always turn off the computer and unplug the power cord from the power outlet before installing ... it is recommended that the motherboard supports the memory. After the memory is installed. 2. Enabling Dual Channel memory mode will automatically detect the specifications and capacity of the same capacity, brand, speed, and chips be enabled if only one direction. The two DDR2 memory sockets (DDRII_1, ...
Manual
Page 18
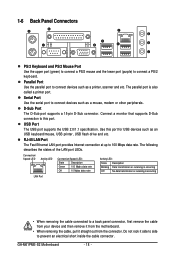
... connector. Serial Port Use the serial port to connect devices such as a mouse, modem or other peripherals. USB Port The USB port supports the USB 2.0/1.1 specification. Parallel Port Use the parallel port to connect devices such as a printer, scanner and etc. Use this port. The following describes the states of the... Mpbs data rate Activity LED: State Description Blinking Data transmission or receiving is occurring Off No data transmission or receiving is also called a printer port. GA-M61PME-S2 Motherboard - 18 -
... connector. Serial Port Use the serial port to connect devices such as a mouse, modem or other peripherals. USB Port The USB port supports the USB 2.0/1.1 specification. Parallel Port Use the parallel port to connect devices such as a printer, scanner and etc. Use this port. The following describes the states of the... Mpbs data rate Activity LED: State Description Blinking Data transmission or receiving is occurring Off No data transmission or receiving is also called a printer port. GA-M61PME-S2 Motherboard - 18 -
Manual
Page 27
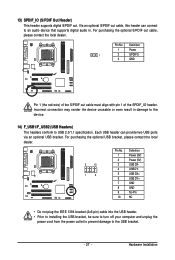
... installing the USB bracket, be sure to turn off your computer and unplug the power cord from the power outlet to prevent damage to USB 2.0/1.1 specification. 13) SPDIF_IO (S/PDIF Out Header) This header supports digital S/PDIF out. Definition 1 Power 1 2 SPDIFO 3 GND Pin 1 (the red wire) of the S/PDIF out cable must...
... installing the USB bracket, be sure to turn off your computer and unplug the power cord from the power outlet to prevent damage to USB 2.0/1.1 specification. 13) SPDIF_IO (S/PDIF Out Header) This header supports digital S/PDIF out. Definition 1 Power 1 2 SPDIFO 3 GND Pin 1 (the red wire) of the S/PDIF out cable must...
Manual
Page 33
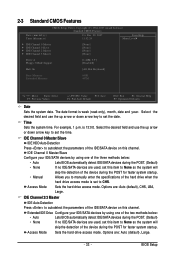
... automatically detect IDE/SATA devices during the POST. (Default) • None If no IDE/SATA devices are used , set this item to manually enter the specifications of the IDE/SATA device on this channel. Select the desired field and use the up arrow or down arrow key to CHS. Time Sets...
... automatically detect IDE/SATA devices during the POST. (Default) • None If no IDE/SATA devices are used , set this item to manually enter the specifications of the IDE/SATA device on this channel. Select the desired field and use the up arrow or down arrow key to CHS. Time Sets...
Manual
Page 34
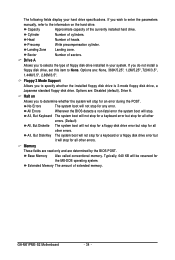
... in your hard drive specifications. Drive A Allows you to specify whether the installed floppy disk drive is 3-mode floppy disk drive, a Japanese standard floppy disk drive. If you to determine whether the system will be reserved for a floppy disk drive error but stop for all other errors. GA-M61PME-S2 Motherboard - 34 - Capacity Approximate...
... in your hard drive specifications. Drive A Allows you to specify whether the installed floppy disk drive is 3-mode floppy disk drive, a Japanese standard floppy disk drive. If you to determine whether the system will be reserved for a floppy disk drive error but stop for all other errors. GA-M61PME-S2 Motherboard - 34 - Capacity Approximate...
Manual
Page 41
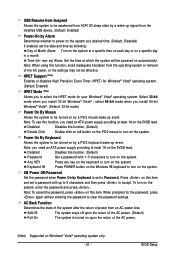
... turn on this function, avoid inadequate shutdown from the operating system or removal of the AC power, or the settings may not be powered on a specific day in a month. Power On By Keyboard Allows the system to turn on Windows® Vista® operating system only. - 41 - Any KEY Keyboard 98... the system at a desired time. (Default: Disabled) If enabled, set the date and time as following: Day of Month Alarm: Turn on the system at a specific time on each day or on automatically. Time (hh: mm: ss) Alarm: Set the time at which the system will be effective. Note: To cancel...
... turn on this function, avoid inadequate shutdown from the operating system or removal of the AC power, or the settings may not be powered on a specific day in a month. Power On By Keyboard Allows the system to turn on Windows® Vista® operating system only. - 41 - Any KEY Keyboard 98... the system at a desired time. (Default: Disabled) If enabled, set the date and time as following: Day of Month Alarm: Turn on the system at a specific time on each day or on automatically. Time (hh: mm: ss) Alarm: Set the time at which the system will be effective. Note: To cancel...