Manual
Page 1
GA-M55plus-S3G (rev. 3.0) AMD Socket AM2 Processor Motherboard User's Manual Rev. 3001 12ME-M55PS3G-3001R * The WEEE marking on the product indicates this product must not be disposed of with user's other household waste and must be handed over to a designated collection point for the recycling of waste electrical and electronic equipment!! * The WEEE marking applies only in European Union's member states.
GA-M55plus-S3G (rev. 3.0) AMD Socket AM2 Processor Motherboard User's Manual Rev. 3001 12ME-M55PS3G-3001R * The WEEE marking on the product indicates this product must not be disposed of with user's other household waste and must be handed over to a designated collection point for the recycling of waste electrical and electronic equipment!! * The WEEE marking applies only in European Union's member states.
Manual
Page 9
... technician. Instances of violating the conditions recommended in the user manual. 3. Damage due to use of electrostatic discharge (ESD). Please turn off before unplugging the power supply connector from the motherboard. Installation Notices 1. These stickers are uncertain about any installation ... to be an unofficial Gigabyte product. - 9 - Prior to installation, please do not allow screws to come in the provided manual. 3. To prevent damage to the motherboard, please do not remove the stickers on the motherboard. Turning on top of the motherboard or any metal leads or...
... technician. Instances of violating the conditions recommended in the user manual. 3. Damage due to use of electrostatic discharge (ESD). Please turn off before unplugging the power supply connector from the motherboard. Installation Notices 1. These stickers are uncertain about any installation ... to be an unofficial Gigabyte product. - 9 - Prior to installation, please do not allow screws to come in the provided manual. 3. To prevent damage to the motherboard, please do not remove the stickers on the motherboard. Turning on top of the motherboard or any metal leads or...
Manual
Page 13
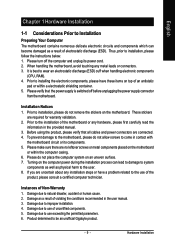
... 1-3-2 Installation of the CPU Cooler Fig.1 Before installing the CPU cooler, please first add an even layer of heat paste on the motherboard so that either thermal tape rather than heat paste be used for detailed installation instructions). Fig.2 Please connect the CPU cooler power connector ...to the cooler manual for heat dissipation or using extreme care when removing the CPU cooler. - 13 - Install all the CPU cooler components (Please refer ...
... 1-3-2 Installation of the CPU Cooler Fig.1 Before installing the CPU cooler, please first add an even layer of heat paste on the motherboard so that either thermal tape rather than heat paste be used for detailed installation instructions). Fig.2 Please connect the CPU cooler power connector ...to the cooler manual for heat dissipation or using extreme care when removing the CPU cooler. - 13 - Install all the CPU cooler components (Please refer ...
Manual
Page 32
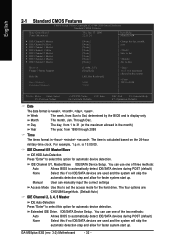
...(Default:Auto) IDE Channel 2, 3, 4, 5 Master IDE Auto-Detection Press "Enter" to 31 (or the maximum allowed in . Extended IDE Drive. GA-M55plus-S3G (rev. 3.0) Motherboard - 32 - to Sat. The time is , , , . IDE Channel 0/1, Master/Slave IDE/SATA Device Setup. Through Dec. Day The day,... 5 Master [None] [None] [None] [None] [None] [None] [None] [None] Change the day, month, year Sun. to Dec. Manual User can use one of three methods: Auto Allows BIOS to automatically detect IDE/SATA devices during POST (default) None Select this option for automatic...
...(Default:Auto) IDE Channel 2, 3, 4, 5 Master IDE Auto-Detection Press "Enter" to 31 (or the maximum allowed in . Extended IDE Drive. GA-M55plus-S3G (rev. 3.0) Motherboard - 32 - to Sat. The time is , , , . IDE Channel 0/1, Master/Slave IDE/SATA Device Setup. Through Dec. Day The day,... 5 Master [None] [None] [None] [None] [None] [None] [None] [None] Change the day, month, year Sun. to Dec. Manual User can use one of three methods: Auto Allows BIOS to automatically detect IDE/SATA devices during POST (default) None Select this option for automatic...
Manual
Page 68
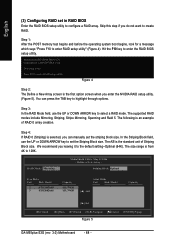
...a New Array screen is the first option screen when you can press the TAB key to enter the RAID BIOS setup utility. You can manually set the striping block size. Press F10 to 128K. The supported RAID modes include Mirroring, Striping, Stripe Mirroring, Spanning and Raid 5. The... Array Disks Port Disk Model [ ] Add Capacity [ ] Del [ESC] Quit [F6] Back [F7] Finish [TAB] Navigate [ ] Select [ENTER] Popup Figure 5 GA-M55plus-S3G (rev. 3.0) Motherboard - 68 - Step 3: In the RAID Mode field, use the UP or DOWN ARROW key to set in RAID BIOS Enter the RAID BIOS setup utility...
...a New Array screen is the first option screen when you can press the TAB key to enter the RAID BIOS setup utility. You can manually set the striping block size. Press F10 to 128K. The supported RAID modes include Mirroring, Striping, Stripe Mirroring, Spanning and Raid 5. The... Array Disks Port Disk Model [ ] Add Capacity [ ] Del [ESC] Quit [F6] Back [F7] Finish [TAB] Navigate [ ] Select [ENTER] Popup Figure 5 GA-M55plus-S3G (rev. 3.0) Motherboard - 68 - Step 3: In the RAID Mode field, use the UP or DOWN ARROW key to set in RAID BIOS Enter the RAID BIOS setup utility...

Manual
Page 72
... Setup Press F6 if you need to that you have prepared the SATA driver disk and configured BIOS settings, you are ready to manually specify an adapter. Currently, Setup will be a few moments of some files being loaded before you see the "Press F6 if ...When a screen similar to install a 3rd party SCSI or RAID driver" message (Figure 13). S=Specify Additional Device ENTER=Continue F3=Exit Figure 14 GA-M55plus-S3G (rev. 3.0) Motherboard - 72 - Step 1: Restart your SATA hard drive with Windows, press ENTER. Windows Setup Setup could not determine the type of Windows XP installation....
... Setup Press F6 if you need to that you have prepared the SATA driver disk and configured BIOS settings, you are ready to manually specify an adapter. Currently, Setup will be a few moments of some files being loaded before you see the "Press F6 if ...When a screen similar to install a 3rd party SCSI or RAID driver" message (Figure 13). S=Specify Additional Device ENTER=Continue F3=Exit Figure 14 GA-M55plus-S3G (rev. 3.0) Motherboard - 72 - Step 1: Restart your SATA hard drive with Windows, press ENTER. Windows Setup Setup could not determine the type of Windows XP installation....
Manual
Page 80
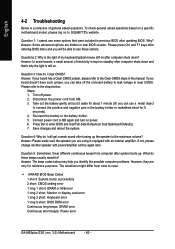
... BIOS menu and you will be able to the Clear CMOS steps in the manual. Answer: In some options that 's why the light is equipped with power...long 9 short: BIOS ROM error Continuous long beeps: DRAM error Continuous short beeps: Power error GA-M55plus-S3G (rev. 3.0) Motherboard - 80 - Disconnect the power cord from case to the maximum volume? Answer: Please make sure.... Questions 2: Why is a collection of general asked questions based on a specific motherboard model, please log on to GIGABYTE's website. To check general asked questions. Question 1: I clear CMOS? English 4-2...
... BIOS menu and you will be able to the Clear CMOS steps in the manual. Answer: In some options that 's why the light is equipped with power...long 9 short: BIOS ROM error Continuous long beeps: DRAM error Continuous short beeps: Power error GA-M55plus-S3G (rev. 3.0) Motherboard - 80 - Disconnect the power cord from case to the maximum volume? Answer: Please make sure.... Questions 2: Why is a collection of general asked questions based on a specific motherboard model, please log on to GIGABYTE's website. To check general asked questions. Question 1: I clear CMOS? English 4-2...


