
User Manual
Page 5
Channel Audio Function Introduction 69 4-2 Troubleshooting 77 - 5 - Chapter 3 Drivers Installation 45 3-1 Install Chipset Drivers 45 3-2 Software Application 46 3-3 Software Information 46 3-4 Hardware Information 47 3-5 Contact Us ...47 Chapter 4 Appendix 49 4-1 Unique Software Utilities 49 4-1-1 EasyTune 5 Introduction 49 4-1-2 Xpress Recovery Introduction 50 4-1-3 Flash BIOS Method Introduction 53 4-1-4 Serial ATA BIOS Setting Utility Introduction 62 4-1-5 2- / 4- / 6- / 8-
Channel Audio Function Introduction 69 4-2 Troubleshooting 77 - 5 - Chapter 3 Drivers Installation 45 3-1 Install Chipset Drivers 45 3-2 Software Application 46 3-3 Software Information 46 3-4 Hardware Information 47 3-5 Contact Us ...47 Chapter 4 Appendix 49 4-1 Unique Software Utilities 49 4-1-1 EasyTune 5 Introduction 49 4-1-2 Xpress Recovery Introduction 50 4-1-3 Flash BIOS Method Introduction 53 4-1-4 Serial ATA BIOS Setting Utility Introduction 62 4-1-5 2- / 4- / 6- / 8-
User Manual
Page 16
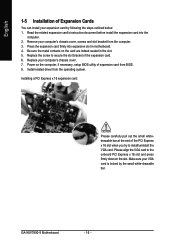
... expansion card by the small white-drawable bar. Power on the computer, if necessary, setup BIOS utility of expansion card from the computer. 3. Install related driver from the operating system. GA-K8VT890-9 Motherboard - 16 - Be sure the metal contacts on the slot.
... expansion card by the small white-drawable bar. Power on the computer, if necessary, setup BIOS utility of expansion card from the computer. 3. Install related driver from the operating system. GA-K8VT890-9 Motherboard - 16 - Be sure the metal contacts on the slot.
User Manual
Page 17
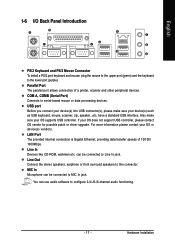
... In Devices like CD-ROM, walkman etc. Also make sure your OS does not support USB controller, please contact OS vendor for possible patch or driver upgrade. You can be connected to Line In jack. have a standard USB interface. For more information please contact your OS supports USB controller. English 1-6 I/O Back...
... In Devices like CD-ROM, walkman etc. Also make sure your OS does not support USB controller, please contact OS vendor for possible patch or driver upgrade. You can be connected to Line In jack. have a standard USB interface. For more information please contact your OS supports USB controller. English 1-6 I/O Back...

User Manual
Page 21
... drive). One IDE connector can connect to one IDE device as Master and the other as Slave (for the Serial ATA and install the proper driver in order to 150MB/s transfer rate. If you wish to connect two IDE devices, please set the jumper on one IDE cable, and the single...
... drive). One IDE connector can connect to one IDE device as Master and the other as Slave (for the Serial ATA and install the proper driver in order to 150MB/s transfer rate. If you wish to connect two IDE devices, please set the jumper on one IDE cable, and the single...

User Manual
Page 45
...Windows XP operating system, please use Windows Service Pack. For USB2.0 driver support under "Device Manager". Drivers Installation Some device drivers will restart your system the "Xpress Install" will continue to install other drivers. Please remove the question mark and restart the system (System will... and execute the Setup.exe. 3-1 Install Chipset Drivers After insert the driver CD, "Xpress Install" will scan automatically the system and then list all the drivers that came with your motherboard into your CD-ROM drive, the driver CD-title will auto start and show a question...
...Windows XP operating system, please use Windows Service Pack. For USB2.0 driver support under "Device Manager". Drivers Installation Some device drivers will restart your system the "Xpress Install" will continue to install other drivers. Please remove the question mark and restart the system (System will... and execute the Setup.exe. 3-1 Install Chipset Drivers After insert the driver CD, "Xpress Install" will scan automatically the system and then list all the drivers that came with your motherboard into your CD-ROM drive, the driver CD-title will auto start and show a question...
User Manual
Page 46
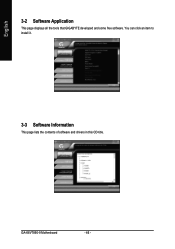
GA-K8VT890-9 Motherboard - 46 - English 3-2 Software Application This page displays all the tools that GIGABYTE developed and some free software. You can click an item to install it. 3-3 Software Information This page lists the contents of software and drivers in this CD-title.
GA-K8VT890-9 Motherboard - 46 - English 3-2 Software Application This page displays all the tools that GIGABYTE developed and some free software. You can click an item to install it. 3-3 Software Information This page lists the contents of software and drivers in this CD-title.

User Manual
Page 47
English 3-4 Hardware Information This page lists all device you have for this motherboard. 3-5 Contact Us Please see the last page for details. - 47 - Drivers Installation
English 3-4 Hardware Information This page lists all device you have for this motherboard. 3-5 Contact Us Please see the last page for details. - 47 - Drivers Installation

User Manual
Page 50
... BIOS menu, select "Advanced BIOS Feature" and set as the boot partition. Insert the provided driver CD into your CD drive, then save and exit the BIOS menu. Remove Backup Image 4. GIGABYTE Technology CO. , Ltd. 1. Xpress Recovery is Xpress Recovery ? Must be used to back up...ROM. Once you have completed this step, subsequent access to Xpress Recovery can restore the drive to NTFS format. Exit and Restart Build 2011 GA-K8VT890-9 Motherboard - 50 - English 4-1-2 Xpress Recovery Introduction What is a utility used with an IDE hard disk supporting HPA 5. How to enter...
... BIOS menu, select "Advanced BIOS Feature" and set as the boot partition. Insert the provided driver CD into your CD drive, then save and exit the BIOS menu. Remove Backup Image 4. GIGABYTE Technology CO. , Ltd. 1. Xpress Recovery is Xpress Recovery ? Must be used to back up...ROM. Once you have completed this step, subsequent access to Xpress Recovery can restore the drive to NTFS format. Exit and Restart Build 2011 GA-K8VT890-9 Motherboard - 50 - English 4-1-2 Xpress Recovery Introduction What is a utility used with an IDE hard disk supporting HPA 5. How to enter...

User Manual
Page 51
...Award Software, Inc. Execute Backup Utility 2. Set Password 5. It is recommended that Xpress Recovery be immediately installed after OS and all required driver and software installations are complete. - 51 - Remove Backup Image 4. System storage capacity as well as drive reading/writing speed will affect backup...F9 key. 2. Press F9 during powering on the computer. (Text Mode) Press F9 during powering on the computer . Execute Restore Utility 3. GIGABYTE Technology CO. , Ltd. 1. Exit and Restart 1. Appendix Press DEL to enter SETUP / Q-Flash, F9 For Xpress Recovery 08/16/2002...
...Award Software, Inc. Execute Backup Utility 2. Set Password 5. It is recommended that Xpress Recovery be immediately installed after OS and all required driver and software installations are complete. - 51 - Remove Backup Image 4. System storage capacity as well as drive reading/writing speed will affect backup...F9 key. 2. Press F9 during powering on the computer. (Text Mode) Press F9 during powering on the computer . Execute Restore Utility 3. GIGABYTE Technology CO. , Ltd. 1. Exit and Restart 1. Appendix Press DEL to enter SETUP / Q-Flash, F9 For Xpress Recovery 08/16/2002...

User Manual
Page 63
...Appendix Note: To achieve best performance, it is provided. (For more detailed setup information, please visit our website at http:\\www.gigabyte.com.tw to read or download the information you need.) Configuring the VT8237(VT8237R) SATA RAID BIOS The RAID BIOS setup utility... RAID setup (Please refer to select VT8237 RAID; Serial_Ch0 Master : ST3120026AS Serial_Ch1 Master : ST3120026AS Press Tab to select Silicon Image). 5) Complete driver installation. 6) Complete RAID utility installation. Ctrl + S to enter RAID setup utility, the VT8237 SATA RAID BIOS utility screen will appear. VIA...
...Appendix Note: To achieve best performance, it is provided. (For more detailed setup information, please visit our website at http:\\www.gigabyte.com.tw to read or download the information you need.) Configuring the VT8237(VT8237R) SATA RAID BIOS The RAID BIOS setup utility... RAID setup (Please refer to select VT8237 RAID; Serial_Ch0 Master : ST3120026AS Serial_Ch1 Master : ST3120026AS Press Tab to select Silicon Image). 5) Complete driver installation. 6) Complete RAID utility installation. Ctrl + S to enter RAID setup utility, the VT8237 SATA RAID BIOS utility screen will appear. VIA...

User Manual
Page 68
... this floppy disk. From the CDROM drive (example: D:\) double click the MENU.exe file in your system. GA-K8VT890-9 Motherboard - 68 - English Installing the RAID drivers To install operating system onto a serial ATA hard disk successfully, you need to be installed under Windows once for...blank formatted disk. Use an alternative system and insert the GIGABYTE motherboard drive CD-ROM. A command prompt window will not have to install a third party SCSI or RAID driver" message, then supply serial ATA controller driver by pressing the corresponding letter from the startup disk. First...
... this floppy disk. From the CDROM drive (example: D:\) double click the MENU.exe file in your system. GA-K8VT890-9 Motherboard - 68 - English Installing the RAID drivers To install operating system onto a serial ATA hard disk successfully, you need to be installed under Windows once for...blank formatted disk. Use an alternative system and insert the GIGABYTE motherboard drive CD-ROM. A command prompt window will not have to install a third party SCSI or RAID driver" message, then supply serial ATA controller driver by pressing the corresponding letter from the startup disk. First...

User Manual
Page 69
... amplifier to set up an 8 channel audio configuration, you use Audio Combo Kit (optional device). English 4-1-5 2- / 4- / 6- / 8- Channel Audio Function Introduction The installation of the audio driver, you'll will find a Sound Effect icon on the left selection bar and select "2CH Speaker" to select the function.
... amplifier to set up an 8 channel audio configuration, you use Audio Combo Kit (optional device). English 4-1-5 2- / 4- / 6- / 8- Channel Audio Function Introduction The installation of the audio driver, you'll will find a Sound Effect icon on the left selection bar and select "2CH Speaker" to select the function.

User Manual
Page 70
Line In (Rear Speaker Out) Line Out (Front Speaker Out) STEP 3: Click "Speaker Configuration" and select the "UAJ Function". Then click on the lower right hand taskbar. Click the icon to complete 4 channel audio configuration. STEP 2: Following installation of the audio driver, you'll find a Sound Effect icon on the left selection bar and select "4CH Speaker" to select the function. GA-K8VT890-9 Motherboard - 70 - English 4 Channel Audio Setup STEP 1: Connect the Front Speakers to "Line Out", the Rear Speakers to "Line In".
Line In (Rear Speaker Out) Line Out (Front Speaker Out) STEP 3: Click "Speaker Configuration" and select the "UAJ Function". Then click on the lower right hand taskbar. Click the icon to complete 4 channel audio configuration. STEP 2: Following installation of the audio driver, you'll find a Sound Effect icon on the left selection bar and select "4CH Speaker" to select the function. GA-K8VT890-9 Motherboard - 70 - English 4 Channel Audio Setup STEP 1: Connect the Front Speakers to "Line Out", the Rear Speakers to "Line In".

User Manual
Page 71
... Speakers to "Line Out", the Rear Speakers to "Line In", and the Center/Subwoofer Speakers to select the function. STEP 2: Following installation of the audio driver, you'll find a Sound Effect icon on the left selection bar and select "6CH Speaker" to complete 6 channel audio configuration. - 71 -
... Speakers to "Line Out", the Rear Speakers to "Line In", and the Center/Subwoofer Speakers to select the function. STEP 2: Following installation of the audio driver, you'll find a Sound Effect icon on the left selection bar and select "6CH Speaker" to complete 6 channel audio configuration. - 71 -

User Manual
Page 73
... left selection bar and select "8CH Speaker" to the Surround-Kit "SUR BACK" port. (This method requires UAJ function) STEP 4: Following installation of the audio driver, you'll find a Sound Effect icon on the lower right hand taskbar. Click the icon to the "Line In" port. Method 2: Connect the front channels...
... left selection bar and select "8CH Speaker" to the Surround-Kit "SUR BACK" port. (This method requires UAJ function) STEP 4: Following installation of the audio driver, you'll find a Sound Effect icon on the lower right hand taskbar. Click the icon to the "Line In" port. Method 2: Connect the front channels...


