User Manual
Page 1
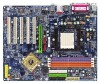
GA-K8NSC-939 AMD Socket 939 Processor Motherboard User's Manual Rev. 1003 12ME-K8NSC939-1003
GA-K8NSC-939 AMD Socket 939 Processor Motherboard User's Manual Rev. 1003 12ME-K8NSC939-1003

User Manual
Page 3
... provided with the product. „ For detailed product information and specifications, please carefully read the "Product User Manual". „ For detailed information related to Gigabyte's unique features, please go to the "Technology Guide" section on Gigabyte's website to their respective companies. Specifications and features are legally registered to read or download the information...
... provided with the product. „ For detailed product information and specifications, please carefully read the "Product User Manual". „ For detailed information related to Gigabyte's unique features, please go to the "Technology Guide" section on Gigabyte's website to their respective companies. Specifications and features are legally registered to read or download the information...
User Manual
Page 9
... electronic components (CPU, RAM). 4. If you are connected. 4. Instances of violating the conditions recommended in the user manual. 3. Damage due to be an unofficial Gigabyte product. - 9 - Product determined to improper installation. 4. English Chapter 1 Hardware Installation 1-1 Considerations Prior to Installation ...a result of Non-Warranty 1. Thus, prior to natural disaster, accident or human cause. 2. Prior to come in the provided manual. 3. Please make sure there are required for warranty validation. 2. To prevent damage to use of the motherboard or any metal leads...
... electronic components (CPU, RAM). 4. If you are connected. 4. Instances of violating the conditions recommended in the user manual. 3. Damage due to be an unofficial Gigabyte product. - 9 - Product determined to improper installation. 4. English Chapter 1 Hardware Installation 1-1 Considerations Prior to Installation ...a result of Non-Warranty 1. Thus, prior to natural disaster, accident or human cause. 2. Prior to come in the provided manual. 3. Please make sure there are required for warranty validation. 2. To prevent damage to use of the motherboard or any metal leads...

User Manual
Page 13
... to the CPU_FAN connector located on the surface of the heat sink paste. Fig.2 Please connect the heat sink power connector to the heat sink manual for heat dissipation or using extreme care when removing the heat sink. - 13 -
... to the CPU_FAN connector located on the surface of the heat sink paste. Fig.2 Please connect the heat sink power connector to the heat sink manual for heat dissipation or using extreme care when removing the heat sink. - 13 -

User Manual
Page 32
...Use this option for automatic device detection. Week The week, from 1999 through 2098 Time The times format in the month) 1999 to Sat. GA-K8NSC-939 Motherboard - 32 - Extended IDE Drive SATA IDE devices setup. For example, 1 p.m. IDE Channel 1 Master/Slave IDE devices setup. The...to automatically detect SATA IDE devices during POST. (Default value) • None Select this option for faster system start up . • Manual User can use one of three methods: • Auto Allows BIOS to set the access mode for faster system start up . Day The ...
...Use this option for automatic device detection. Week The week, from 1999 through 2098 Time The times format in the month) 1999 to Sat. GA-K8NSC-939 Motherboard - 32 - Extended IDE Drive SATA IDE devices setup. For example, 1 p.m. IDE Channel 1 Master/Slave IDE devices setup. The...to automatically detect SATA IDE devices during POST. (Default value) • None Select this option for faster system start up . • Manual User can use one of three methods: • Auto Allows BIOS to set the access mode for faster system start up . Day The ...
User Manual
Page 75
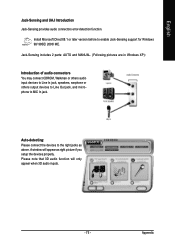
... as right picture if you setup the devices properly. A window will only appear when 3D audio inputs. - 75 - Appendix Jack-Sensing includes 2 parts: AUTO and MANUAL. (Following pictures are in Windows XP): Introduction of audio connectors You may connect CDROM, Walkman or others audio input devices to Line In jack, speakers...
... as right picture if you setup the devices properly. A window will only appear when 3D audio inputs. - 75 - Appendix Jack-Sensing includes 2 parts: AUTO and MANUAL. (Following pictures are in Windows XP): Introduction of audio connectors You may connect CDROM, Walkman or others audio input devices to Line In jack, speakers...

User Manual
Page 76
Enable UAJ function: You can click "UAJ Automatic" button to worry the audio device should be plug in Line-in / Line-out). GA-K8NSC-939 Motherboard - 76 - UAJ Introduction UAJ (Universal Audio Jack) has a very smart feature: It will switch signal automatically when user plugs his audio ...jack, the device will come out as right picture. English If you set, please press "Manual Selection" to set wrong with the connectors, the warning message will work perfectly after UAJ is activated. Manual setting: If the device picture shows different from what you set . That means users do ...
Enable UAJ function: You can click "UAJ Automatic" button to worry the audio device should be plug in Line-in / Line-out). GA-K8NSC-939 Motherboard - 76 - UAJ Introduction UAJ (Universal Audio Jack) has a very smart feature: It will switch signal automatically when user plugs his audio ...jack, the device will come out as right picture. English If you set, please press "Manual Selection" to set wrong with the connectors, the warning message will work perfectly after UAJ is activated. Manual setting: If the device picture shows different from what you set . That means users do ...
User Manual
Page 77
... beeps usually stand for beep code 8, these codes are hidden in the battery holder to the battery holder. 5. Questions 2: Why is still on to www.gigabyte.com.tw Question 1: I still get a weak sound after updating BIOS. Answer: The beep codes below : Steps: 1. Save changes and reboot the system. AMI BIOS Beep... BIOS menu and you can take off power. 2. Why? Please press Ctrl and F1 keys after computer shuts down and that were included in the manual.
... beeps usually stand for beep code 8, these codes are hidden in the battery holder to the battery holder. 5. Questions 2: Why is still on to www.gigabyte.com.tw Question 1: I still get a weak sound after updating BIOS. Answer: The beep codes below : Steps: 1. Save changes and reboot the system. AMI BIOS Beep... BIOS menu and you can take off power. 2. Why? Please press Ctrl and F1 keys after computer shuts down and that were included in the manual.


