
User Manual
Page 29
... BIOS needs to be used. The CMOS SETUP saves the configuration in the event that does not require users to boot to a new BIOS, either Gigabyte's Q-Flash or @BIOS utility can enter the BIOS setup screen by pressing "Ctrl + F1". BIOS Setup If you save changes into CMOS Status Page Setup...
... BIOS needs to be used. The CMOS SETUP saves the configuration in the event that does not require users to boot to a new BIOS, either Gigabyte's Q-Flash or @BIOS utility can enter the BIOS setup screen by pressing "Ctrl + F1". BIOS Setup If you save changes into CMOS Status Page Setup...
User Manual
Page 32
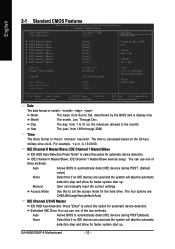
... automatic device detection. Extended IDE Drive You can use one of three methods: Auto Allows BIOS to set the access mode for the hard drive. GA-K8N51GMF-9 Motherboard - 32 - Jan. Day The day, from Sun to Dec. IDE Channel 0 Master/Slave; IDE Channel 0 Master/Slave; Access Mode Use... for automatic device detection. Week The week, from 1 to 2098 KLJI: Move Enter: Select F5: Previous Values +/-/PU/PD: Value F10: Save F6: Fail-Safe Defaults ESC: Exit F1: General Help F7: Optimized Defaults Date The date format is display only Month The month, Jan. is calculated...
... automatic device detection. Extended IDE Drive You can use one of three methods: Auto Allows BIOS to set the access mode for the hard drive. GA-K8N51GMF-9 Motherboard - 32 - Jan. Day The day, from Sun to Dec. IDE Channel 0 Master/Slave; IDE Channel 0 Master/Slave; Access Mode Use... for automatic device detection. Week The week, from 1 to 2098 KLJI: Move Enter: Select F5: Previous Values +/-/PU/PD: Value F10: Save F6: Fail-Safe Defaults ESC: Exit F1: General Help F7: Optimized Defaults Date The date format is display only Month The month, Jan. is calculated...
User Manual
Page 34
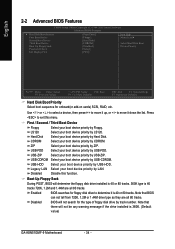
...] [Setup] [PEG] Item Help Menu Level` Select Hard Disk Boot Device Priority KLJI: Move Enter: Select F5: Previous Values +/-/PU/PD: Value F10: Save F6: Fail-Safe Defaults ESC: Exit F1: General Help F7: Optimized Defaults Hard Disk Boot Priority Select boot sequence for onboard(or add-on cards) SCSI...by USB-FDD. Use < > or < > to select a device, then press to move it down the list. Press to move it is 360K. (Default value) GA-K8N51GMF-9 Motherboard - 34 - Note that BIOS can not tell from 720K, 1.2M or 1.44M drive type as they are all 80 tracks. Note that there will...
...] [Setup] [PEG] Item Help Menu Level` Select Hard Disk Boot Device Priority KLJI: Move Enter: Select F5: Previous Values +/-/PU/PD: Value F10: Save F6: Fail-Safe Defaults ESC: Exit F1: General Help F7: Optimized Defaults Hard Disk Boot Priority Select boot sequence for onboard(or add-on cards) SCSI...by USB-FDD. Use < > or < > to select a device, then press to move it down the list. Press to move it is 360K. (Default value) GA-K8N51GMF-9 Motherboard - 34 - Note that BIOS can not tell from 720K, 1.2M or 1.44M drive type as they are all 80 tracks. Note that there will...
User Manual
Page 36
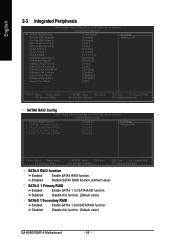
Disable this function. (Default value) GA-K8N51GMF-9 Motherboard - 36 - Disabled Disable this function. (Default value) SATA-II 1 Secondary RAID Enabled Enable SATAII 1 2nd SATA RAID function. English 2-3 Integrated Peripherals CMOS Setup...-II 2 Secondary RAID [Disabled] Disabled Disabled Disabled Disabled Item Help Menu Level` KLJI: Move Enter: Select F5: Previous Values +/-/PU/PD: Value F10: Save F6: Fail-Safe Defaults ESC: Exit F1: General Help F7: Optimized Defaults SATA-II RAID function Enabled Enable SATAII RAID function. Disabled Disable SATAII RAID function...
Disable this function. (Default value) GA-K8N51GMF-9 Motherboard - 36 - Disabled Disable this function. (Default value) SATA-II 1 Secondary RAID Enabled Enable SATAII 1 2nd SATA RAID function. English 2-3 Integrated Peripherals CMOS Setup...-II 2 Secondary RAID [Disabled] Disabled Disabled Disabled Disabled Item Help Menu Level` KLJI: Move Enter: Select F5: Previous Values +/-/PU/PD: Value F10: Save F6: Fail-Safe Defaults ESC: Exit F1: General Help F7: Optimized Defaults SATA-II RAID function Enabled Enable SATAII RAID function. Disabled Disable SATAII RAID function...

User Manual
Page 39
...] [Enabled] [Enabled] [Disabled] Everyday 0 : 0 : 0 [Disabled] Enter [Disabled] [Soft-Off] Item Help Menu Level` KLJI: Move Enter: Select F5: Previous Values +/-/PU/PD: Value F10: Save F6: Fail-Safe Defaults ESC: Exit F1: General Help F7: Optimized Defaults ACPI Suspend Type S1(POS) S3(STR) Set ACPI suspend type to S1/POS...
...] [Enabled] [Enabled] [Disabled] Everyday 0 : 0 : 0 [Disabled] Enter [Disabled] [Soft-Off] Item Help Menu Level` KLJI: Move Enter: Select F5: Previous Values +/-/PU/PD: Value F10: Save F6: Fail-Safe Defaults ESC: Exit F1: General Help F7: Optimized Defaults ACPI Suspend Type S1(POS) S3(STR) Set ACPI suspend type to S1/POS...

User Manual
Page 41
... 2 IRQ Assignment [Auto] [Auto] Item Help Menu Level` Assign PCI IRQ For Device KLJI: Move Enter: Select F5: Previous Values +/-/PU/PD: Value F10: Save F6: Fail-Safe Defaults ESC: Exit F1: General Help F7: Optimized Defaults PCI 1 IRQ Assignment Auto 3,4,5,7,9,10,11,12,14,15 PCI 2 IRQ Assignment Auto 3,4,5,7,9,10...
... 2 IRQ Assignment [Auto] [Auto] Item Help Menu Level` Assign PCI IRQ For Device KLJI: Move Enter: Select F5: Previous Values +/-/PU/PD: Value F10: Save F6: Fail-Safe Defaults ESC: Exit F1: General Help F7: Optimized Defaults PCI 1 IRQ Assignment Auto 3,4,5,7,9,10,11,12,14,15 PCI 2 IRQ Assignment Auto 3,4,5,7,9,10...
User Manual
Page 42
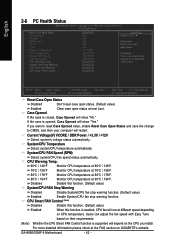
If you install. GA-K8N51GMF-9 Motherboard - 42 - System/CPU Temperature Detect system/CPU temperature automatically. CPU Smart ...function is closed, Case Opened will show "No." If the case is enabled, CPU fan will depend on GIGABYTE's website. For more detailed information please check at next boot. English 2-6 PC Health Status CMOS Setup Utility-Copyright... be Disabled at next boot KLJI: Move Enter: Select F5: Previous Values +/-/PU/PD: Value F10: Save F6: Fail-Safe Defaults ESC: Exit F1: General Help F7: Optimized Defaults Reset Case Open Status Disabled Don't reset...
If you install. GA-K8N51GMF-9 Motherboard - 42 - System/CPU Temperature Detect system/CPU temperature automatically. CPU Smart ...function is closed, Case Opened will show "No." If the case is enabled, CPU fan will depend on GIGABYTE's website. For more detailed information please check at next boot. English 2-6 PC Health Status CMOS Setup Utility-Copyright... be Disabled at next boot KLJI: Move Enter: Select F5: Previous Values +/-/PU/PD: Value F10: Save F6: Fail-Safe Defaults ESC: Exit F1: General Help F7: Optimized Defaults Reset Case Open Status Disabled Don't reset...

User Manual
Page 43
... Clock Ratio Robust Graphics Booster [200.0] [100Mhz] [Default] [Auto] Item Help Menu Level` KLJI: Move Enter: Select F5: Previous Values +/-/PU/PD: Value F10: Save F6: Fail-Safe Defaults ESC: Exit F1: General Help F7: Optimized Defaults Incorrect using these features may cause your system broken.
... Clock Ratio Robust Graphics Booster [200.0] [100Mhz] [Default] [Auto] Item Help Menu Level` KLJI: Move Enter: Select F5: Previous Values +/-/PU/PD: Value F10: Save F6: Fail-Safe Defaults ESC: Exit F1: General Help F7: Optimized Defaults Incorrect using these features may cause your system broken.
User Manual
Page 65
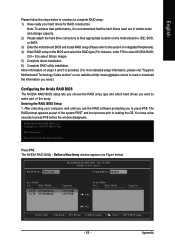
... is provided. (For more detailed setup information, please visit "Support\ Motherboard\ Technology Guide section" on our website at http:\\www.gigabyte.com.tw to read or download the information you need.) Configuring the Nvidia RAID BIOS The NVIDIA RAID BIOS setup lets you choose...Optimal Free Disks Loc Disk Model 2.0.M ST3120026AS 2.1.M ST3120026AS Capacity 111.79GB 111.79GB Array Disks Loc Disk Model [ ] Add Capacity [ ] Del [ESC] Quit [F6] Back [F7] Finish [TAB] Navigate [ ] Select [ENTER] Popup - 65 - The RAID prompt appears as Figure below to construct a complete RAID array:...
... is provided. (For more detailed setup information, please visit "Support\ Motherboard\ Technology Guide section" on our website at http:\\www.gigabyte.com.tw to read or download the information you need.) Configuring the Nvidia RAID BIOS The NVIDIA RAID BIOS setup lets you choose...Optimal Free Disks Loc Disk Model 2.0.M ST3120026AS 2.1.M ST3120026AS Capacity 111.79GB 111.79GB Array Disks Loc Disk Model [ ] Add Capacity [ ] Del [ESC] Quit [F6] Back [F7] Finish [TAB] Navigate [ ] Select [ENTER] Popup - 65 - The RAID prompt appears as Figure below to construct a complete RAID array:...
User Manual
Page 66
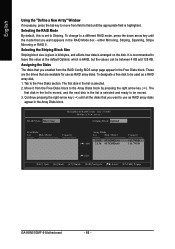
... Disks Loc Disk Model Capacity Array Disks Loc Disk Model [ ] Add 2.0.M ST3120026AS 2.1.M ST3120026AS Capacity 111.79GB 111.79GB [ ] Del [ESC] Quit [F6] Back [F7] Finish [TAB] Navigate [ ] Select [ENTER] Popup GA-K8N51GMF-9 Motherboard - 66 - Selecting the RAID Mode By default, this value at the default Optimal, which is set to Striping. These are...
... Disks Loc Disk Model Capacity Array Disks Loc Disk Model [ ] Add 2.0.M ST3120026AS 2.1.M ST3120026AS Capacity 111.79GB 111.79GB [ ] Del [ESC] Quit [F6] Back [F7] Finish [TAB] Navigate [ ] Select [ENTER] Popup GA-K8N51GMF-9 Motherboard - 66 - Selecting the RAID Mode By default, this value at the default Optimal, which is set to Striping. These are...
User Manual
Page 67
... Disk Model Capacity Clear disk daAtarr?ay Disks Loc Disk Model [Y[] Y]EASdd [N] N11..O01..MM ST3120026AS ST3120026AS Capacity 111.79GB 111.79GB [ ] Del [ESC] Quit [F6] Back [F7] Finish [TAB] Navigate [ ] Select [ENTER] Popup Press Y if you want to wipe out all the data from an array. You can review the...
... Disk Model Capacity Clear disk daAtarr?ay Disks Loc Disk Model [Y[] Y]EASdd [N] N11..O01..MM ST3120026AS ST3120026AS Capacity 111.79GB 111.79GB [ ] Del [ESC] Quit [F6] Back [F7] Finish [TAB] Navigate [ ] Select [ENTER] Popup Press Y if you want to wipe out all the data from an array. You can review the...
User Manual
Page 69
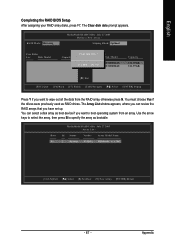
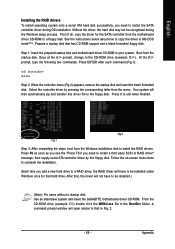
...the RAID drivers. Fig.2 Fig.1 Step 3: After completing the steps, boot from the Windows installation disk to exit when finished. Press F6 as soon as you see the "Press F6 if you add a new hard drive to a RAID array, the RAID driver will then automatically zip and transfer this floppy disk. ... system will have to that has CD-ROM support and a blank formatted floppy disk. After that hard drive. Use an alternative system and insert the GIGABYTE motherboard driver CD-ROM. From the CD-ROM drive (example: D:\) double click the MENU.exe file in your system. Select the controller driver by ...
...the RAID drivers. Fig.2 Fig.1 Step 3: After completing the steps, boot from the Windows installation disk to exit when finished. Press F6 as soon as you see the "Press F6 if you add a new hard drive to a RAID array, the RAID driver will then automatically zip and transfer this floppy disk. ... system will have to that has CD-ROM support and a blank formatted floppy disk. After that hard drive. Use an alternative system and insert the GIGABYTE motherboard driver CD-ROM. From the CD-ROM drive (example: D:\) double click the MENU.exe file in your system. Select the controller driver by ...