
User Manual
Page 5
Channel Audio Function Introduction 70 4-2 Troubleshooting 75 - 5 - Chapter 3 Drivers Installation 47 3-1 Install Chipset Drivers 47 3-2 SoftwareApplication 48 3-3 Software Information 48 3-4 Hardware Information 49 3-5 Contact Us ...49 Chapter 4 Appendix 51 4-1 Unique Software Utilities 51 4-1-1 EasyTune 5 Introduction 51 4-1-2 Xpress Recovery Introduction 52 4-1-3 Flash BIOS Method Introduction 55 4-1-4 Serial ATA BIOS Setting Utility Introduction 64 4-1-5 2- / 4- / 6- / 8-
Channel Audio Function Introduction 70 4-2 Troubleshooting 75 - 5 - Chapter 3 Drivers Installation 47 3-1 Install Chipset Drivers 47 3-2 SoftwareApplication 48 3-3 Software Information 48 3-4 Hardware Information 49 3-5 Contact Us ...49 Chapter 4 Appendix 51 4-1 Unique Software Utilities 51 4-1-1 EasyTune 5 Introduction 51 4-1-2 Xpress Recovery Introduction 52 4-1-3 Flash BIOS Method Introduction 55 4-1-4 Serial ATA BIOS Setting Utility Introduction 64 4-1-5 2- / 4- / 6- / 8-
User Manual
Page 22
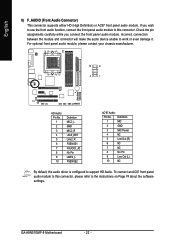
...and connector will make the audio device unable to support HD Audio. Definition 1 MIC 2 GND 3 MIC Power 4 NC 5 Line Out (R) 6 NC 7 NC 8 No Pin 9 Line Out (L) 10 NC By default, the audio driver is configured to work or even damage it. GA-K8N51GMF-9 Motherboard - 22 - ...If you connect the front panel audio module. To connect an AC97 front panel audio module to the instructions on Page 74 about the software settings. ...
...and connector will make the audio device unable to support HD Audio. Definition 1 MIC 2 GND 3 MIC Power 4 NC 5 Line Out (R) 6 NC 7 NC 8 No Pin 9 Line Out (L) 10 NC By default, the audio driver is configured to work or even damage it. GA-K8N51GMF-9 Motherboard - 22 - ...If you connect the front panel audio module. To connect an AC97 front panel audio module to the instructions on Page 74 about the software settings. ...

User Manual
Page 70
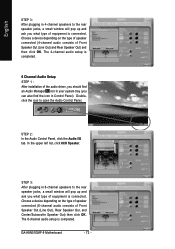
... music, have become a reality so you can, for each audio jack by HD Audio allows users to change the center/ subwoofer speaker out jack to fucntion as a rear speaker out jack via the audio software.Please follow the steps to install the function. (Following ...to the default Mic In jack for the microphone to handle multiple audio streams (in Control Panel). STEP 1 : After installation of the audio driver, you should find the icon in and out) simultaneously. GA-K8N51GMF-9 Motherboard - 70 - all at up to open the Audio Control Panel. English 4-1-5 2- / 4- / 6- / 8- ...
... music, have become a reality so you can, for each audio jack by HD Audio allows users to change the center/ subwoofer speaker out jack to fucntion as a rear speaker out jack via the audio software.Please follow the steps to install the function. (Following ...to the default Mic In jack for the microphone to handle multiple audio streams (in Control Panel). STEP 1 : After installation of the audio driver, you should find the icon in and out) simultaneously. GA-K8N51GMF-9 Motherboard - 70 - all at up to open the Audio Control Panel. English 4-1-5 2- / 4- / 6- / 8- ...

User Manual
Page 71
... of equipment is plugged into the rear Line Out jack, a small window will pop up and ask you what type of the audio driver, you should find an Audio Manager icon in your system tray (you can also find the icon in Control Panel). In the upper left list, click 2CH ...Speaker. STEP 2: In the Audio Control Panel, click the Audio I /O tab. In the upper left list, click 4CH Speaker. - 71 - STEP 2: In the Audio Control Panel, click the Audio I /O tab. Choose Headphone or Line Out depending on the device connected and click OK...
... of equipment is plugged into the rear Line Out jack, a small window will pop up and ask you what type of the audio driver, you should find an Audio Manager icon in your system tray (you can also find the icon in Control Panel). In the upper left list, click 2CH ...Speaker. STEP 2: In the Audio Control Panel, click the Audio I /O tab. In the upper left list, click 4CH Speaker. - 71 - STEP 2: In the Audio Control Panel, click the Audio I /O tab. Choose Headphone or Line Out depending on the device connected and click OK...
User Manual
Page 72
.... In the upper left list, click 6CH Speaker. Choose a device depending on the type of speaker connected (6-channel audio consists of the audio driver, you should find an Audio Manager icon in your system tray (you can also find the icon in Control Panel). STEP 3: After plugging in ...the rear speaker jacks, a small window will pop up and ask you what type of equipment is connected. STEP 2: In the Audio Control Panel, click the Audio I/O tab. GA-K8N51GMF-9 Motherboard - 72 - English STEP 3: After plugging in 4-channel speakers to the rear speaker jacks, a small window will pop ...
.... In the upper left list, click 6CH Speaker. Choose a device depending on the type of speaker connected (6-channel audio consists of the audio driver, you should find an Audio Manager icon in your system tray (you can also find the icon in Control Panel). STEP 3: After plugging in ...the rear speaker jacks, a small window will pop up and ask you what type of equipment is connected. STEP 2: In the Audio Control Panel, click the Audio I/O tab. GA-K8N51GMF-9 Motherboard - 72 - English STEP 3: After plugging in 4-channel speakers to the rear speaker jacks, a small window will pop ...

User Manual
Page 73
... of equipment is completed. - 73 - Appendix English STEP 2: In the Audio Control Panel, click the Audio I/O tab. STEP 3: After plugging in Control Panel). The 8-channel audio setup is connected. 8 Channel Audio Setup STEP 1 : After installation of the audio driver, you should find an Audio Manager icon in your system tray (you what type of Front Speaker Out... icon to the rear speaker jacks, a small window will pop up and ask you can also find the icon in 8-channel speakers to open the Audio Control Panel.
... of equipment is completed. - 73 - Appendix English STEP 2: In the Audio Control Panel, click the Audio I/O tab. STEP 3: After plugging in Control Panel). The 8-channel audio setup is connected. 8 Channel Audio Setup STEP 1 : After installation of the audio driver, you should find an Audio Manager icon in your system tray (you what type of Front Speaker Out... icon to the rear speaker jacks, a small window will pop up and ask you can also find the icon in 8-channel speakers to open the Audio Control Panel.


