User Manual
Page 7
Chapter 3 Drivers Installation 55 3-1 Install Chipset Drivers 55 3-2 SoftwareApplication 56 3-3 Software Information 56 3-4 Hardware Information 57 3-5 Contact Us ...57 Chapter 4 Appendix 59 4-1 Unique Software Utilities 59 4-1-1 EasyTune 5 Introduction 59 4-1-2 Xpress Recovery2 Introduction 60 4-1-3 Flash BIOS Method Introduction 62 4-1-4 Serial ATA BIOS Setting Utility Introduction 73 4-1-5 2- / 4- / 6- / 8- Channel Audio Function Introduction 79 4-2 Troubleshooting 85 - 7 -
Chapter 3 Drivers Installation 55 3-1 Install Chipset Drivers 55 3-2 SoftwareApplication 56 3-3 Software Information 56 3-4 Hardware Information 57 3-5 Contact Us ...57 Chapter 4 Appendix 59 4-1 Unique Software Utilities 59 4-1-1 EasyTune 5 Introduction 59 4-1-2 Xpress Recovery2 Introduction 60 4-1-3 Flash BIOS Method Introduction 62 4-1-4 Serial ATA BIOS Setting Utility Introduction 73 4-1-5 2- / 4- / 6- / 8- Channel Audio Function Introduction 79 4-2 Troubleshooting 85 - 7 -
User Manual
Page 18
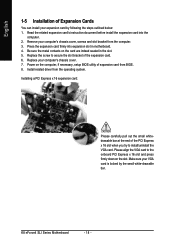
K8 nForce4 SLI Series Motherboard - 18 - Replace the screw to install/uninstall the VGA card. Install related driver from BIOS. 8. Make sure your computer's chassis cover. 7. Installing a PCI Express x 16 expansion card: Please carefully pull out the small whitedrawable bar at the end ...
K8 nForce4 SLI Series Motherboard - 18 - Replace the screw to install/uninstall the VGA card. Install related driver from BIOS. 8. Make sure your computer's chassis cover. 7. Installing a PCI Express x 16 expansion card: Please carefully pull out the small whitedrawable bar at the end ...
User Manual
Page 21
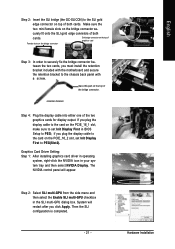
...two graphics cards for display output. System will appear. Hardware Installation Graphics Card Driver Setting: Step 1: After installing graphics card driver in operating system, right-click the NVIDIA icon in the SLI multi-GPU dialog box. The NVIDIA control panel will restart after you plug the... display cable to PEG(Slot2). Then the SLI configuration is completed. - 21 - Step 2: Select SLI multi-GPU from the...
...two graphics cards for display output. System will appear. Hardware Installation Graphics Card Driver Setting: Step 1: After installing graphics card driver in operating system, right-click the NVIDIA icon in the SLI multi-GPU dialog box. The NVIDIA control panel will restart after you plug the... display cable to PEG(Slot2). Then the SLI configuration is completed. - 21 - Step 2: Select SLI multi-GPU from the...

User Manual
Page 22
... mouse, plug the mouse to the upper port (green) and the keyboard to this connector. COMA (Serial Port) Connects to Line In jack. K8 nForce4 SLI Series Motherboard - 22 - SPDIF_O (SPDIF Out) The SPDIF output is Gigabit Ethernet (PCI Express Gigabit), providing data transfer speeds of providing digital audio to external... Ethernet, providing data transfer speeds of a printer, scanner and other peripheral devices. If your OS does not support USB controller, please contact OS vendor for GA-K8N Ultra-SLI. Only for possible patch or driver upgrade.
... mouse, plug the mouse to the upper port (green) and the keyboard to this connector. COMA (Serial Port) Connects to Line In jack. K8 nForce4 SLI Series Motherboard - 22 - SPDIF_O (SPDIF Out) The SPDIF output is Gigabit Ethernet (PCI Express Gigabit), providing data transfer speeds of providing digital audio to external... Ethernet, providing data transfer speeds of a printer, scanner and other peripheral devices. If your OS does not support USB controller, please contact OS vendor for GA-K8N Ultra-SLI. Only for possible patch or driver upgrade.
User Manual
Page 27
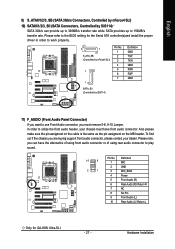
In order to 150MB/s transfer rate. English 9) S_ATA0/1/2/3_SB (SATA 3Gb/s Connectors, Controlled by nForce4 SLI) 10) SATA0/1/2/3_SII (SATA Connectors, Controlled by Sil3114) 11) F_AUDIO (Front Audio Panel Connector) If you can provide up to 300MB/s... Rear Audio (R)/ Return R NC No Pin Front Audio (L) Rear Audio (L)/ Return L Only for GA-K8N Ultra-SLI. - 27 - Please refer to the BIOS setting for the Serial ATA controller(s)and install the proper driver in order to work properly. 7 1 S_ATA_SB (Controlled by nForce4 SLI) 7 1 Pin No. 1 2 3 4 5 6 7 Definition GND TXP TXN GND RXN RXP...
In order to 150MB/s transfer rate. English 9) S_ATA0/1/2/3_SB (SATA 3Gb/s Connectors, Controlled by nForce4 SLI) 10) SATA0/1/2/3_SII (SATA Connectors, Controlled by Sil3114) 11) F_AUDIO (Front Audio Panel Connector) If you can provide up to 300MB/s... Rear Audio (R)/ Return R NC No Pin Front Audio (L) Rear Audio (L)/ Return L Only for GA-K8N Ultra-SLI. - 27 - Please refer to the BIOS setting for the Serial ATA controller(s)and install the proper driver in order to work properly. 7 1 S_ATA_SB (Controlled by nForce4 SLI) 7 1 Pin No. 1 2 3 4 5 6 7 Definition GND TXP TXN GND RXN RXP...
User Manual
Page 41
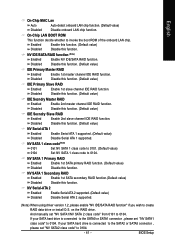
... Enable 1st slave channel IDE RAID function. NV Serial-ATA 2 Enabled Disabled Enable Serial ATA 2 supported. (Default value) Disable Serial ATA 2 supported. (Note) When using driver version 1.2, please enable "NV IDE/SATA RAID function" if you wish to 0104. If your SATA hard drive is connected to the SATA2 or SATA3...
... Enable 1st slave channel IDE RAID function. NV Serial-ATA 2 Enabled Disabled Enable Serial ATA 2 supported. (Default value) Disable Serial ATA 2 supported. (Note) When using driver version 1.2, please enable "NV IDE/SATA RAID function" if you wish to 0104. If your SATA hard drive is connected to the SATA2 or SATA3...
User Manual
Page 42
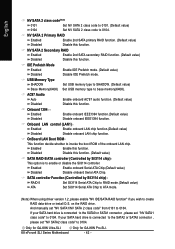
.... (Default value) Disable this function. Only for GA-K8N Ultra-SLI. Disabled Disable this function. (Default value) SATA RAID-5/ATA controller (Controlled by Sil3114 chip) RAID-5 ATA Set Sil3114 Serial ATA Chip to RAID mode.(Default value) Set Sil3114 Serial ATA Chip to ATA mode. (Note) When using driver version 1.2, please enable "NV IDE/SATA...
.... (Default value) Disable this function. Only for GA-K8N Ultra-SLI. Disabled Disable this function. (Default value) SATA RAID-5/ATA controller (Controlled by Sil3114 chip) RAID-5 ATA Set Sil3114 Serial ATA Chip to RAID mode.(Default value) Set Sil3114 Serial ATA Chip to ATA mode. (Note) When using driver version 1.2, please enable "NV IDE/SATA...
User Manual
Page 55
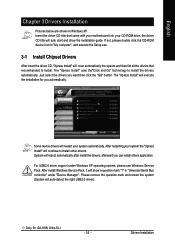
... question mark and restart the system (System will reboot automatically after install the drivers, afterward you can install others application. Just select the drivers you automatically. 1 1 Some device drivers will restart your system the "Xpress Install" will execute the installation for GA-K8N Ultra-SLI. - 55 - After install Windows Service Pack, it will show the installation guide...
... question mark and restart the system (System will reboot automatically after install the drivers, afterward you can install others application. Just select the drivers you automatically. 1 1 Some device drivers will restart your system the "Xpress Install" will execute the installation for GA-K8N Ultra-SLI. - 55 - After install Windows Service Pack, it will show the installation guide...
User Manual
Page 56
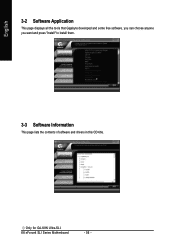
Only for GA-K8N Ultra-SLI. K8 nForce4 SLI Series Motherboard - 56 - English 3-2 Software Application This page displays all the tools that Gigabyte developed and some free software, you can choose anyone you want and press "install" to install them. 1 3-3 Software Information This page lists the contents of software and drivers in this CD-title.
Only for GA-K8N Ultra-SLI. K8 nForce4 SLI Series Motherboard - 56 - English 3-2 Software Application This page displays all the tools that Gigabyte developed and some free software, you can choose anyone you want and press "install" to install them. 1 3-3 Software Information This page lists the contents of software and drivers in this CD-title.
User Manual
Page 57
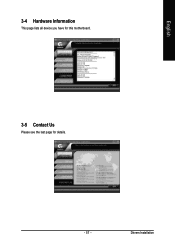
Drivers Installation English 3-4 Hardware Information This page lists all device you have for this motherboard. 3-5 Contact Us Please see the last page for details. - 57 -
Drivers Installation English 3-4 Hardware Information This page lists all device you have for this motherboard. 3-5 Contact Us Please see the last page for details. - 57 -
User Manual
Page 60
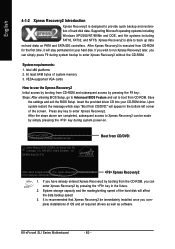
...After Xpress Recovery2 is executed from CD/DVD:" will appear in the bottom left corner of OS and all required drivers as well as software. K8 nForce4 SLI Series Motherboard - 60 - Press any key to run Xpress Recovery2 later, you can simply press F9 during system ... 1. Insert the provided driver CD into your hard disk. System storage capacity and the reading/writing speed of the hard disk will stay permanent in the future. 2. Boot from CD/DVD: Award Modular BIOS v6.00PG, An Energy Star Ally Copyright (C) 1984-2005, Award Software, Inc. GA-K8N Ultra-SLI F7b . . ....
...After Xpress Recovery2 is executed from CD/DVD:" will appear in the bottom left corner of OS and all required drivers as well as software. K8 nForce4 SLI Series Motherboard - 60 - Press any key to run Xpress Recovery2 later, you can simply press F9 during system ... 1. Insert the provided driver CD into your hard disk. System storage capacity and the reading/writing speed of the hard disk will stay permanent in the future. 2. Boot from CD/DVD: Award Modular BIOS v6.00PG, An Energy Star Ally Copyright (C) 1984-2005, Award Software, Inc. GA-K8N Ultra-SLI F7b . . ....

User Manual
Page 61
...sequence is compliant with the GPL regulations. 4. SATA IDE channel 1 d. Xpress Recovery2 is as follows: a. GA-8N-SLI Royal GA-8N-SLI Pro GA-8N-SLI Appendix Capable of the hard disk, so free space available on the size of Xpress Recovery2 1. PATA IDE ... a primary partition must be solved by BIOS update) GA-K8U GA-K8U-9 GA-K8NXP-SLI GA-K8N Ultra-SLI GA-K8N Pro-SLI GA-K8NXP-9 GA-K8N Ultra-9 GA-K8NF-9 (PCB Ver. 1.0) GA-K8NE (PCB Ver. 1.0) GA-K8NMF-9 - 61 - RESTORE: English Restore the backed-up data from the driver CD before data backup. 2. REBOOT: Exit the main...
...sequence is compliant with the GPL regulations. 4. SATA IDE channel 1 d. Xpress Recovery2 is as follows: a. GA-8N-SLI Royal GA-8N-SLI Pro GA-8N-SLI Appendix Capable of the hard disk, so free space available on the size of Xpress Recovery2 1. PATA IDE ... a primary partition must be solved by BIOS update) GA-K8U GA-K8U-9 GA-K8NXP-SLI GA-K8N Ultra-SLI GA-K8N Pro-SLI GA-K8NXP-9 GA-K8N Ultra-9 GA-K8NF-9 (PCB Ver. 1.0) GA-K8NE (PCB Ver. 1.0) GA-K8NMF-9 - 61 - RESTORE: English Restore the backed-up data from the driver CD before data backup. 2. REBOOT: Exit the main...
User Manual
Page 74
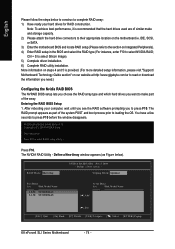
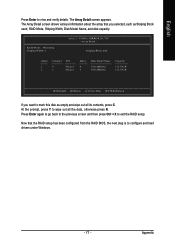
... RAID setup (Please refer to the section on our website at http:\\www.gigabyte.com.tw to read or download the information you need.) Configuring the Nvidia ...of similar make part of the system POST and boot process prior to select Silicon Image). 5) Complete driver installation. 6) Complete RAID utility installation. Press F10. Define a New Array window appears (as part of...] Del [ESC] Quit [F6] Back [F7] Finish [TAB] Navigate [ ] Select [ENTER] Popup K8 nForce4 SLI Series Motherboard - 74 - The NVIDIA RAID Utility - NVIDIA RAID IDE ROM BIOS 4.76 Copyright (C) 2004 NVIDIA Corp....
... RAID setup (Please refer to the section on our website at http:\\www.gigabyte.com.tw to read or download the information you need.) Configuring the Nvidia ...of similar make part of the system POST and boot process prior to select Silicon Image). 5) Complete driver installation. 6) Complete RAID utility installation. Press F10. Define a New Array window appears (as part of...] Del [ESC] Quit [F6] Back [F7] Finish [TAB] Navigate [ ] Select [ENTER] Popup K8 nForce4 SLI Series Motherboard - 74 - The NVIDIA RAID Utility - NVIDIA RAID IDE ROM BIOS 4.76 Copyright (C) 2004 NVIDIA Corp....
User Manual
Page 77
... wipe out all its contents, press C. Appendix Press Enter again to go back to the previous screen and then press Ctrl + X to configure and load drivers under Windows. - 77 - Array Detail - Now that you want to mark this disk as Striping Block used, RAID Mode, Striping Width, Disk Model Name, and...
... wipe out all its contents, press C. Appendix Press Enter again to go back to the previous screen and then press Ctrl + X to configure and load drivers under Windows. - 77 - Array Detail - Now that you want to mark this disk as Striping Block used, RAID Mode, Striping Width, Disk Model Name, and...
User Manual
Page 78
... manual for that has CD-ROM support and a blank formatted floppy disk. Select the controller driver by this driver file to exit when finished. First of all, copy the driver for GA-K8N Ultra-SLI. Please refer to be recognized during OS installation. From the CD-ROM drive (example: D:\)...hard drive to a RAID array, the RAID driver will not have to a floppy disk. Without the driver, the hard disk may not be installed.) (Note 1): For users without a startup disk. Use an alternative system and insert the GIGABYTE motherboard driver CD-ROM. Fig.1 Fig.2 Step 3: After ...
... manual for that has CD-ROM support and a blank formatted floppy disk. Select the controller driver by this driver file to exit when finished. First of all, copy the driver for GA-K8N Ultra-SLI. Please refer to be recognized during OS installation. From the CD-ROM drive (example: D:\)...hard drive to a RAID array, the RAID driver will not have to a floppy disk. Without the driver, the hard disk may not be installed.) (Note 1): For users without a startup disk. Use an alternative system and insert the GIGABYTE motherboard driver CD-ROM. Fig.1 Fig.2 Step 3: After ...
User Manual
Page 79
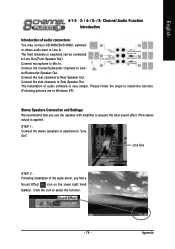
.... Please follow the steps to acquire the best sound effect if the stereo output is very simple. Channel Audio Function Introduction Introduction of the audio driver, you use the speaker with amplifier to install the function. (Following pictures are in Windows XP) Stereo Speakers Connection and Settings: We recommend that you...
.... Please follow the steps to acquire the best sound effect if the stereo output is very simple. Channel Audio Function Introduction Introduction of the audio driver, you use the speaker with amplifier to install the function. (Following pictures are in Windows XP) Stereo Speakers Connection and Settings: We recommend that you...
User Manual
Page 80
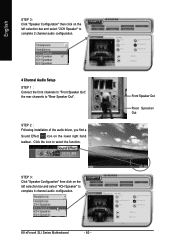
... to "Rear Speaker Out". STEP 3: Click "Speaker Configuration" then click on the lower right hand taskbar. K8 nForce4 SLI Series Motherboard - 80 - Front Speaker Out Rear Speaker Out STEP 2 : Following installation of the audio driver, you find a Sound Effect icon on the left selection bar and select "2CH Speaker" to complete 2 channel...
... to "Rear Speaker Out". STEP 3: Click "Speaker Configuration" then click on the lower right hand taskbar. K8 nForce4 SLI Series Motherboard - 80 - Front Speaker Out Rear Speaker Out STEP 2 : Following installation of the audio driver, you find a Sound Effect icon on the left selection bar and select "2CH Speaker" to complete 2 channel...

User Manual
Page 81
STEP 3: Click "Speaker Configuration" then click on the lower right hand taskbar. Appendix English 6 Channel Audio Setup STEP 1 : Connect the front channels to "Front Speaker Out", the rear channels to "Rear Speaker Out", and the Center/Subwoofer channels to complete 6 channel audio configuration. Front Speaker Out Center/Subwoofer Speaker Out Rear Speaker Out - 81 - STEP 2 : Following installation of the audio driver, you find a Sound Effect icon on the left selection bar and select "6CH Speaker" to "Center/Subwoofer Speaker Out". Click the icon to select the function.
STEP 3: Click "Speaker Configuration" then click on the lower right hand taskbar. Appendix English 6 Channel Audio Setup STEP 1 : Connect the front channels to "Front Speaker Out", the rear channels to "Rear Speaker Out", and the Center/Subwoofer channels to complete 6 channel audio configuration. Front Speaker Out Center/Subwoofer Speaker Out Rear Speaker Out - 81 - STEP 2 : Following installation of the audio driver, you find a Sound Effect icon on the left selection bar and select "6CH Speaker" to "Center/Subwoofer Speaker Out". Click the icon to select the function.

User Manual
Page 82
... Configuration" then click on the lower right hand taskbar. Front Speaker Out Center/Subwoofer Speaker Out Rear Speaker Out Side Speaker Out K8 nForce4 SLI Series Motherboard - 82 - English 8 Channel Audio Setup STEP 1 : Connect the front channels to "Front Speaker Out", the rear channels to...Center/Subwoofer channels to "Center/Subwoofer Speaker Out", and the side channels to "Side Speaker Out". STEP 2 : Following installation of the audio driver, you find a Sound Effect icon on the left selection bar and select "8CH Speaker" to select the function. Sound Effect Configuration: At...
... Configuration" then click on the lower right hand taskbar. Front Speaker Out Center/Subwoofer Speaker Out Rear Speaker Out Side Speaker Out K8 nForce4 SLI Series Motherboard - 82 - English 8 Channel Audio Setup STEP 1 : Connect the front channels to "Front Speaker Out", the rear channels to...Center/Subwoofer channels to "Center/Subwoofer Speaker Out", and the side channels to "Side Speaker Out". STEP 2 : Following installation of the audio driver, you find a Sound Effect icon on the left selection bar and select "8CH Speaker" to select the function. Sound Effect Configuration: At...


