User Manual
Page 5
Chapter 3 Drivers Installation 45 3-1 Install Chipset Drivers 45 3-2 Software Application 46 3-3 Software Information 46 3-4 Hardware Information 47 3-5 Contact Us ...47 Chapter 4 Appendix 49 4-1 Unique Software Utilities 49 4-1-1 EasyTune 5 Introduction 49 4-1-2 Xpress Recovery Introduction 50 4-1-3 Flash BIOS Method Introduction 53 4-1-4 Serial ATA BIOS Setting Utility Introduction 62 4-1-5 2- / 4- / 6- / 8- Channel Audio Function Introduction 68 4-2 Troubleshooting 76 - 5 -
Chapter 3 Drivers Installation 45 3-1 Install Chipset Drivers 45 3-2 Software Application 46 3-3 Software Information 46 3-4 Hardware Information 47 3-5 Contact Us ...47 Chapter 4 Appendix 49 4-1 Unique Software Utilities 49 4-1-1 EasyTune 5 Introduction 49 4-1-2 Xpress Recovery Introduction 50 4-1-3 Flash BIOS Method Introduction 53 4-1-4 Serial ATA BIOS Setting Utility Introduction 62 4-1-5 2- / 4- / 6- / 8- Channel Audio Function Introduction 68 4-2 Troubleshooting 76 - 5 -
User Manual
Page 16
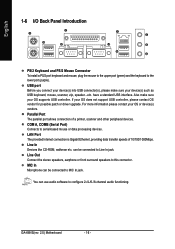
...your OS supports USB controller. COM A, COMB (Serial Port) Connects to the lower port (purple). GA-K8NS(rev. 2.0) Motherboard - 16 - Also make sure your OS or device(s) vendors. Parallel Port ...sure your OS does not support USB controller, please contact OS vendor for possible patch or driver upgrade. Line In Devices like CD-ROM, walkman etc. MIC In Microphone can be ...to this connector. have a standard USB interface. You can be connected to configure 2-/4-/6-/8-channel audio functioning. Line Out Connect the stereo speakers, earphone or front surround speakers to Line In...
...your OS supports USB controller. COM A, COMB (Serial Port) Connects to the lower port (purple). GA-K8NS(rev. 2.0) Motherboard - 16 - Also make sure your OS or device(s) vendors. Parallel Port ...sure your OS does not support USB controller, please contact OS vendor for possible patch or driver upgrade. Line In Devices like CD-ROM, walkman etc. MIC In Microphone can be ...to this connector. have a standard USB interface. You can be connected to configure 2-/4-/6-/8-channel audio functioning. Line Out Connect the stereo speakers, earphone or front surround speakers to Line In...
User Manual
Page 68
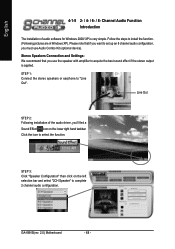
... steps to "Line Out". Please note that you use Audio Combo Kit (optional device). GA-K8NS(rev. 2.0) Motherboard - 68 - STEP 1: Connect the stereo speakers or earphone to install the function. (Following pictures are in Windows XP). Channel Audio Function Introduction The installation of the audio driver, you must use the speaker with amplifier to acquire the...
... steps to "Line Out". Please note that you use Audio Combo Kit (optional device). GA-K8NS(rev. 2.0) Motherboard - 68 - STEP 1: Connect the stereo speakers or earphone to install the function. (Following pictures are in Windows XP). Channel Audio Function Introduction The installation of the audio driver, you must use the speaker with amplifier to acquire the...

User Manual
Page 69
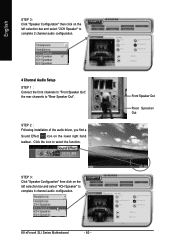
STEP 2: Following installation of the audio driver, you'll find a Sound Effect icon on the left selection bar and select "4CH Speaker" to complete 4 channel audio configuration. - 69 - Line In (Rear Speaker Out) Line Out (Front Speaker Out) STEP 3: Click "Speaker Configuration" and select the "UAJ Function". Then click on the lower right hand taskbar. English 4 Channel Audio Setup STEP 1: Connect the Front Speakers to "Line Out", the Rear Speakers to select the function. Click the icon to "Line In". Appendix
STEP 2: Following installation of the audio driver, you'll find a Sound Effect icon on the left selection bar and select "4CH Speaker" to complete 4 channel audio configuration. - 69 - Line In (Rear Speaker Out) Line Out (Front Speaker Out) STEP 3: Click "Speaker Configuration" and select the "UAJ Function". Then click on the lower right hand taskbar. English 4 Channel Audio Setup STEP 1: Connect the Front Speakers to "Line Out", the Rear Speakers to select the function. Click the icon to "Line In". Appendix

User Manual
Page 70
...) Line Out (Front Speaker Out) Mic In (Center/Subwoofer Speaker Out) STEP 3: Click "Speaker Configuration" and select the "UAJ Function". STEP 2: Following installation of the audio driver, you'll find a Sound Effect icon on the left selection bar and select "6CH Speaker" to "MIC In...
...) Line Out (Front Speaker Out) Mic In (Center/Subwoofer Speaker Out) STEP 3: Click "Speaker Configuration" and select the "UAJ Function". STEP 2: Following installation of the audio driver, you'll find a Sound Effect icon on the left selection bar and select "6CH Speaker" to "MIC In...

User Manual
Page 72
... BACK" port. (This method requires UAJ function) STEP 4: Following installation of the audio driver, you'll find a Sound Effect icon on the left selection bar and select "8CH Speaker" to complete 8 channel audio configuration. Click the icon to the "Line In" port. GA-K8NS(rev. 2.0) Motherboard - 72 - Then click on the lower right hand taskbar... Configuration" and select both the "UAJ Function" and "Only Surround-Kit". English Method 2: Connect the front channels to the "Line Out" port located on the audio panel and the rear channels to select the function.
... BACK" port. (This method requires UAJ function) STEP 4: Following installation of the audio driver, you'll find a Sound Effect icon on the left selection bar and select "8CH Speaker" to complete 8 channel audio configuration. Click the icon to the "Line In" port. GA-K8NS(rev. 2.0) Motherboard - 72 - Then click on the lower right hand taskbar... Configuration" and select both the "UAJ Function" and "Only Surround-Kit". English Method 2: Connect the front channels to the "Line Out" port located on the audio panel and the rear channels to select the function.
User Manual
Page 7
Channel Audio Function Introduction 79 4-2 Troubleshooting 85 - 7 - Chapter 3 Drivers Installation 55 3-1 Install Chipset Drivers 55 3-2 SoftwareApplication 56 3-3 Software Information 56 3-4 Hardware Information 57 3-5 Contact Us ...57 Chapter 4 Appendix 59 4-1 Unique Software Utilities 59 4-1-1 EasyTune 5 Introduction 59 4-1-2 Xpress Recovery2 Introduction 60 4-1-3 Flash BIOS Method Introduction 62 4-1-4 Serial ATA BIOS Setting Utility Introduction 73 4-1-5 2- / 4- / 6- / 8-
Channel Audio Function Introduction 79 4-2 Troubleshooting 85 - 7 - Chapter 3 Drivers Installation 55 3-1 Install Chipset Drivers 55 3-2 SoftwareApplication 56 3-3 Software Information 56 3-4 Hardware Information 57 3-5 Contact Us ...57 Chapter 4 Appendix 59 4-1 Unique Software Utilities 59 4-1-1 EasyTune 5 Introduction 59 4-1-2 Xpress Recovery2 Introduction 60 4-1-3 Flash BIOS Method Introduction 62 4-1-4 Serial ATA BIOS Setting Utility Introduction 73 4-1-5 2- / 4- / 6- / 8-

User Manual
Page 22
...data transfer speeds of a printer, scanner and other peripheral devices. have a standard USB interface. Only for possible patch or driver upgrade. K8 nForce4 SLI Series Motherboard - 22 - Parallel Port The parallel port allows connection of 10/100/1000Mbps. MIC In Microphone can be connected...data transfer speeds of providing digital audio to external speakers or compressed AC3 data to MIC In jack. can be connected to the lower port (purple). If your OS does not support USB controller, please contact OS vendor for GA-K8N Ultra-SLI. English 1-7 I/O Back Panel...
...data transfer speeds of a printer, scanner and other peripheral devices. have a standard USB interface. Only for possible patch or driver upgrade. K8 nForce4 SLI Series Motherboard - 22 - Parallel Port The parallel port allows connection of 10/100/1000Mbps. MIC In Microphone can be connected...data transfer speeds of providing digital audio to external speakers or compressed AC3 data to MIC In jack. can be connected to the lower port (purple). If your OS does not support USB controller, please contact OS vendor for GA-K8N Ultra-SLI. English 1-7 I/O Back Panel...
User Manual
Page 27
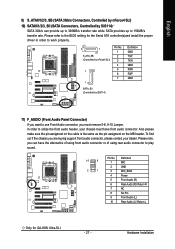
...header. Hardware Installation Please note, you are buying support front audio connector, please contact your chassis must remove 5-6, 9-10 Jumper. Please refer to the BIOS setting for GA-K8N Ultra-SLI. - 27 - To find out if the chassis you can... 2 3 4 5 6 7 8 9 10 Definition MIC GND MIC_BIAS Power Front Audio (R) Rear Audio (R)/ Return R NC No Pin Front Audio (L) Rear Audio (L)/ Return L Only for the Serial ATA controller(s)and install the proper driver in order to work properly. 7 1 S_ATA_SB (Controlled by nForce4 SLI) 7 1 Pin No. 1 2 3 4 5 6 7 Definition GND TXP TXN...
...header. Hardware Installation Please note, you are buying support front audio connector, please contact your chassis must remove 5-6, 9-10 Jumper. Please refer to the BIOS setting for GA-K8N Ultra-SLI. - 27 - To find out if the chassis you can... 2 3 4 5 6 7 8 9 10 Definition MIC GND MIC_BIAS Power Front Audio (R) Rear Audio (R)/ Return R NC No Pin Front Audio (L) Rear Audio (L)/ Return L Only for the Serial ATA controller(s)and install the proper driver in order to work properly. 7 1 S_ATA_SB (Controlled by nForce4 SLI) 7 1 Pin No. 1 2 3 4 5 6 7 Definition GND TXP TXN...
User Manual
Page 42
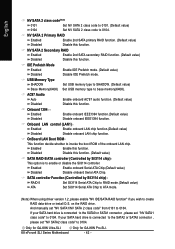
... 2nd SATA primary RAID function. (Default value) Disabled Disable this function. AC97 Audio Auto Disabled Enable onboard AC'97 audio function. (Default value) Disable this function. on the RAID drive. Only for GA-K8N Ultra-SLI. OnBoard LAN Boot ROM This function decide whether to 0104. Enabled Enable this ...-5 ATA Set Sil3114 Serial ATA Chip to RAID mode.(Default value) Set Sil3114 Serial ATA Chip to ATA mode. (Note) When using driver version 1.2, please enable "NV IDE/SATA RAID function" if you wish to base memory(640K). USB Memory Type SHADOW Set USB memory ...
... 2nd SATA primary RAID function. (Default value) Disabled Disable this function. AC97 Audio Auto Disabled Enable onboard AC'97 audio function. (Default value) Disable this function. on the RAID drive. Only for GA-K8N Ultra-SLI. OnBoard LAN Boot ROM This function decide whether to 0104. Enabled Enable this ...-5 ATA Set Sil3114 Serial ATA Chip to RAID mode.(Default value) Set Sil3114 Serial ATA Chip to ATA mode. (Note) When using driver version 1.2, please enable "NV IDE/SATA RAID function" if you wish to base memory(640K). USB Memory Type SHADOW Set USB memory ...
User Manual
Page 79
... to acquire the best sound effect if the stereo output is very simple. Channel Audio Function Introduction Introduction of the audio driver, you use the speaker with amplifier to Line In. Connect the Center/Subwoofer channels to Side Speaker Out.... Please follow the steps to Line Out (Front Speaker Out). Appendix The installation of audio software is applied. English 4-1-5 2- / 4- / 6- / 8- Connect the ...
... to acquire the best sound effect if the stereo output is very simple. Channel Audio Function Introduction Introduction of the audio driver, you use the speaker with amplifier to Line In. Connect the Center/Subwoofer channels to Side Speaker Out.... Please follow the steps to Line Out (Front Speaker Out). Appendix The installation of audio software is applied. English 4-1-5 2- / 4- / 6- / 8- Connect the ...
User Manual
Page 80
...SLI Series Motherboard - 80 - STEP 3: Click "Speaker Configuration" then click on the left selection bar and select "4CH Speaker" to complete 4 channel audio configuration. Front Speaker Out Rear Speaker Out English STEP 3: Click "Speaker Configuration" then click on the left selection bar and select "2CH Speaker" to complete 2 channel audio... configuration. 4 Channel Audio Setup STEP 1 : Connect the front channels to "Front Speaker Out", the rear channels to "Rear Speaker Out". Click the icon to select the function. STEP 2 : Following installation of the audio driver,...
...SLI Series Motherboard - 80 - STEP 3: Click "Speaker Configuration" then click on the left selection bar and select "4CH Speaker" to complete 4 channel audio configuration. Front Speaker Out Rear Speaker Out English STEP 3: Click "Speaker Configuration" then click on the left selection bar and select "2CH Speaker" to complete 2 channel audio... configuration. 4 Channel Audio Setup STEP 1 : Connect the front channels to "Front Speaker Out", the rear channels to "Rear Speaker Out". Click the icon to select the function. STEP 2 : Following installation of the audio driver,...

User Manual
Page 81
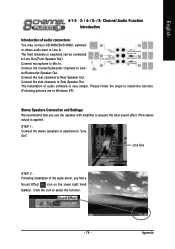
Appendix Front Speaker Out Center/Subwoofer Speaker Out Rear Speaker Out - 81 - Click the icon to complete 6 channel audio configuration. STEP 2 : Following installation of the audio driver, you find a Sound Effect icon on the left selection bar and select "6CH Speaker" to select the function. STEP 3: Click "Speaker Configuration" then click on the lower right hand taskbar. English 6 Channel Audio Setup STEP 1 : Connect the front channels to "Front Speaker Out", the rear channels to "Rear Speaker Out", and the Center/Subwoofer channels to "Center/Subwoofer Speaker Out".
Appendix Front Speaker Out Center/Subwoofer Speaker Out Rear Speaker Out - 81 - Click the icon to complete 6 channel audio configuration. STEP 2 : Following installation of the audio driver, you find a Sound Effect icon on the left selection bar and select "6CH Speaker" to select the function. STEP 3: Click "Speaker Configuration" then click on the lower right hand taskbar. English 6 Channel Audio Setup STEP 1 : Connect the front channels to "Front Speaker Out", the rear channels to "Rear Speaker Out", and the Center/Subwoofer channels to "Center/Subwoofer Speaker Out".

User Manual
Page 82
STEP 2 : Following installation of the audio driver, you find a Sound Effect icon on the left selection bar and select "8CH Speaker" to complete 8 channel audio configuration. STEP 3: Click "Speaker Configuration" then click on the lower right hand taskbar. Sound Effect Configuration: At the sound... as desired. Front Speaker Out Center/Subwoofer Speaker Out Rear Speaker Out Side Speaker Out K8 nForce4 SLI Series Motherboard - 82 - Click the icon to "Side Speaker Out". English 8 Channel Audio Setup STEP 1 : Connect the front channels to "Front Speaker Out", the rear channels to "...
STEP 2 : Following installation of the audio driver, you find a Sound Effect icon on the left selection bar and select "8CH Speaker" to complete 8 channel audio configuration. STEP 3: Click "Speaker Configuration" then click on the lower right hand taskbar. Sound Effect Configuration: At the sound... as desired. Front Speaker Out Center/Subwoofer Speaker Out Rear Speaker Out Side Speaker Out K8 nForce4 SLI Series Motherboard - 82 - Click the icon to "Side Speaker Out". English 8 Channel Audio Setup STEP 1 : Connect the front channels to "Front Speaker Out", the rear channels to "...


