

Manual
Page 3
... and features in this manual may be made by copyright laws and is the property of the motherboard is protected by GIGABYTE without GIGABYTE's prior written permission. „„ In order to assist in this manual are legally registered to their respective owners..... „„ For product-related information, check on our website at: http://www.gigabyte.com Identifying Your Motherboard Revision The revision number on your motherboard revision before updating motherboard BIOS, drivers, or when looking for technical information. Copyright © 2012 GIGA-BYTE TECHNOLOGY CO.,...
... and features in this manual may be made by copyright laws and is the property of the motherboard is protected by GIGABYTE without GIGABYTE's prior written permission. „„ In order to assist in this manual are legally registered to their respective owners..... „„ For product-related information, check on our website at: http://www.gigabyte.com Identifying Your Motherboard Revision The revision number on your motherboard revision before updating motherboard BIOS, drivers, or when looking for technical information. Copyright © 2012 GIGA-BYTE TECHNOLOGY CO.,...
Manual
Page 4
Table of Contents GA-H61M-HD2 Motherboard Layout 5 GA-H61M-HD2 Motherboard Block Diagram 6 Chapter 1 Hardware Installation 7 1-1 Installation Precautions 7 1-2 Product Specifications 8 1-3 Installing the CPU and CPU Cooler 10 1-4 Installing the Memory 11 1-5 Installing an Expansion Card ... 2 BIOS Setup 20 2-1 Startup Screen 20 2-2 The Main Menu 21 2-3 M.I.T...22 2-4 System...29 2-5 BIOS Features 30 2-6 Peripherals...33 2-7 Power Management 34 2-8 Save & Exit...36 Chapter 3 Drivers Installation 37 Regulatory Statements 38 - 4 -
Table of Contents GA-H61M-HD2 Motherboard Layout 5 GA-H61M-HD2 Motherboard Block Diagram 6 Chapter 1 Hardware Installation 7 1-1 Installation Precautions 7 1-2 Product Specifications 8 1-3 Installing the CPU and CPU Cooler 10 1-4 Installing the Memory 11 1-5 Installing an Expansion Card ... 2 BIOS Setup 20 2-1 Startup Screen 20 2-2 The Main Menu 21 2-3 M.I.T...22 2-4 System...29 2-5 BIOS Features 30 2-6 Peripherals...33 2-7 Power Management 34 2-8 Save & Exit...36 Chapter 3 Drivers Installation 37 Regulatory Statements 38 - 4 -
Manual
Page 5
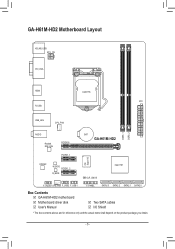
GA-H61M-HD2 Motherboard Layout KB_MS_USB ATX_12V DVI_VGA HDMI LGA1155 ATX R_USB USB_LAN CPU_FAN iTE Super I/O DDR3_1 DDR3_2 AUDIO Realtek GbE LAN PCIEX16 BAT GA-H61M-HD2 PCIEX1_1 CODEC M_BIOS PCIEX1_2 B_BIOS CLR_CMOS Intel® H61 F_AUDIO SYS_FAN F_USB2 F_USB1 F_PANEL SATA2 3 SATA2 2 SATA2 1 SATA2 0 Box Contents 55 GA-H61M-HD2 motherboard 55 Motherboard driver disk 55 User's Manual 55 Two SATA cables 55 I/O Shield * The box contents above are for reference only and the actual items shall depend on the product package you obtain. - 5 -
GA-H61M-HD2 Motherboard Layout KB_MS_USB ATX_12V DVI_VGA HDMI LGA1155 ATX R_USB USB_LAN CPU_FAN iTE Super I/O DDR3_1 DDR3_2 AUDIO Realtek GbE LAN PCIEX16 BAT GA-H61M-HD2 PCIEX1_1 CODEC M_BIOS PCIEX1_2 B_BIOS CLR_CMOS Intel® H61 F_AUDIO SYS_FAN F_USB2 F_USB1 F_PANEL SATA2 3 SATA2 2 SATA2 1 SATA2 0 Box Contents 55 GA-H61M-HD2 motherboard 55 Motherboard driver disk 55 User's Manual 55 Two SATA cables 55 I/O Shield * The box contents above are for reference only and the actual items shall depend on the product package you obtain. - 5 -
Manual
Page 8
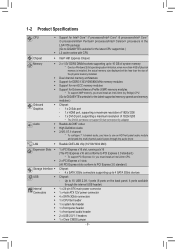
...™ i5 processors/Intel® Core™ i3 processors/Intel® Pentium® processors/Intel® Celeron® processors in the LGA1155 package (Go to GIGABYTE's website for the latest supported memory speeds and memory modules.) ŠŠ Chipset: - 1 x D-Sub port - 1 x HDMI port, supporting a maximum ... modules * To support XMP memory, you have to 10 USB 2.0/1.1 ports (6 ports on the back panel, 4 ports available through the audio driver. LAN ŠŠ Realtek GbE LAN chip (10/100/1000 Mbit) Expansion Slots ŠŠ ŠŠ Storage Interface ŠŠ...
...™ i5 processors/Intel® Core™ i3 processors/Intel® Pentium® processors/Intel® Celeron® processors in the LGA1155 package (Go to GIGABYTE's website for the latest supported memory speeds and memory modules.) ŠŠ Chipset: - 1 x D-Sub port - 1 x HDMI port, supporting a maximum ... modules * To support XMP memory, you have to 10 USB 2.0/1.1 ports (6 ports on the back panel, 4 ports available through the audio driver. LAN ŠŠ Realtek GbE LAN chip (10/100/1000 Mbit) Expansion Slots ŠŠ ŠŠ Storage Interface ŠŠ...
Manual
Page 13
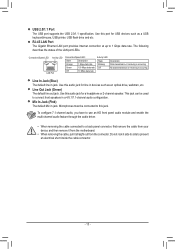
... etc. To configure 7.1-channel audio, you have to use an HD front panel audio module and enable the multi-channel audio feature through the audio driver. •• When removing the cable connected to prevent an electrical short inside the cable connector. - 13 - Do not rock it straight out from the...
... etc. To configure 7.1-channel audio, you have to use an HD front panel audio module and enable the multi-channel audio feature through the audio driver. •• When removing the cable connected to prevent an electrical short inside the cable connector. - 13 - Do not rock it straight out from the...

Manual
Page 33
... instead of using the onboard audio, set the onboard graphics memory size. Advanced Host Controller Interface (AHCI) is an interface specification that allows the storage driver to enable advanced Serial ATA features such as the first display. && Internal Graphics Enables or disables the onboard graphics function. (Default: Auto) && Internal Graphics Memory...
... instead of using the onboard audio, set the onboard graphics memory size. Advanced Host Controller Interface (AHCI) is an interface specification that allows the storage driver to enable advanced Serial ATA features such as the first display. && Internal Graphics Enables or disables the onboard graphics function. (Default: Auto) && Internal Graphics Memory...

Manual
Page 37
... can click the Install All button and "Xpress Install" will automatically scan your optical drive. The driver Autorun screen is automatically displayed which looks like that shown in the screen shot below. (If the driver Autorun screen does not appear automatically, go to My Computer, double-click the optical drive and execute...
... can click the Install All button and "Xpress Install" will automatically scan your optical drive. The driver Autorun screen is automatically displayed which looks like that shown in the screen shot below. (If the driver Autorun screen does not appear automatically, go to My Computer, double-click the optical drive and execute...


