Manual
Page 5
...Driver CD Information 52 3-4 Hardware Information 53 3-5 Contact Us ...53 Chapter 4 Unique Features 55 4-1 Xpress Recovery2 55 4-2 BIOS Update Utilities 60 4-2-1 Updating the BIOS with the Q-Flash Utility 60 4-2-2 Updating the BIOS with the @BIOS Utility 63 4-3 EasyTune 5 Pro 65 4-4 Windows Vista ReadyBoost 66 Chapter 5 Appendix ...67 5-1 Configuring Audio... Input and Output 67 5-1-1 Configuring 2/4/5.1-Channel Audio 67 5-1-2 Installing the S/PDIFOut Cable (Optional 70 5-1-3 Configuring Microphone ...
...Driver CD Information 52 3-4 Hardware Information 53 3-5 Contact Us ...53 Chapter 4 Unique Features 55 4-1 Xpress Recovery2 55 4-2 BIOS Update Utilities 60 4-2-1 Updating the BIOS with the Q-Flash Utility 60 4-2-2 Updating the BIOS with the @BIOS Utility 63 4-3 EasyTune 5 Pro 65 4-4 Windows Vista ReadyBoost 66 Chapter 5 Appendix ...67 5-1 Configuring Audio... Input and Output 67 5-1-1 Configuring 2/4/5.1-Channel Audio 67 5-1-2 Installing the S/PDIFOut Cable (Optional 70 5-1-3 Configuring Microphone ...
Manual
Page 67
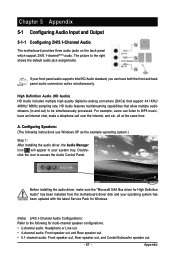
... the example operating system.) Step 1: After installing the audio driver, the Audio Manager icon will appear in and out) to access the Audio Control Panel. For example, users can listen to -analog converters (DACs) that allow multiple audio streams (in your front panel audio supports Intel HD Audio standard, you can have an Internet chat, make sure...
... the example operating system.) Step 1: After installing the audio driver, the Audio Manager icon will appear in and out) to access the Audio Control Panel. For example, users can listen to -analog converters (DACs) that allow multiple audio streams (in your front panel audio supports Intel HD Audio standard, you can have an Internet chat, make sure...
Manual
Page 72
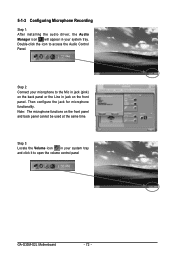
...Double-click the icon to open the volume control panel GA-G33M-S2L Motherboard - 72 - Step 2: Connect your system tray. Then configure the jack for microphone functionality. 5-1-3 Configuring Microphone Recording Step 1: After installing the audio driver, the Audio Manager icon will appear in your microphone to the Mic... in jack (pink) on the back panel or the Line in your system tray and click it to access the Audio Control Panel.
...Double-click the icon to open the volume control panel GA-G33M-S2L Motherboard - 72 - Step 2: Connect your system tray. Then configure the jack for microphone functionality. 5-1-3 Configuring Microphone Recording Step 1: After installing the audio driver, the Audio Manager icon will appear in your microphone to the Mic... in jack (pink) on the back panel or the Line in your system tray and click it to access the Audio Control Panel.


