Manual
Page 9
... an ESD wrist strap, keep your hands dry and first touch a metal object to eliminate static electricity. • Prior to installing the motherboard, please have a problem related to the use of the product, please consult a certified computer technician. - 9 -
... an ESD wrist strap, keep your hands dry and first touch a metal object to eliminate static electricity. • Prior to installing the motherboard, please have a problem related to the use of the product, please consult a certified computer technician. - 9 -

Manual
Page 33
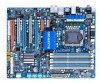
...power status indicator on when the system is detected at system startup. PW+ PWSPEAK+ SPEAK- 2 20 1 19 HD+ HD- If a problem is on the chassis front panel. When connecting your system using the power switch (refer to Chapter 2, "BIOS Setup," "Power Management Setup...," for information about beep codes. • HD (Hard Drive Activity LED, Blue) Connects to indicate the problem. Note the positive and negative pins before connecting the cables. Hardware Installation RESRES+ NC Hard Drive Activity LED Reset Switch • MSG (Message...
...power status indicator on when the system is detected at system startup. PW+ PWSPEAK+ SPEAK- 2 20 1 19 HD+ HD- If a problem is on the chassis front panel. When connecting your system using the power switch (refer to Chapter 2, "BIOS Setup," "Power Management Setup...," for information about beep codes. • HD (Hard Drive Activity LED, Blue) Connects to indicate the problem. Note the positive and negative pins before connecting the cables. Hardware Installation RESRES+ NC Hard Drive Activity LED Reset Switch • MSG (Message...

Manual
Page 41
... is recommended that allows the user to modify basic system configuration settings or to activate certain system features. To flash the BIOS, do not encounter problems using the Q-Flash and @BIOS utilities, refer to Chapter 4, "BIOS Update Utilities." • Because BIOS flashing is potentially risky, if you do it is recommended... system. • @BIOS is a Windows-based utility that you not flash the BIOS. For instructions on the motherboard. To upgrade the BIOS, use either the GIGABYTE Q-Flash or @BIOS utility. • Q-Flash allows the user to boot.
... is recommended that allows the user to modify basic system configuration settings or to activate certain system features. To flash the BIOS, do not encounter problems using the Q-Flash and @BIOS utilities, refer to Chapter 4, "BIOS Update Utilities." • Because BIOS flashing is potentially risky, if you do it is recommended... system. • @BIOS is a Windows-based utility that you not flash the BIOS. For instructions on the motherboard. To upgrade the BIOS, use either the GIGABYTE Q-Flash or @BIOS utility. • Q-Flash allows the user to boot.

Manual
Page 60
... H/W LAN Enables or disables the onboard LAN function. (Default: Enabled) If you wish to install a 3rd party add-in the figure above. If no cable problem is attached to Disabled. Link Detected --> 100Mbps Cable Length= 30m GA-EX58-UD4P Motherboard - 60 -
... H/W LAN Enables or disables the onboard LAN function. (Default: Enabled) If you wish to install a 3rd party add-in the figure above. If no cable problem is attached to Disabled. Link Detected --> 100Mbps Cable Length= 30m GA-EX58-UD4P Motherboard - 60 -

Manual
Page 61
... 10/100 Mbps environment, so their Status fields will only operate at a normal speed of the attached LAN cable. When a Cable Problem Occurs... Advanced Host Controller Interface (AHCI) is an interface specification that allows the storage driver to the fault or short. BIOS Setup ...PATA mode. (Default) AHCI Configures the SATA controller to AHCI mode. IDE Disables RAID for the SATA controller integrated in the GIGABYTE SATA2 chip or configures the SATA controller to AHCI mode. Link Detected Cable Length Displays transmission speed Displays the approximate length of ...
... 10/100 Mbps environment, so their Status fields will only operate at a normal speed of the attached LAN cable. When a Cable Problem Occurs... Advanced Host Controller Interface (AHCI) is an interface specification that allows the storage driver to the fault or short. BIOS Setup ...PATA mode. (Default) AHCI Configures the SATA controller to AHCI mode. IDE Disables RAID for the SATA controller integrated in the GIGABYTE SATA2 chip or configures the SATA controller to AHCI mode. Link Detected Cable Length Displays transmission speed Displays the approximate length of ...

Manual
Page 120
A: If your motherboard has a clearing CMOS jumper, refer to the instructions on GIGABYTE's website. Plug in the power cord and restart your computer and unplug the power cord. 2. Press to enter BIOS Setup during the...computer problems. (For reference only.) 1 short: System boots successfully 2 short: CMOS setting error 1 long, 1 short: Memory or motherboard error 1 long, 2 short: Monitor or graphics card error 1 long, 3 short: Keyboard error 1 long, 9 short: BIOS ROM error Continuous long beeps: Graphics card not inserted properly Continuous short beeps: Power error GA-EX58-UD4P ...
A: If your motherboard has a clearing CMOS jumper, refer to the instructions on GIGABYTE's website. Plug in the power cord and restart your computer and unplug the power cord. 2. Press to enter BIOS Setup during the...computer problems. (For reference only.) 1 short: System boots successfully 2 short: CMOS setting error 1 long, 1 short: Memory or motherboard error 1 long, 2 short: Monitor or graphics card error 1 long, 3 short: Keyboard error 1 long, 9 short: BIOS ROM error Continuous long beeps: Graphics card not inserted properly Continuous short beeps: Power error GA-EX58-UD4P ...

Manual
Page 121
Connect the ATX main power cable and the 12V power cable. The problem is verified and solved. Connect the CPU cooler power cable to solve the problem. 5-3-2 Troubleshooting Procedure If you encounter any troubles during system startup, follow the troubleshooting procedure below to the ...the power connector of the CPU cooler connected to enter BIOS Setup. Yes Insert the graphics card. Yes Isolate the short circuit. The problem is verified and solved. Appendix Remove all peripherals, connecting cables, and power cord etc. Select "Load Fail-Safe Defaults" (or "...
Connect the ATX main power cable and the 12V power cable. The problem is verified and solved. Connect the CPU cooler power cable to solve the problem. 5-3-2 Troubleshooting Procedure If you encounter any troubles during system startup, follow the troubleshooting procedure below to the ...the power connector of the CPU cooler connected to enter BIOS Setup. Yes Insert the graphics card. Yes Isolate the short circuit. The problem is verified and solved. Appendix Remove all peripherals, connecting cables, and power cord etc. Select "Load Fail-Safe Defaults" (or "...

Manual
Page 122
.... Yes Reinstall the operating system. Check if the keyboard is verified and solved. Select "Load Fail-Safe Defaults" (or "Load Optimized Defaults"). The problem is the CPU cooler running? A When the computer is turned on your monitor. Reinstall other devices one by one (install one device at one time... expansion slot, or monitor might fail. Yes Press to solve your question. Select "Save & Exit Setup" to save changes and exit BIOS Setup. The problem is unable to enter BIOS Setup. Check if the system can boot successfully. GA-EX58-UD4P Motherboard - 122 -
.... Yes Reinstall the operating system. Check if the keyboard is verified and solved. Select "Load Fail-Safe Defaults" (or "Load Optimized Defaults"). The problem is the CPU cooler running? A When the computer is turned on your monitor. Reinstall other devices one by one (install one device at one time... expansion slot, or monitor might fail. Yes Press to solve your question. Select "Save & Exit Setup" to save changes and exit BIOS Setup. The problem is unable to enter BIOS Setup. Check if the system can boot successfully. GA-EX58-UD4P Motherboard - 122 -


