Manual
Page 3
...copied, translated, transmitted, or published in the use GIGABYTE's unique features, read or download the information on/from the Support\Motherboard\Technology Guide page on your motherboard revision before updating motherboard BIOS, drivers, or when looking for technical information. Check your ...motherboard looks like this product, GIGABYTE provides the following types of documentations: For quick set-up of ...
...copied, translated, transmitted, or published in the use GIGABYTE's unique features, read or download the information on/from the Support\Motherboard\Technology Guide page on your motherboard revision before updating motherboard BIOS, drivers, or when looking for technical information. Check your ...motherboard looks like this product, GIGABYTE provides the following types of documentations: For quick set-up of ...
Manual
Page 5
... 71 3-1 Installing Chipset Drivers 71 3-2 Application Software 72 3-3 Technical Manuals 72 3-4 Contact ...73 3-5 System ...73 3-6 Download Center 74 Chapter 4 Unique Features 75 4-1 Xpress Recovery2... Appendix ...89 5-1 Configuring SATA Hard Drive(s 89 5-1-1 Configuring Intel ICH10R SATA Controllers 89 5-1-2 Configuring GIGABYTE SATA2/JMB322 SATA Controller 95 5-1-3 Making a SATA RAID/AHCI Driver Diskette 97 5-1-4 Installing the SATA RAID/AHCI Driver and Operating System 99 5-1-5 Smart Backup Utility 104 5-2 ConfiguringAudio Input and Output 105 5-2-1 Configuring 2/4/5.1/7.1-Channel...
... 71 3-1 Installing Chipset Drivers 71 3-2 Application Software 72 3-3 Technical Manuals 72 3-4 Contact ...73 3-5 System ...73 3-6 Download Center 74 Chapter 4 Unique Features 75 4-1 Xpress Recovery2... Appendix ...89 5-1 Configuring SATA Hard Drive(s 89 5-1-1 Configuring Intel ICH10R SATA Controllers 89 5-1-2 Configuring GIGABYTE SATA2/JMB322 SATA Controller 95 5-1-3 Making a SATA RAID/AHCI Driver Diskette 97 5-1-4 Installing the SATA RAID/AHCI Driver and Operating System 99 5-1-5 Smart Backup Utility 104 5-2 ConfiguringAudio Input and Output 105 5-2-1 Configuring 2/4/5.1/7.1-Channel...
Manual
Page 6
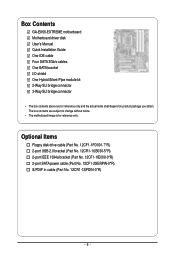
...-0*R) 2-port SATA power cable (Part No. 12CF1-2SERPW-0*R) S/PDIF in cable (Part No. 12CR1-1SPDIN-0*R) - 6 - The box contents are for reference only. Box Contents GA-EX58-EXTREME motherboard Motherboard driver disk User's Manual Quick Installation Guide One IDE cable Four SATA 3Gb/s cables One SATA bracket I/O shield One Hybrid Silent-Pipe module kit 2-Way...
...-0*R) 2-port SATA power cable (Part No. 12CF1-2SERPW-0*R) S/PDIF in cable (Part No. 12CR1-1SPDIN-0*R) - 6 - The box contents are for reference only. Box Contents GA-EX58-EXTREME motherboard Motherboard driver disk User's Manual Quick Installation Guide One IDE cable Four SATA 3Gb/s cables One SATA bracket I/O shield One Hybrid Silent-Pipe module kit 2-Way...
Manual
Page 19
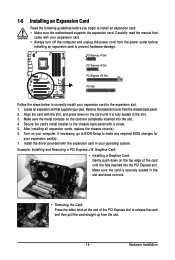
... bracket to the chassis back panel with the slot, and press down on the card are completely inserted into the PCI Express slot. Install the driver provided with your expansion card in the slot and does not rock. • Removing the Card: Press the white latch at the end of the...
... bracket to the chassis back panel with the slot, and press down on the card are completely inserted into the PCI Express slot. Install the driver provided with your expansion card in the slot and does not rock. • Removing the Card: Press the white latch at the end of the...

Manual
Page 22
... enable SLI function For 2-Way/3-Way SLI: After installing graphics card driver in the operating system, go to complete the configuration. GA-EX58-EXTREME Motherboard - 22 - Browse to the CrossFireX screen and select the Enable CrossFire check box to the NVIDIA Control Panel. For ...enabling SLI/CrossFireX technology may slightly differ by graphics cards. C-2 To enable CrossFireX function For 2-Way CrossFireX: After installing graphics card driver in the operating system, go to the SLI and Physx configuration screen. Refer to the CrossFireX screen and select the Enable CrossFire check...
... enable SLI function For 2-Way/3-Way SLI: After installing graphics card driver in the operating system, go to complete the configuration. GA-EX58-EXTREME Motherboard - 22 - Browse to the CrossFireX screen and select the Enable CrossFire check box to the NVIDIA Control Panel. For ...enabling SLI/CrossFireX technology may slightly differ by graphics cards. C-2 To enable CrossFireX function For 2-Way CrossFireX: After installing graphics card driver in the operating system, go to the SLI and Physx configuration screen. Refer to the CrossFireX screen and select the Enable CrossFire check...

Manual
Page 42
... arrow key< > to select the first boot device, then press to the instructions on the Full Screen LOGO Show item on BIOS Setup settings. GA-EX58-EXTREME Motherboard - 42 - The POST Screen Award Modular BIOS v6.00PG, An Energy Star Ally Copyright (C) 1984-2008, Award Software, Inc. Motherboard Model BIOS... BIOS Setup or to access the Q-Flash utility directly without entering BIOS Setup. In Boot Menu, use the up hard drive data using the driver disk, the key can access Boot Menu again to change the first boot device setting as needed. : Q-FLASH Press the key to access the...
... arrow key< > to select the first boot device, then press to the instructions on the Full Screen LOGO Show item on BIOS Setup settings. GA-EX58-EXTREME Motherboard - 42 - The POST Screen Award Modular BIOS v6.00PG, An Energy Star Ally Copyright (C) 1984-2008, Award Software, Inc. Motherboard Model BIOS... BIOS Setup or to access the Q-Flash utility directly without entering BIOS Setup. In Boot Menu, use the up hard drive data using the driver disk, the key can access Boot Menu again to change the first boot device setting as needed. : Q-FLASH Press the key to access the...
Manual
Page 59
.... (Default) AHCI Configures the SATA controllers to AHCI mode. Set this option to Disabled if you wish to install operating systems that allows the storage driver to be used in MS-DOS. (Default: Disabled) USB Mouse Function Allows USB mouse to enable advanced Serial ATA features such as Native Command Queuing...
.... (Default) AHCI Configures the SATA controllers to AHCI mode. Set this option to Disabled if you wish to install operating systems that allows the storage driver to be used in MS-DOS. (Default: Disabled) USB Mouse Function Allows USB mouse to enable advanced Serial ATA features such as Native Command Queuing...
Manual
Page 61
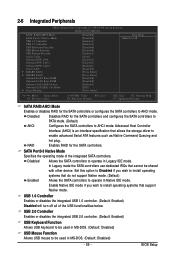
...Allows you to decide whether to activate the boot ROM integrated with the onboard LAN chip. (Default: Disabled) Onboard SATA/IDE Device (GIGABYTE SATA2 Chip) Enables or disables the IDE and SATA controllers integrated in Windows mode or when the LAN Boot ROM is the approximate length ...and install the driver. - 61 - BIOS Setup it will show Open, and the length shown is activated. Link Detected Cable Length Displays transmission speed Displays the approximate length of 10/100/1000 Mbps in the GIGABYTE SATA 2 chip. (Default: Enabled) Onboard SATA/IDE Ctrl Mode (GIGABYTE SATA2 Chip)...
...Allows you to decide whether to activate the boot ROM integrated with the onboard LAN chip. (Default: Disabled) Onboard SATA/IDE Device (GIGABYTE SATA2 Chip) Enables or disables the IDE and SATA controllers integrated in Windows mode or when the LAN Boot ROM is the approximate length ...and install the driver. - 61 - BIOS Setup it will show Open, and the length shown is activated. Link Detected Cable Length Displays transmission speed Displays the approximate length of 10/100/1000 Mbps in the GIGABYTE SATA 2 chip. (Default: Enabled) Onboard SATA/IDE Ctrl Mode (GIGABYTE SATA2 Chip)...
Manual
Page 62
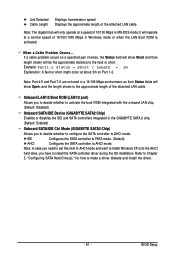
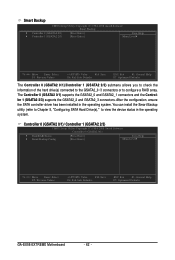
.... You can install the Smart Backup utility (refer to Chapter 5, "Configuring SATA Hard Drive(s)," to configure a RAID array. After the configuration, ensure the SATA controller driver has been installed in the operating system. Controller 0 (GSATA2 0/1)/ Controller 1 (GSATA2 2/3) CMOS Setup Utility-Copyright (C) 1984-2008 Award Software Controller 0 (GSATA2 0/1) Disk/RAID ... Level Move Enter: Select F5: Previous Values +/-/PU/PD: Value F10: Save F6: Fail-Safe Defaults ESC: Exit F1: General Help F7: Optimized Defaults GA-EX58-EXTREME Motherboard - 62 -
.... You can install the Smart Backup utility (refer to Chapter 5, "Configuring SATA Hard Drive(s)," to configure a RAID array. After the configuration, ensure the SATA controller driver has been installed in the operating system. Controller 0 (GSATA2 0/1)/ Controller 1 (GSATA2 2/3) CMOS Setup Utility-Copyright (C) 1984-2008 Award Software Controller 0 (GSATA2 0/1) Disk/RAID ... Level Move Enter: Select F5: Previous Values +/-/PU/PD: Value F10: Save F6: Fail-Safe Defaults ESC: Exit F1: General Help F7: Optimized Defaults GA-EX58-EXTREME Motherboard - 62 -

Manual
Page 63
... to erase an existing RAID array and set up a new array, make sure to set to Normal mode, make sure to install the SATA controller driver in the operating system for the settings to build a RAID array. message appears, press to confirm. (Note: If you want .) (Note) When the hard drive...
... to erase an existing RAID array and set up a new array, make sure to set to Normal mode, make sure to install the SATA controller driver in the operating system for the settings to build a RAID array. message appears, press to confirm. (Note: If you want .) (Note) When the hard drive...
Manual
Page 71
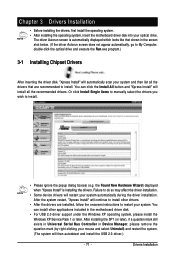
...into your mouse and select Uninstall) and restart the system. (The system will continue to install other applications included in the motherboard driver disk. • For USB 2.0 driver support under the Windows XP operating system, please install the Windows XP Service Pack 1 or later. Failure to install. •...the SP1 (or later), if a question mark still exists in Universal Serial Bus Controller in the screen shot below. (If the driver Autorun screen does not appear automatically, go to My Computer, double-click the optical drive and execute the Run.exe program.) 3-1 Installing Chipset...
...into your mouse and select Uninstall) and restart the system. (The system will continue to install other applications included in the motherboard driver disk. • For USB 2.0 driver support under the Windows XP operating system, please install the Windows XP Service Pack 1 or later. Failure to install. •...the SP1 (or later), if a question mark still exists in Universal Serial Bus Controller in the screen shot below. (If the driver Autorun screen does not appear automatically, go to My Computer, double-click the optical drive and execute the Run.exe program.) 3-1 Installing Chipset...
Manual
Page 72
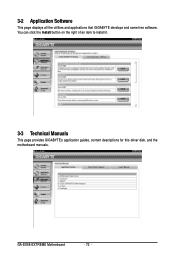
3-2 Application Software This page displays all the utilities and applications that GIGABYTE develops and some free software. GA-EX58-EXTREME Motherboard - 72 - You can click the Install button on the right of an item to install it. 3-3 Technical Manuals This page provides GIGABYTE's application guides, content descriptions for this driver disk, and the motherboard manuals.
3-2 Application Software This page displays all the utilities and applications that GIGABYTE develops and some free software. GA-EX58-EXTREME Motherboard - 72 - You can click the Install button on the right of an item to install it. 3-3 Technical Manuals This page provides GIGABYTE's application guides, content descriptions for this driver disk, and the motherboard manuals.
Manual
Page 73
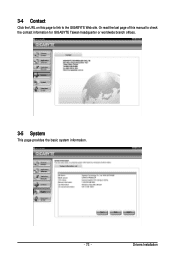
Drivers Installation Or read the last page of this page to link to check the contact information for GIGABYTE Taiwan headquarter or worldwide branch offices. 3-5 System This page provides the basic system information. - 73 - 3-4 Contact Click the URL on this manual to the GIGABYTE Web site.
Drivers Installation Or read the last page of this page to link to check the contact information for GIGABYTE Taiwan headquarter or worldwide branch offices. 3-5 System This page provides the basic system information. - 73 - 3-4 Contact Click the URL on this manual to the GIGABYTE Web site.
Manual
Page 74
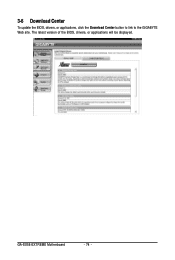
The latest version of the BIOS, drivers, or applications will be displayed. GA-EX58-EXTREME Motherboard - 74 - 3-6 Download Center To update the BIOS, drivers, or applications, click the Download Center button to link to the GIGABYTE Web site.
The latest version of the BIOS, drivers, or applications will be displayed. GA-EX58-EXTREME Motherboard - 74 - 3-6 Download Center To update the BIOS, drivers, or applications, click the Download Center button to link to the GIGABYTE Web site.

Manual
Page 75
... will check the first physical hard drive* for the operating system. A. actual size requirements vary, depending on your system soon after the operating system and drivers are different utilities. "*" Xpress Recovery2 checks the first physical hard drive in RAID/AHCI mode are attached to restore it . When hard drives are not...
... will check the first physical hard drive* for the operating system. A. actual size requirements vary, depending on your system soon after the operating system and drivers are different utilities. "*" Xpress Recovery2 checks the first physical hard drive in RAID/AHCI mode are attached to restore it . When hard drives are not...

Manual
Page 76
... you wish to enter Xpress Recovery2. 2. Step 2: When finished, go to Disk Management to start backing up your hard drive data. Boot from the motherboard driver disk to store the backup image file. C. Using the Backup Function in your hard drive. Go to Disk Management to leave unallocated space (10 GB... access Xpress Recovery2 for the first time, Xpress Recovery2 will save the backup file. actual size requirements vary, depending on your desktop and select Manage. GA-EX58-EXTREME Motherboard - 76 -
... you wish to enter Xpress Recovery2. 2. Step 2: When finished, go to Disk Management to start backing up your hard drive data. Boot from the motherboard driver disk to store the backup image file. C. Using the Backup Function in your hard drive. Go to Disk Management to leave unallocated space (10 GB... access Xpress Recovery2 for the first time, Xpress Recovery2 will save the backup file. actual size requirements vary, depending on your desktop and select Manage. GA-EX58-EXTREME Motherboard - 76 -

Manual
Page 85
... connection settings and Q-Share, you are able to launch the Q-Share tool. Directions for using Q-Share After installing Q-Share from the motherboard driver disk, go to Start>All Programs>GIGABYTE> Q-Share.exe to share your system tray and right-click on the same network, making full use of Internet resources. Figure 1. Data...
... connection settings and Q-Share, you are able to launch the Q-Share tool. Directions for using Q-Share After installing Q-Share from the motherboard driver disk, go to Start>All Programs>GIGABYTE> Q-Share.exe to share your system tray and right-click on the same network, making full use of Internet resources. Figure 1. Data...
Manual
Page 87
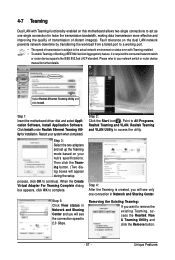
... allows two single connections to act as one connection in Network and Sharing Center. Fault tolerance on your system when completed. Step 1: Insert the motherboard driver disk and select Application Software, Install Application Software. Step 3: Select the two adapters and set up the Teaming mode based on the dual LAN network...
... allows two single connections to act as one connection in Network and Sharing Center. Fault tolerance on your system when completed. Step 1: Insert the motherboard driver disk and select Application Software, Install Application Software. Step 3: Select the two adapters and set up the Teaming mode based on the dual LAN network...

Manual
Page 89
...," to create RAID array on the SATA controller. (Note 2) For ICH10R SATA controller only. - 89 - Appendix Install the SATA RAID/AHCI driver and operating system. (Note 2) Before you begin Please prepare: • At least two SATA hard drives (to ensure optimal performance, it is... you may prepare only one hard drive. • An empty formatted floppy disk. • Windows Vista/XP setup disk. • Motherboard driver disk. 5-1-1 Configuring Intel ICH10R SATA Controllers A. Configure a RAID array in BIOS Setup. Install SATA hard drive(s) in your computer. Configure SATA...
...," to create RAID array on the SATA controller. (Note 2) For ICH10R SATA controller only. - 89 - Appendix Install the SATA RAID/AHCI driver and operating system. (Note 2) Before you begin Please prepare: • At least two SATA hard drives (to ensure optimal performance, it is... you may prepare only one hard drive. • An empty formatted floppy disk. • Windows Vista/XP setup disk. • Motherboard driver disk. 5-1-1 Configuring Intel ICH10R SATA Controllers A. Configure a RAID array in BIOS Setup. Install SATA hard drive(s) in your computer. Configure SATA...

Manual
Page 93
... Menu Figure 6 [ENTER]-Select When completed, you want to create this volume, press to confirm or to create the SATA RAID/AHCI driver diskette and install the SATA RAID/ACHI driver and operating system. - 93 - Intel(R) Matrix Storage Manager option ROM v8.0.0.1039 ICH10R wRAID5 Copyright(C) 2003-08 Intel Corporation. Exit RAID...
... Menu Figure 6 [ENTER]-Select When completed, you want to create this volume, press to confirm or to create the SATA RAID/AHCI driver diskette and install the SATA RAID/ACHI driver and operating system. - 93 - Intel(R) Matrix Storage Manager option ROM v8.0.0.1039 ICH10R wRAID5 Copyright(C) 2003-08 Intel Corporation. Exit RAID...


