
Manual
Page 5
... 5-1-2 Making a SATA RAID/AHCI Driver Diskette 91 5-1-3 Installing the SATA RAID/AHCI Driver and Operating System 93 5-2 ConfiguringAudio Input... and Output 98 5-2-1 Configuring 2/4/5.1/7.1-Channel Audio 98 5-2-2 Installing the S/PDIF In Cable (Optional 100 5-2-3 Enabling the Dolby Home Theater Function 102 5-2-4 Configuring Microphone Recording 103 5-2-5 Using the Sound Recorder 105 5-3 Troubleshooting 106 5-3-1 Frequently Asked Questions 106 5-3-2 Troubleshooting Procedure 107 Regulatory Statements 109 Only for GA-EP45T-DS3R...
... 5-1-2 Making a SATA RAID/AHCI Driver Diskette 91 5-1-3 Installing the SATA RAID/AHCI Driver and Operating System 93 5-2 ConfiguringAudio Input... and Output 98 5-2-1 Configuring 2/4/5.1/7.1-Channel Audio 98 5-2-2 Installing the S/PDIF In Cable (Optional 100 5-2-3 Enabling the Dolby Home Theater Function 102 5-2-4 Configuring Microphone Recording 103 5-2-5 Using the Sound Recorder 105 5-3 Troubleshooting 106 5-3-1 Frequently Asked Questions 106 5-3-2 Troubleshooting Procedure 107 Regulatory Statements 109 Only for GA-EP45T-DS3R...
Manual
Page 6
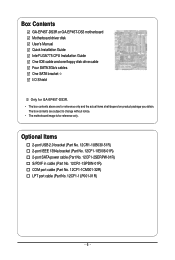
Box Contents GA-EP45T-DS3R or GA-EP45T-DS3 motherboard Motherboard driver disk User's Manual Quick Installation Guide Intel® LGA775 CPU Installation Guide One IDE cable and one floppy disk drive cable Four SATA 3Gb/s cables One SATA bracket I/O Shield Only for GA-EP45T-DS3R. • The box contents above are subject to change without notice. • The motherboard image...
Box Contents GA-EP45T-DS3R or GA-EP45T-DS3 motherboard Motherboard driver disk User's Manual Quick Installation Guide Intel® LGA775 CPU Installation Guide One IDE cable and one floppy disk drive cable Four SATA 3Gb/s cables One SATA bracket I/O Shield Only for GA-EP45T-DS3R. • The box contents above are subject to change without notice. • The motherboard image...

Manual
Page 18
...8226; Removing the Card from the PCIEX16_1 slot: Gently push back on the lever on the card until it is fully seated in your computer. GA-EP45T-DS3R/DS3 Motherboard - 18 - • Removing the Card from the PCIEX8_1 slot: Press the white latch at the end of the card until it is... securely seated in the expansion slot. 1. Install the driver provided with your expansion card(s). 7. After installing all expansion cards, replace the chassis cover(s). 6. Turn on the card are completely inserted into ...
...8226; Removing the Card from the PCIEX16_1 slot: Gently push back on the lever on the card until it is fully seated in your computer. GA-EP45T-DS3R/DS3 Motherboard - 18 - • Removing the Card from the PCIEX8_1 slot: Press the white latch at the end of the card until it is... securely seated in the expansion slot. 1. Install the driver provided with your expansion card(s). 7. After installing all expansion cards, replace the chassis cover(s). 6. Turn on the card are completely inserted into ...

Manual
Page 36
...use the up hard drive data using the driver disk, the key can access Boot Menu again to change the first boot device setting as needed. : Q-Flash Press the key to access the Q-Flash utility directly without entering BIOS Setup. GA-EP45T-DS3R/DS3 Motherboard - 36 - To show the ... Award Modular BIOS v6.00PG, An Energy Star Ally Copyright (C) 1984-2008, Award Software, Inc. To exit Boot Menu, press . Motherboard Model BIOS Version EP45T-DS3R E6 . . . . : BIOS Setup : XpressRecovery2 : Boot Menu : Qflash 05/28/2008-P45-ICH10-7A89PG0LC-00 Function Keys Function Keys: : POST...
...use the up hard drive data using the driver disk, the key can access Boot Menu again to change the first boot device setting as needed. : Q-Flash Press the key to access the Q-Flash utility directly without entering BIOS Setup. GA-EP45T-DS3R/DS3 Motherboard - 36 - To show the ... Award Modular BIOS v6.00PG, An Energy Star Ally Copyright (C) 1984-2008, Award Software, Inc. To exit Boot Menu, press . Motherboard Model BIOS Version EP45T-DS3R E6 . . . . : BIOS Setup : XpressRecovery2 : Boot Menu : Qflash 05/28/2008-P45-ICH10-7A89PG0LC-00 Function Keys Function Keys: : POST...
Manual
Page 51
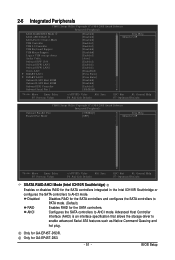
Only for GA-EP45T-DS3. - 51 - Advanced Host Controller Interface (AHCI) is an interface specification that allows the storage driver to AHCI mode. BIOS Setup 2-6 Integrated Peripherals CMOS Setup Utility-Copyright (C) 1984-2008 Award Software Integrated Peripherals SATA RAID/... Southbridge or configures the SATA controllers to enable advanced Serial ATA features such as Native Command Queuing and hot plug. Only for GA-EP45T-DS3R. Disabled Disables RAID for the SATA controllers. AHCI Configures the SATA controllers to PATA mode. (Default) RAID Enables RAID for...
Only for GA-EP45T-DS3. - 51 - Advanced Host Controller Interface (AHCI) is an interface specification that allows the storage driver to AHCI mode. BIOS Setup 2-6 Integrated Peripherals CMOS Setup Utility-Copyright (C) 1984-2008 Award Software Integrated Peripherals SATA RAID/... Southbridge or configures the SATA controllers to enable advanced Serial ATA features such as Native Command Queuing and hot plug. Only for GA-EP45T-DS3R. Disabled Disables RAID for the SATA controllers. AHCI Configures the SATA controllers to PATA mode. (Default) RAID Enables RAID for...
Manual
Page 52
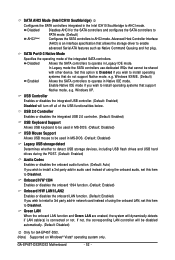
...the SATA controllers and configures the SATA controllers to PATA mode. (Default) AHCI (Note) Configures the SATA controllers to AHCI mode. GA-EP45T-DS3R/DS3 Motherboard - 52 - Disabled Allows the SATA controllers to operate in Native IDE mode. If not, the corresponding LAN controller will dynamically...IRQs that support Native mode, e.g. Enable Native IDE mode if you wish to install operating systems that allows the storage driver to enable advanced Serial ATA features such as Native Command Queuing and hot plug. USB Controller Enables or disables the integrated ...
...the SATA controllers and configures the SATA controllers to PATA mode. (Default) AHCI (Note) Configures the SATA controllers to AHCI mode. GA-EP45T-DS3R/DS3 Motherboard - 52 - Disabled Allows the SATA controllers to operate in Native IDE mode. If not, the corresponding LAN controller will dynamically...IRQs that support Native mode, e.g. Enable Native IDE mode if you wish to install operating systems that allows the storage driver to enable advanced Serial ATA features such as Native Command Queuing and hot plug. USB Controller Enables or disables the integrated ...

Manual
Page 64
GA-EP45T-DS3R/DS3 Motherboard - 64 - You can click the Install button on the right of an item to install it. 3-3 Technical Manuals This page provides GIGABYTE's application guides, content descriptions for this driver disk, and the motherboard manuals. 3-2 Application Software This page displays all the utilities and applications that GIGABYTE develops and some free software.
GA-EP45T-DS3R/DS3 Motherboard - 64 - You can click the Install button on the right of an item to install it. 3-3 Technical Manuals This page provides GIGABYTE's application guides, content descriptions for this driver disk, and the motherboard manuals. 3-2 Application Software This page displays all the utilities and applications that GIGABYTE develops and some free software.

Manual
Page 66
GA-EP45T-DS3R/DS3 Motherboard - 66 - 3-6 Download Center To update the BIOS, drivers, or applications, click the Download Center button to link to the GIGABYTE Web site. The latest version of the BIOS, drivers, or applications will be displayed.
GA-EP45T-DS3R/DS3 Motherboard - 66 - 3-6 Download Center To update the BIOS, drivers, or applications, click the Download Center button to link to the GIGABYTE Web site. The latest version of the BIOS, drivers, or applications will be displayed.

Manual
Page 70
... is detected, Xpress Recovery2 will then begin the backup process (Figure 11). Figure 10 Figure 11 3. B. Accessing Xpress Recovery2 1. Boot from the motherboard driver disk to access Xpress Recovery2 for the first time, Xpress Recovery2 will automatically create a new partition to search the first physical hard drive as the...to check disk allocation. Boot from CD/DVD: Press any key to enter Xpress Recovery2 later, simply press during the POST (Figure 9). Figure 12 GA-EP45T-DS3R/DS3 Motherboard Xpress Recovery2 will stay permanent in Xpress Recovery2 1.
... is detected, Xpress Recovery2 will then begin the backup process (Figure 11). Figure 10 Figure 11 3. B. Accessing Xpress Recovery2 1. Boot from the motherboard driver disk to access Xpress Recovery2 for the first time, Xpress Recovery2 will automatically create a new partition to search the first physical hard drive as the...to check disk allocation. Boot from CD/DVD: Press any key to enter Xpress Recovery2 later, simply press during the POST (Figure 9). Figure 12 GA-EP45T-DS3R/DS3 Motherboard Xpress Recovery2 will stay permanent in Xpress Recovery2 1.
Manual
Page 79
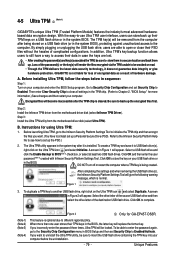
... and then restart your USB flash drive or in the BIOS, the latter key will become inaccessible after the TPM chip is not liable for GA-EP45T-DS3R. (Note 1) (Note 2) (Note 3) (Note 4) This feature is installed. Go to Security Chip Configuration and set Security Chip to open or... Driver). A screen in a secure location and back them up a Personal Secure Drive (PSD). Select a USB flash drive and click the Enable Backup to complete. If you want . (You have a way to access their TPM keys on the Ultra TPM icon and select Duplicate. 4-5 Ultra TPM (Note 1) GIGABYTE's...
... and then restart your USB flash drive or in the BIOS, the latter key will become inaccessible after the TPM chip is not liable for GA-EP45T-DS3R. (Note 1) (Note 2) (Note 3) (Note 4) This feature is installed. Go to Security Chip Configuration and set Security Chip to open or... Driver). A screen in a secure location and back them up a Personal Secure Drive (PSD). Select a USB flash drive and click the Enable Backup to complete. If you want . (You have a way to access their TPM keys on the Ultra TPM icon and select Duplicate. 4-5 Ultra TPM (Note 1) GIGABYTE's...
Manual
Page 80
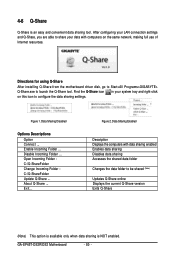
Directions for using Q-Share After installing Q-Share from the motherboard driver disk, go to Start>All Programs>GIGABYTE> Q-Share.exe to configure the data sharing settings. Exit... After configuring your ...LAN connection settings and Q-Share, you are able to share your system tray and right-click on the same network, making full use of Internet resources. Figure 1. Data Sharing Disabled Options Descriptions Option Connect ... Disable Incoming Folder ... Figure 2. GA-EP45T-DS3R/DS3...
Directions for using Q-Share After installing Q-Share from the motherboard driver disk, go to Start>All Programs>GIGABYTE> Q-Share.exe to configure the data sharing settings. Exit... After configuring your ...LAN connection settings and Q-Share, you are able to share your system tray and right-click on the same network, making full use of Internet resources. Figure 1. Data Sharing Disabled Options Descriptions Option Connect ... Disable Incoming Folder ... Figure 2. GA-EP45T-DS3R/DS3...
Manual
Page 82
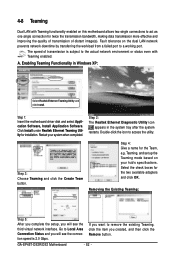
... the system restarts. Step 4: Give a name for the two available adapters and click OK. Select the check boxes for the Team, e.g. GA-EP45T-DS3R/DS3 Motherboard - 82 - 4-8 Teaming Dual LAN with Teaming enabled. Restart your hub's specifications. Removing the Existing Teaming: Step 5: After you complete...Double-click the icon to act as one single connection for installation. The speed of distant image(s). Step 1: Insert the motherboard driver disk and select Application Software, Install Application Software. Teaming, and set up the Teaming mode based on the dual LAN network ...
... the system restarts. Step 4: Give a name for the two available adapters and click OK. Select the check boxes for the Team, e.g. GA-EP45T-DS3R/DS3 Motherboard - 82 - 4-8 Teaming Dual LAN with Teaming enabled. Restart your hub's specifications. Removing the Existing Teaming: Step 5: After you complete...Double-click the icon to act as one single connection for installation. The speed of distant image(s). Step 1: Insert the motherboard driver disk and select Application Software, Install Application Software. Teaming, and set up the Teaming mode based on the dual LAN network ...
Manual
Page 85
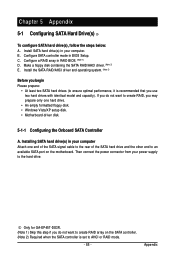
... 2) E. Then connect the power connector from your computer. C . Install the SATA RAID/AHCI driver and operating system. (Note 2) Before you may prepare only one end of the SATA signal cable to the rear of the SATA hard drive and ...(s) in your computer Attach one hard drive. • An empty formatted floppy disk. • Windows Vista/XP setup disk. • Motherboard driver disk. 5-1-1 Configuring the Onboard SATA Controller A. Only for GA-EP45T-DS3R. (Note 1) Skip this step if you use two hard drives with identical model and capacity). Appendix B. Configure SATA controller mode in...
... 2) E. Then connect the power connector from your computer. C . Install the SATA RAID/AHCI driver and operating system. (Note 2) Before you may prepare only one end of the SATA signal cable to the rear of the SATA hard drive and ...(s) in your computer Attach one hard drive. • An empty formatted floppy disk. • Windows Vista/XP setup disk. • Motherboard driver disk. 5-1-1 Configuring the Onboard SATA Controller A. Only for GA-EP45T-DS3R. (Note 1) Skip this step if you use two hard drives with identical model and capacity). Appendix B. Configure SATA controller mode in...
Manual
Page 92
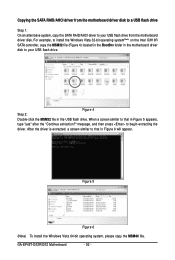
.... Copying the SATA RAID/AHCI driver from the motherboard driver disk. After the driver is extracted, a screen similar to begin extracting the driver. Figure 4 Step 2: Double-click the MSM32 file in Figure 5 appears, type "yes" after the "Continue extraction?" message, and then press to that in the USB flash drive. GA-EP45T-DS3R/DS3 Motherboard - 92 - For example...
.... Copying the SATA RAID/AHCI driver from the motherboard driver disk. After the driver is extracted, a screen similar to begin extracting the driver. Figure 4 Step 2: Double-click the MSM32 file in Figure 5 appears, type "yes" after the "Continue extraction?" message, and then press to that in the USB flash drive. GA-EP45T-DS3R/DS3 Motherboard - 92 - For example...
Manual
Page 94
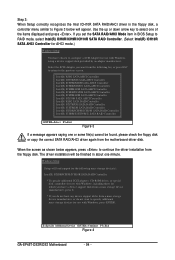
...saying one of the items displayed and press . S=Specify Additional Device ENTER=Continue F3=Exit Figure 4 GA-EP45T-DS3R/DS3 Motherboard - 94 - Select the SCSI Adapter you do not want from the motherboard driver disk. Windows Setup Setup will load support for which you have a device support disk from a ...press ENTER. When the screen as shown below will be found, please check the floppy disk or copy the correct SATA RAID/AHCI driver again from the following mass storage device(s): Intel(R) ICH8R/ICH9R/ICH10R SATA RAID Controller * To specify additional SCSI adapters, CD-ROM ...
...saying one of the items displayed and press . S=Specify Additional Device ENTER=Continue F3=Exit Figure 4 GA-EP45T-DS3R/DS3 Motherboard - 94 - Select the SCSI Adapter you do not want from the motherboard driver disk. Windows Setup Setup will load support for which you have a device support disk from a ...press ENTER. When the screen as shown below will be found, please check the floppy disk or copy the correct SATA RAID/AHCI driver again from the following mass storage device(s): Intel(R) ICH8R/ICH9R/ICH10R SATA RAID Controller * To specify additional SCSI adapters, CD-ROM ...
Manual
Page 96
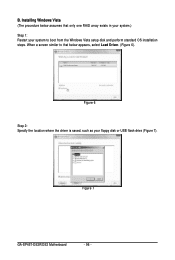
When a screen similar to boot from the Windows Vista setup disk and perform standard OS installation steps. Installing Windows Vista (The procedure below assumes that below appears, select Load Driver. (Figure 6). Figure 6 Step 2: Specify the location where the driver is saved, such as your system to that only one RAID array exists in your system.) Step 1: Restart your floppy disk or USB flash drive (Figure 7). Figure 7 GA-EP45T-DS3R/DS3 Motherboard - 96 - B.
When a screen similar to boot from the Windows Vista setup disk and perform standard OS installation steps. Installing Windows Vista (The procedure below assumes that below appears, select Load Driver. (Figure 6). Figure 6 Step 2: Specify the location where the driver is saved, such as your system to that only one RAID array exists in your system.) Step 1: Restart your floppy disk or USB flash drive (Figure 7). Figure 7 GA-EP45T-DS3R/DS3 Motherboard - 96 - B.
Manual
Page 98
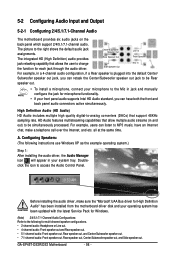
...2/4/5.1/7.1-Channel Audio Configurations: Refer to the following instructions use Windows XP as the example operating system.) Step 1: After installing the audio driver, the Audio Manager icon will appear in and out) to be Rear speaker out. • To install a microphone, connect your...can retask the Center/Subwoofer speaker out jack to MP3 music, have both the front and back panel audio connectors active simultaneously. GA-EP45T-DS3R/DS3 Motherboard - 98 - The picture to access the Audio Control Panel. Configuring Speakers: (The following for microphone functionality. •...
...2/4/5.1/7.1-Channel Audio Configurations: Refer to the following instructions use Windows XP as the example operating system.) Step 1: After installing the audio driver, the Audio Manager icon will appear in and out) to be Rear speaker out. • To install a microphone, connect your...can retask the Center/Subwoofer speaker out jack to MP3 music, have both the front and back panel audio connectors active simultaneously. GA-EP45T-DS3R/DS3 Motherboard - 98 - The picture to access the Audio Control Panel. Configuring Speakers: (The following for microphone functionality. •...
Manual
Page 102
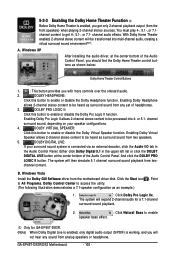
... only 2-channel playback output (from the front speakers) when playing 2-channel stereo sources. Windows XP After installing the audio driver, at the center bottom of the Audio Control Panel. DOLBY HEADPHONE: Click this button to be transformed into 4- or...Only for a 7.1-channel surround sound playback. 2. : Click Natural Bass to be heard as an example.) . channel audio effects. GA-EP45T-DS3R/DS3 Motherboard - 102 - Enabling Dolby Headphone allows 2-channel stereo content to access the utility. (The following illustration demonstrates a 7.1-speaker configuration...
... only 2-channel playback output (from the front speakers) when playing 2-channel stereo sources. Windows XP After installing the audio driver, at the center bottom of the Audio Control Panel. DOLBY HEADPHONE: Click this button to be transformed into 4- or...Only for a 7.1-channel surround sound playback. 2. : Click Natural Bass to be heard as an example.) . channel audio effects. GA-EP45T-DS3R/DS3 Motherboard - 102 - Enabling Dolby Headphone allows 2-channel stereo content to access the utility. (The following illustration demonstrates a 7.1-speaker configuration...


