
Manual
Page 3
... In order to assist in any means without prior notice. For product-related information, check on our website at: http://www.gigabyte.com Identifying Your Motherboard Revision The revision number on your motherboard revision before updating motherboard BIOS, drivers, or when looking for technical information. Check your motherboard looks like this product...
... In order to assist in any means without prior notice. For product-related information, check on our website at: http://www.gigabyte.com Identifying Your Motherboard Revision The revision number on your motherboard revision before updating motherboard BIOS, drivers, or when looking for technical information. Check your motherboard looks like this product...

Manual
Page 5
... 49 3-1 Installing Chipset Drivers 49 3-2 Application Software 50 3-3 Technical Manuals 50 3-4 Contact...51 3-5 System...51 3-6 Download Center 52 3-7 New Utilities...52 Chapter 4 Unique Features 53 4-1 Xpress Recovery2 53 4-2 BIOS ...
... 49 3-1 Installing Chipset Drivers 49 3-2 Application Software 50 3-3 Technical Manuals 50 3-4 Contact...51 3-5 System...51 3-6 Download Center 52 3-7 New Utilities...52 Chapter 4 Unique Features 53 4-1 Xpress Recovery2 53 4-2 BIOS ...
Manual
Page 6
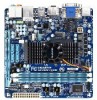
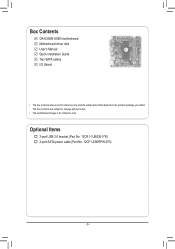
The box contents are for reference only. Box Contents GA-E350N-USB3 motherboard Motherboard driver disk User's Manual Quick Installation Guide Two SATA cables I/O Shield • The box contents above are subject to change without notice. • The motherboard image is for reference only and the actual items shall depend on the product package you obtain. Optional Items 2-port USB 2.0 bracket (Part No. 12CR1-1UB030-5*R) 2-port SATA power cable (Part No. 12CF1-2SERPW-0*R) - 6 -
The box contents are for reference only. Box Contents GA-E350N-USB3 motherboard Motherboard driver disk User's Manual Quick Installation Guide Two SATA cables I/O Shield • The box contents above are subject to change without notice. • The motherboard image is for reference only and the actual items shall depend on the product package you obtain. Optional Items 2-port USB 2.0 bracket (Part No. 12CR1-1UB030-5*R) 2-port SATA power cable (Part No. 12CF1-2SERPW-0*R) - 6 -
Manual
Page 14
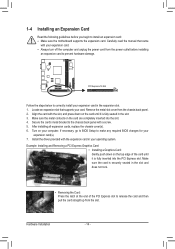
... Card: Press the latch at the end of the PCI Express slot to make any required BIOS changes for your expansion card(s). 777 Install the driver provided with your operating system. Hardware Installation - 14 - 1-4 Installing an Expansion Card Read the following guidelines before installing an expansion card to prevent hardware damage...
... Card: Press the latch at the end of the PCI Express slot to make any required BIOS changes for your expansion card(s). 777 Install the driver provided with your operating system. Hardware Installation - 14 - 1-4 Installing an Expansion Card Read the following guidelines before installing an expansion card to prevent hardware damage...
Manual
Page 16
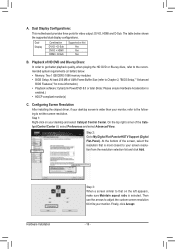
... 256 MB of UMA Frame Buffer Size (refer to My Digital Flat-Panels>HDTV Support (Digital Flat-Panel). Configuring Screen Resolution After installing the chipset driver, if your desktop screen is wider than your monitor. At the bottom of the Catalyst Control Center UI, select Preferences and select Advanced View. A. Dual...
... 256 MB of UMA Frame Buffer Size (refer to My Digital Flat-Panels>HDTV Support (Digital Flat-Panel). Configuring Screen Resolution After installing the chipset driver, if your desktop screen is wider than your monitor. At the bottom of the Catalyst Control Center UI, select Preferences and select Advanced View. A. Dual...
Manual
Page 28
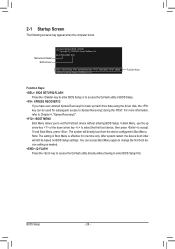
..., Inc. GA-E350N-USB3 D20 . . . . : BIOS Setup : XpressRecovery2 : Boot Menu : Qflash 12/29/2010-Zacate-Hudson-7A66EG01C-00 Function Keys Function Keys: : BIOS SETUP\Q-FLASH Press the key to enter BIOS Setup or to access the Q-Flash utility in Boot Menu. In Boot Menu, use the up hard drive data using the driver disk...
..., Inc. GA-E350N-USB3 D20 . . . . : BIOS Setup : XpressRecovery2 : Boot Menu : Qflash 12/29/2010-Zacate-Hudson-7A66EG01C-00 Function Keys Function Keys: : BIOS SETUP\Q-FLASH Press the key to enter BIOS Setup or to access the Q-Flash utility in Boot Menu. In Boot Menu, use the up hard drive data using the driver disk...

Manual
Page 37
... Away Mode Backup BIOS Image to reduce heat output from your hard drive. AMD K8 Cool&Quiet control Auto Disabled Lets the AMD Cool'n'Quiet driver dynamically adjust the CPU clock and VID to HDD Init Display First [Press Enter] [Auto] [Press Enter] [Hard Disk] [CDROM] [USB-HDD] [Setup] [Disabled] [Disabled...
... Away Mode Backup BIOS Image to reduce heat output from your hard drive. AMD K8 Cool&Quiet control Auto Disabled Lets the AMD Cool'n'Quiet driver dynamically adjust the CPU clock and VID to HDD Init Display First [Press Enter] [Auto] [Press Enter] [Hard Disk] [CDROM] [USB-HDD] [Setup] [Disabled] [Disabled...
Manual
Page 39
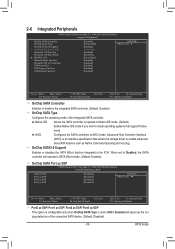
... the SATA 6Gb/s function integrated in Native IDE mode. (Default) Enable Native IDE mode if you wish to install operating systems that allows the storage driver to enable advanced Serial ATA features such as Native Command Queuing and hot plug. Native IDE Allows the SATA controller to AHCI. BIOS Setup When...
... the SATA 6Gb/s function integrated in Native IDE mode. (Default) Enable Native IDE mode if you wish to install operating systems that allows the storage driver to enable advanced Serial ATA features such as Native Command Queuing and hot plug. Native IDE Allows the SATA controller to AHCI. BIOS Setup When...

Manual
Page 49
... go to install. Or click Install Single Items to manually select the drivers you want to manually select the utilities to install. • Please ignore the popup dialog box(es) (e.g. Click Yes to install new GIGABYTE utilities. Or click No if you wish to install on the Application ...Software page later. • For USB 2.0 driver support under the Windows XP operating system, please install the Windows XP Service Pack 1 or...
... go to install. Or click Install Single Items to manually select the drivers you want to manually select the utilities to install. • Please ignore the popup dialog box(es) (e.g. Click Yes to install new GIGABYTE utilities. Or click No if you wish to install on the Application ...Software page later. • For USB 2.0 driver support under the Windows XP operating system, please install the Windows XP Service Pack 1 or...

Manual
Page 50
You can click the Install button on the right of an item to install it. 3-3 Technical Manuals This page provides GIGABYTE's application guides, content descriptions for this driver disk, and the motherboard manuals. Drivers Installation - 50 - 3-2 Application Software This page displays all the utilities and applications that GIGABYTE develops and some free software.
You can click the Install button on the right of an item to install it. 3-3 Technical Manuals This page provides GIGABYTE's application guides, content descriptions for this driver disk, and the motherboard manuals. Drivers Installation - 50 - 3-2 Application Software This page displays all the utilities and applications that GIGABYTE develops and some free software.

Manual
Page 51
3-4 Contact For the detailed contact information of the GIGABYTE Taiwan headquarter or worldwide branch offices, click the URL on this page to link to the GIGABYTE website. 3-5 System This page provides the basic system information. - 51 - Drivers Installation
3-4 Contact For the detailed contact information of the GIGABYTE Taiwan headquarter or worldwide branch offices, click the URL on this page to link to the GIGABYTE website. 3-5 System This page provides the basic system information. - 51 - Drivers Installation

Manual
Page 52
3-6 Download Center To update the BIOS, drivers, or applications, click the Download Center button to link to install. Drivers Installation - 52 - The latest version of an item to install it. You can click the Install button on the right of the BIOS, drivers, or applications will be displayed. 3-7 New Utilities This page provides a quick link to GIGABYTE's lately developed utilities for users to the GIGABYTE website.
3-6 Download Center To update the BIOS, drivers, or applications, click the Download Center button to link to install. Drivers Installation - 52 - The latest version of an item to install it. You can click the Install button on the right of the BIOS, drivers, or applications will be displayed. 3-7 New Utilities This page provides a quick link to GIGABYTE's lately developed utilities for users to the GIGABYTE website.
Manual
Page 53
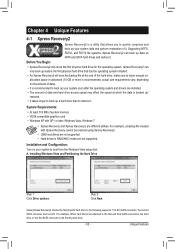
... the speed at which the data is backed up/ restored. • It takes longer to back up your system soon after the operating system and drivers are not supported. System Requirements: • At least 512 MB of the hard drive, make sure to leave enough unallocated space in the following sequence...
... the speed at which the data is backed up/ restored. • It takes longer to back up your system soon after the operating system and drivers are not supported. System Requirements: • At least 512 MB of the hard drive, make sure to leave enough unallocated space in the following sequence...

Manual
Page 54
... Recovery2 Xpress Recovery2 will save the backup file. After you use the backup function in Xpress Recovery2 for the first time. Boot from the motherboard driver disk to enter Xpress Recovery2. 2. Accessing Xpress Recovery2 1.
... Recovery2 Xpress Recovery2 will save the backup file. After you use the backup function in Xpress Recovery2 for the first time. Boot from the motherboard driver disk to enter Xpress Recovery2. 2. Accessing Xpress Recovery2 1.

Manual
Page 61
... Folder ... Unique Features About Q-Share ... Open Incoming Folder : C:\Q-ShareFolder Change Incoming Folder : C:\Q-ShareFolder Update Q-Share ... Directions for using Q-Share After installing Q-Share from the motherboard driver disk, go to Start>All Programs>GIGABYTE>Q-Share.
... Folder ... Unique Features About Q-Share ... Open Incoming Folder : C:\Q-ShareFolder Change Incoming Folder : C:\Q-ShareFolder Update Q-Share ... Directions for using Q-Share After installing Q-Share from the motherboard driver disk, go to Start>All Programs>GIGABYTE>Q-Share.
Manual
Page 65
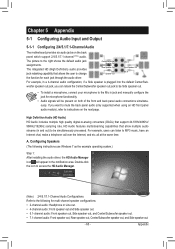
...DACs) that allow multiple audio streams (in and out) to the Mic in jack and manually configure the jack for each jack through the audio driver. Double-click the icon to access the HD Audio Manager. (Note) 2/4/5.1/7.1-Channel Audio Configurations: Refer to the right shows the default audio jack ... on the next page. A. The picture to the following instructions use Windows 7 as the example operating system.) Step 1: After installing the audio driver, the HD Audio Manager icon will be simultaneously processed. all at the same time. For example, in the notification area.
...DACs) that allow multiple audio streams (in and out) to the Mic in jack and manually configure the jack for each jack through the audio driver. Double-click the icon to access the HD Audio Manager. (Note) 2/4/5.1/7.1-Channel Audio Configurations: Refer to the right shows the default audio jack ... on the next page. A. The picture to the following instructions use Windows 7 as the example operating system.) Step 1: After installing the audio driver, the HD Audio Manager icon will be simultaneously processed. all at the same time. For example, in the notification area.

Manual
Page 69
... icon on the right of the Recording Volume slider and set the volumes at the same time. 5-1-4 Configuring Microphone Recording Step 1: After installing the audio driver, the HD Audio Manager icon will appear in jack (pink) on the front panel. Appendix To hear the sound being recorded during the recording process...
... icon on the right of the Recording Volume slider and set the volumes at the same time. 5-1-4 Configuring Microphone Recording Step 1: After installing the audio driver, the HD Audio Manager icon will appear in jack (pink) on the front panel. Appendix To hear the sound being recorded during the recording process...
Manual
Page 72
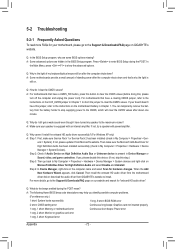
... about one minute. If not, try a speaker with an internal amplifier. Then install the onboard HD audio driver from the motherboard driver disk or download the audio driver from Microsoft's website. A: Some motherboards provide a small amount of my keyboard/optical mouse still on after the... Device on High Definition Audio Bus or Unknown device is still on. If not, please update it from GIGABYTE's website to the Support & Downloads\FAQ page on GIGABYTE's website. 5-2 Troubleshooting 5-2-1 Frequently Asked Questions To read more details, go back to the instructions on the...
... about one minute. If not, try a speaker with an internal amplifier. Then install the onboard HD audio driver from the motherboard driver disk or download the audio driver from Microsoft's website. A: Some motherboards provide a small amount of my keyboard/optical mouse still on after the... Device on High Definition Audio Bus or Unknown device is still on. If not, please update it from GIGABYTE's website to the Support & Downloads\FAQ page on GIGABYTE's website. 5-2 Troubleshooting 5-2-1 Frequently Asked Questions To read more details, go back to the instructions on the...


