Manual
Page 5
... 43 3-1 Installing Chipset Drivers 43 3-2 Application Software 44 3-3 Technical Manuals 44 3-4 Contact...45 3-5 System...45 3-6 Download Center 46 3-7 New Utilities...46 Chapter 4 Unique ...Chapter 5 Appendix...59 5-1 Configuring SATA Hard Drive(s 59 5-1-1 Configuring GIGABYTE SATA2 SATA Controller 60 5-1-2 Making a SATA RAID/AHCI Driver Diskette 66 5-1-3 Installing the SATA RAID/AHCI Driver and Operating System 67 5-2 Configuring Audio Input and Output 72 5-2-1 Configuring 2/4/5.1/7.1-Channel Audio 72 5-2-2 Configuring Microphone Recording 75 5-2-3 Using the Sound Recorder 77...
... 43 3-1 Installing Chipset Drivers 43 3-2 Application Software 44 3-3 Technical Manuals 44 3-4 Contact...45 3-5 System...45 3-6 Download Center 46 3-7 New Utilities...46 Chapter 4 Unique ...Chapter 5 Appendix...59 5-1 Configuring SATA Hard Drive(s 59 5-1-1 Configuring GIGABYTE SATA2 SATA Controller 60 5-1-2 Making a SATA RAID/AHCI Driver Diskette 66 5-1-3 Installing the SATA RAID/AHCI Driver and Operating System 67 5-2 Configuring Audio Input and Output 72 5-2-1 Configuring 2/4/5.1/7.1-Channel Audio 72 5-2-2 Configuring Microphone Recording 75 5-2-3 Using the Sound Recorder 77...

Manual
Page 11
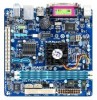
...w 1 x PS/2 mouse port w 1 x parallel port w 1 x serial port w 1 x D-Sub port w 4 x USB 2.0/1.1 ports w 1 x RJ-45 port w 3 x audio jacks (Line In/Line Out/Microphone) w iTE IT8720 chip Hardware Monitor w w w w BIOS w w w w Unique Features w w w w w w w w w w w System voltage...less than 4 GB. (Note 3) To enable 7.1-channel audio, you have to use an HD front panel audio module and enable the multi-channel audio feature through the audio driver. (Note 4) Available functions in EasyTune may differ by ...
...w 1 x PS/2 mouse port w 1 x parallel port w 1 x serial port w 1 x D-Sub port w 4 x USB 2.0/1.1 ports w 1 x RJ-45 port w 3 x audio jacks (Line In/Line Out/Microphone) w iTE IT8720 chip Hardware Monitor w w w w BIOS w w w w Unique Features w w w w w w w w w w w System voltage...less than 4 GB. (Note 3) To enable 7.1-channel audio, you have to use an HD front panel audio module and enable the multi-channel audio feature through the audio driver. (Note 4) Available functions in EasyTune may differ by ...

Manual
Page 14
This jack can be connected to this audio jack for a headphone or 2-channel speaker. To configure 7.1-channel audio, you need connect with the port of HD Audio standard via front panel and enable the multi-channel audio feature through the audio driver. Refer to connect front speakers in a 4/5.1/7.1-channel audio configuration. Line In Jack (Blue) The default line...
This jack can be connected to this audio jack for a headphone or 2-channel speaker. To configure 7.1-channel audio, you need connect with the port of HD Audio standard via front panel and enable the multi-channel audio feature through the audio driver. Refer to connect front speakers in a 4/5.1/7.1-channel audio configuration. Line In Jack (Blue) The default line...
Manual
Page 33
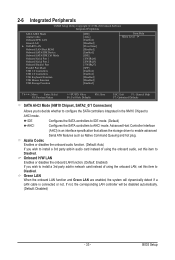
... Interface (AHCI) is connected or not. Azalia Codec Enables or disables the onboard audio function. (Default: Auto) If you wish to install a 3rd party add-in audio card instead of using the onboard audio, set this item to Disabled. If not, the corresponding LAN controller will dynamically ...detect if a LAN cable is an interface specification that allows the storage driver to enable advanced Serial ATA features such ...
... Interface (AHCI) is connected or not. Azalia Codec Enables or disables the onboard audio function. (Default: Auto) If you wish to install a 3rd party add-in audio card instead of using the onboard audio, set this item to Disabled. If not, the corresponding LAN controller will dynamically ...detect if a LAN cable is an interface specification that allows the storage driver to enable advanced Serial ATA features such ...

Manual
Page 72
... following instructions use Windows Vista as the example operating system.) Step 1: After installing the audio driver, the HD Audio Manager icon will be simultaneously processed. all at the same time. Double-click the icon to access the HD Audio Manager. (Note) 2/4/5.1/7.1-Channel Audio Configurations: Refer to instructions on the back panel which support 2/4/5.1/7.1(Note)-channel...
... following instructions use Windows Vista as the example operating system.) Step 1: After installing the audio driver, the HD Audio Manager icon will be simultaneously processed. all at the same time. Double-click the icon to access the HD Audio Manager. (Note) 2/4/5.1/7.1-Channel Audio Configurations: Refer to instructions on the back panel which support 2/4/5.1/7.1(Note)-channel...

Manual
Page 75
... your microphone to record the sound. If you set the volumes at the same time. Step 3: Go to access the HD Audio Manager. 5-2-2 Configuring Microphone Recording Step 1: After installing the audio driver, the HD Audio Manager icon will appear in jack (pink) on the front panel. Double-click the icon to the Microphone screen.
... your microphone to record the sound. If you set the volumes at the same time. Step 3: Go to access the HD Audio Manager. 5-2-2 Configuring Microphone Recording Step 1: After installing the audio driver, the HD Audio Manager icon will appear in jack (pink) on the front panel. Double-click the icon to the Microphone screen.

Manual
Page 78
... that 's why the light is the light of standby power after about one minute. Then install the onboard HD audio driver from the motherboard driver disk or download the audio driver from the battery holder to stop supplying power to the CMOS, which will clear the CMOS values after the computer shuts... the beeps emitted during the POST. 5-3 Troubleshooting 5-3-1 Frequently Asked Questions To read more details, go to the Support&Downloads\Motherboard\FAQ page on GIGABYTE's website. Q: Why is still on the computer name and select Scan for "onboard HD audio driver."
... that 's why the light is the light of standby power after about one minute. Then install the onboard HD audio driver from the motherboard driver disk or download the audio driver from the battery holder to stop supplying power to the CMOS, which will clear the CMOS values after the computer shuts... the beeps emitted during the POST. 5-3 Troubleshooting 5-3-1 Frequently Asked Questions To read more details, go to the Support&Downloads\Motherboard\FAQ page on GIGABYTE's website. Q: Why is still on the computer name and select Scan for "onboard HD audio driver."


