User Manual
Page 7
... or metal components placed on the motherboard or within an electrostatic shielding container. •• Before unplugging the power supply cable from the power outlet before installing or removing the motherboard or other hardware components. •• When connecting hardware components to ... motherboard S/N (Serial Number) sticker or warranty sticker provided by unplugging the power cord from the motherboard, make sure the power supply has been turned off. •• Before turning on the power, make sure they are uncertain about any metal leads or connectors. •...
... or metal components placed on the motherboard or within an electrostatic shielding container. •• Before unplugging the power supply cable from the power outlet before installing or removing the motherboard or other hardware components. •• When connecting hardware components to ... motherboard S/N (Serial Number) sticker or warranty sticker provided by unplugging the power cord from the motherboard, make sure the power supply has been turned off. •• Before turning on the power, make sure they are uncertain about any metal leads or connectors. •...
User Manual
Page 15
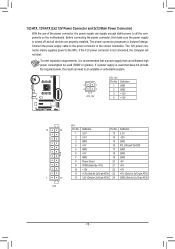
... ATX) GND (Only for 2x12-pin ATX) - 15 - If the 12V power connector is turned off and all the components on the motherboard. Connect the power supply cable to the APU. The power connector possesses a foolproof design. The 12V power connector mainly supplies power to the power connector in the correct orientation. To meet expansion requirements, it is...
... ATX) GND (Only for 2x12-pin ATX) - 15 - If the 12V power connector is turned off and all the components on the motherboard. Connect the power supply cable to the APU. The power connector possesses a foolproof design. The 12V power connector mainly supplies power to the power connector in the correct orientation. To meet expansion requirements, it is...

User Manual
Page 32
...is turned on the system. To turn on upon the return of the AC power. Note: To use this function, you need an ATX power supply providing at least 1A on this function, avoid inadequate shutdown from an AC power loss. Note: To cancel the password, press on the +5VSB lead. (... characters and then press to accept. Note: When using this item. Note: you need an ATX power supply providing at which the system will become unavailable: PME event wake up, power on by mouse, power on by keyboard, and wake on LAN. (Note) Supported on the system. Any KEY Press any ...
...is turned on the system. To turn on upon the return of the AC power. Note: To use this function, you need an ATX power supply providing at least 1A on this function, avoid inadequate shutdown from an AC power loss. Note: To cancel the password, press on the +5VSB lead. (... characters and then press to accept. Note: When using this item. Note: you need an ATX power supply providing at which the system will become unavailable: PME event wake up, power on by mouse, power on by keyboard, and wake on LAN. (Note) Supported on the system. Any KEY Press any ...
User Manual
Page 37
... driver disk. • A USB floppy disk drive (needed during Windows XP installation) • An empty formatted floppy disk (needed during the POST (Power-On Self-Test). Chapter 4 Appendix 4-1 Configuring SATA Hard Drive(s) Before you begin Please prepare: • At least two SATA hard drives (to enter...the key or to change the Assignment option to As SATA Type. 2. Steps: 1. To enable RAID for your power supply to the hard drive. Steps: 1. Then connect the power connector from the exact settings for the SATA2_4/SATA2_5 connectors, set OnChip SATA Type to RAID and set in this ...
... driver disk. • A USB floppy disk drive (needed during Windows XP installation) • An empty formatted floppy disk (needed during the POST (Power-On Self-Test). Chapter 4 Appendix 4-1 Configuring SATA Hard Drive(s) Before you begin Please prepare: • At least two SATA hard drives (to enter...the key or to change the Assignment option to As SATA Type. 2. Steps: 1. To enable RAID for your power supply to the hard drive. Steps: 1. Then connect the power connector from the exact settings for the SATA2_4/SATA2_5 connectors, set OnChip SATA Type to RAID and set in this ...


