
User Manual
Page 1
GA-9IVDT Dual XeonTM (Nocona/Iwindale) Processor Motherboard USER'S MANUAL Dual XeonTM (Nocona/Iwindale)Processor Motherboard Rev. 1102 12ME-9IVDT-1102
GA-9IVDT Dual XeonTM (Nocona/Iwindale) Processor Motherboard USER'S MANUAL Dual XeonTM (Nocona/Iwindale)Processor Motherboard Rev. 1102 12ME-9IVDT-1102
User Manual
Page 2
... Table of Content Item Checklist 4 WARNING 4 Chapter 1 Introduction 5 Features Summary 5 GA-9IVDT Motherboard Layout 7 Chapter 2 Hardware Installation Process 9 Step 1: Install the Central Processing Unit (CPU 10 Step 1-2:CPU Heat Sink Installation 11 Step 2: Install memory modules 13... 17 Step 4-2 :Connectors and Jumper Setting Introduction 19 Chapter 3 BIOS Setup 32 Main ...34 Advanced 37 PCI Configuration ...38 Advanced Chipset Control 40 Advanced Processor Option 42 Peripheral Configuration 44 Security ...48 Server ...50 Console Redirection ...50 Boot ...54 Exit ...55 2
... Table of Content Item Checklist 4 WARNING 4 Chapter 1 Introduction 5 Features Summary 5 GA-9IVDT Motherboard Layout 7 Chapter 2 Hardware Installation Process 9 Step 1: Install the Central Processing Unit (CPU 10 Step 1-2:CPU Heat Sink Installation 11 Step 2: Install memory modules 13... 17 Step 4-2 :Connectors and Jumper Setting Introduction 19 Chapter 3 BIOS Setup 32 Main ...34 Advanced 37 PCI Configuration ...38 Advanced Chipset Control 40 Advanced Processor Option 42 Peripheral Configuration 44 Security ...48 Server ...50 Console Redirection ...50 Boot ...54 Exit ...55 2

User Manual
Page 5
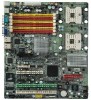
... port Hardware Monitor y CPU/Power/System Fan Revolution Detect y CPU shutdown when overtemperature y System Voltage Detect 5 y GA-9IVDT Motherboard: CPU Chipset Memory I/O Control Slots On-Board IDE y Dual socket 604 for Intel® Xeon(Nocona/Iwindale) processor suopprts 3.6 GB and upper y Intel® Xeon (Nocona/Irwindale) CPUs supports 800 MHz FSB y L2 cache...
... port Hardware Monitor y CPU/Power/System Fan Revolution Detect y CPU shutdown when overtemperature y System Voltage Detect 5 y GA-9IVDT Motherboard: CPU Chipset Memory I/O Control Slots On-Board IDE y Dual socket 604 for Intel® Xeon(Nocona/Iwindale) processor suopprts 3.6 GB and upper y Intel® Xeon (Nocona/Irwindale) CPUs supports 800 MHz FSB y L2 cache...

User Manual
Page 10
.... CPU Top View Pin1 indicator 3. Please change the insert orientation. Pin1 indicator 2. Press down the CPU socket lever and finish CPU installation. 10 English GA-9IVDTMotherboard Step 1: Install the Central Processing Unit (CPU) Before installing the processor , adhere to 90-degree when a noise "cough" made. Then insert the CPU into the socket. 4.
.... CPU Top View Pin1 indicator 3. Please change the insert orientation. Pin1 indicator 2. Press down the CPU socket lever and finish CPU installation. 10 English GA-9IVDTMotherboard Step 1: Install the Central Processing Unit (CPU) Before installing the processor , adhere to 90-degree when a noise "cough" made. Then insert the CPU into the socket. 4.
User Manual
Page 11
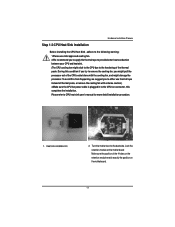
...heatsink. (The CPU cooling fan might stick to the CPU due to the CPU fan connector, this from happening, we suggest you might damage the processor. Heat sink installation kit. 2. To avoid this completes the installation. Lock the retention module on the mother board Make sure the position of the ...to the following warning: 1.Please use thermal tape instead of thermal paste, or remove the cooling fan with the cooling fan, and might pull the processor out of the CPU socket alone with extreme caution.) 3.Make sure the CPU fan power cable is plugged in to the hardening of the 4 ...
...heatsink. (The CPU cooling fan might stick to the CPU due to the CPU fan connector, this from happening, we suggest you might damage the processor. Heat sink installation kit. 2. To avoid this completes the installation. Lock the retention module on the mother board Make sure the position of the ...to the following warning: 1.Please use thermal tape instead of thermal paste, or remove the cooling fan with the cooling fan, and might pull the processor out of the CPU socket alone with extreme caution.) 3.Make sure the CPU fan power cable is plugged in to the hardening of the 4 ...

User Manual
Page 13
... can only fit in one notches. The motherboard has 6 dual inline memory module (DIMM) sockets. Step 2: Install memory modules Hardware Installation Process Before installing the processor and heatsink, adhere to the notch. Please note that the DIMM module can vary between sockets. 㕺㖀㕣 㕼㖀㖄㕡 㖇㕿...
... can only fit in one notches. The motherboard has 6 dual inline memory module (DIMM) sockets. Step 2: Install memory modules Hardware Installation Process Before installing the processor and heatsink, adhere to the notch. Please note that the DIMM module can vary between sockets. 㕺㖀㕣 㕼㖀㖄㕡 㖇㕿...

User Manual
Page 36
This field shows the information of Processor Type, Speed, Extended memory, BIOS Version, BIOS Date, System Product Name, System serial number, System version, System UUID, Main Board ID, and Main Board Serial ... IDE data transfer rate. LBA Mode 32-Bit I/O Transfer Mode Ultra DMA Mode This field shows if the device type in the specific IDE channel. GA-9IVDT Motherboard Multi-Sector Transfer This field displays the information of the device in the specific IDE channel support LBA Mode.
This field shows the information of Processor Type, Speed, Extended memory, BIOS Version, BIOS Date, System Product Name, System serial number, System version, System UUID, Main Board ID, and Main Board Serial ... IDE data transfer rate. LBA Mode 32-Bit I/O Transfer Mode Ultra DMA Mode This field shows if the device type in the specific IDE channel. GA-9IVDT Motherboard Multi-Sector Transfer This field displays the information of the device in the specific IDE channel support LBA Mode.
User Manual
Page 37
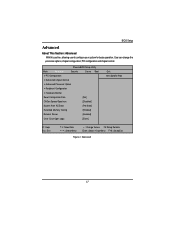
PhoenixBIOS Setup Utility Main Advanced Security Server Boot PCI Configuration Advanced Chipset Control Advanced Processor Option Peripheral Configuration Hardware Monitor Reset Configuration Data [No] ClkGen Spread Spectrum [Disabled] System After AC Back [Pre-State] Extended Memory Testing [Enabled] Network Server [... 2: Advanced 37 BIOS Setup Advanced About This Section: Advanced With this section, allowing user to configure your system for basic operation. User can change the processor options, chipset configuration, PCI configuration and chipset control.
PhoenixBIOS Setup Utility Main Advanced Security Server Boot PCI Configuration Advanced Chipset Control Advanced Processor Option Peripheral Configuration Hardware Monitor Reset Configuration Data [No] ClkGen Spread Spectrum [Disabled] System After AC Back [Pre-State] Extended Memory Testing [Enabled] Network Server [... 2: Advanced 37 BIOS Setup Advanced About This Section: Advanced With this section, allowing user to configure your system for basic operation. User can change the processor options, chipset configuration, PCI configuration and chipset control.
User Manual
Page 42
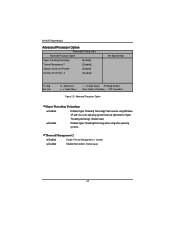
Disabled Disable this function. (Default value) 42 GA-9IVDT Motherboard Advanced Processor Option PhoenixBIOS Setup Utility Advanced Processor Option Hyper Threading Technology [Enabled] Thermal Management 2 [Disabled] Adjacent Cache Line Prefetch [Enabled] Set Max Ext... Item IJ: Select Menu + -: Change Values F5: Setup Defaults Enter: Select Sub-Menu F10: Save&Exit Figure 2-3: Advanced Processor Option Hyper Threading Technology Enabled Enables Hyper-Threading Technology Feature when using other operating systems. Thermal Management 2 Enabled Enable Thermal Management 2...
Disabled Disable this function. (Default value) 42 GA-9IVDT Motherboard Advanced Processor Option PhoenixBIOS Setup Utility Advanced Processor Option Hyper Threading Technology [Enabled] Thermal Management 2 [Disabled] Adjacent Cache Line Prefetch [Enabled] Set Max Ext... Item IJ: Select Menu + -: Change Values F5: Setup Defaults Enter: Select Sub-Menu F10: Save&Exit Figure 2-3: Advanced Processor Option Hyper Threading Technology Enabled Enables Hyper-Threading Technology Feature when using other operating systems. Thermal Management 2 Enabled Enable Thermal Management 2...

User Manual
Page 43
Enabled Enable Set Max Ext CPUID = 3 function. BIOS Setup Adjacent Cache Line Prefetch Enabled Processor will fetch both cache lines when it requires data that is not currently inits cache. (Defualt value) Disabled Processor will only fetch the cache line that contains the data currently required by the processor. Disabled Disable this function. (Default value) 43 Set Max Ext CPUID = 3 Set MAX CPUID extended function value to 3.
Enabled Enable Set Max Ext CPUID = 3 function. BIOS Setup Adjacent Cache Line Prefetch Enabled Processor will fetch both cache lines when it requires data that is not currently inits cache. (Defualt value) Disabled Processor will only fetch the cache line that contains the data currently required by the processor. Disabled Disable this function. (Default value) 43 Set Max Ext CPUID = 3 Set MAX CPUID extended function value to 3.


