Manual
Page 3
...is 1.0. For product-related information, check on our website at: http://www.gigabyte.com Identifying Your Motherboard Revision The revision number on your motherboard revision before updating motherboard BIOS, drivers, or when looking for technical information. For example, "REV: 1.0" means ... copied, translated, transmitted, or published in this manual are legally registered to assist in this manual is protected by GIGABYTE without GIGABYTE's prior written permission. Documentation Classifications In order to their respective owners. Example: No part of the product, read ...
...is 1.0. For product-related information, check on our website at: http://www.gigabyte.com Identifying Your Motherboard Revision The revision number on your motherboard revision before updating motherboard BIOS, drivers, or when looking for technical information. For example, "REV: 1.0" means ... copied, translated, transmitted, or published in this manual are legally registered to assist in this manual is protected by GIGABYTE without GIGABYTE's prior written permission. Documentation Classifications In order to their respective owners. Example: No part of the product, read ...

Manual
Page 5
... 57 3-1 Installing Chipset Drivers 57 3-2 Application Software 58 3-3 Technical Manuals 58 3-4 Contact...59 3-5 System...59 3-6 Download Center 60 3-7 New Utilities...60 Chapter 4 Unique Features 61 4-1 Xpress... Auto Green...73 4-8 Cloud OC...74 Chapter 5 Appendix...75 5-1 Configuring SATA Hard Drive(s 75 5-1-1 Configuring SATA Controllers 75 5-1-2 Installing the SATA RAID/AHCI Driver and Operating System 81 5-2 Configuring Audio Input and Output 85 5-2-1 Configuring 2/4/5.1/7.1-Channel Audio 85 5-2-2 Configuring S/PDIF Out 87 5-2-3 Configuring Microphone Recording 88 5-2-4 Using ...
... 57 3-1 Installing Chipset Drivers 57 3-2 Application Software 58 3-3 Technical Manuals 58 3-4 Contact...59 3-5 System...59 3-6 Download Center 60 3-7 New Utilities...60 Chapter 4 Unique Features 61 4-1 Xpress... Auto Green...73 4-8 Cloud OC...74 Chapter 5 Appendix...75 5-1 Configuring SATA Hard Drive(s 75 5-1-1 Configuring SATA Controllers 75 5-1-2 Installing the SATA RAID/AHCI Driver and Operating System 81 5-2 Configuring Audio Input and Output 85 5-2-1 Configuring 2/4/5.1/7.1-Channel Audio 85 5-2-2 Configuring S/PDIF Out 87 5-2-3 Configuring Microphone Recording 88 5-2-4 Using ...
Manual
Page 6
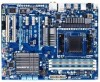
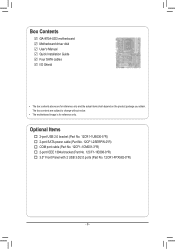
... cable (Part No. 12CF1-1CM001-3*R) 2-port IEEE 1394a bracket (Part No. 12CF1-1IE008-0*R) 3.5" Front Panel with 2 USB 3.0/2.0 ports (Part No. 12CR1-FPX582-0*R) - 6 - Box Contents GA-970A-UD3 motherboard Motherboard driver disk User's Manual Quick Installation Guide Four SATA cables I/O Shield • The box contents above are subject to change without notice. • The motherboard...
... cable (Part No. 12CF1-1CM001-3*R) 2-port IEEE 1394a bracket (Part No. 12CF1-1IE008-0*R) 3.5" Front Panel with 2 USB 3.0/2.0 ports (Part No. 12CR1-FPX582-0*R) - 6 - Box Contents GA-970A-UD3 motherboard Motherboard driver disk User's Manual Quick Installation Guide Four SATA cables I/O Shield • The box contents above are subject to change without notice. • The motherboard...
Manual
Page 18
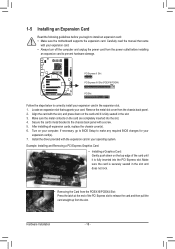
... - Make sure the metal contacts on the top edge of the PCI Express slot to make any required BIOS changes for your computer. Install the driver provided with your card. Align the card with a screw. 5. If necessary, go to BIOS Setup to release the card and then pull the card straight...
... - Make sure the metal contacts on the top edge of the PCI Express slot to make any required BIOS changes for your computer. Install the driver provided with your card. Align the card with a screw. 5. If necessary, go to BIOS Setup to release the card and then pull the card straight...

Manual
Page 32
...(Default) Function Keys B. Note: The setting in Boot Menu. BIOS Setup - 32 - In Boot Menu, use the up hard drive data using the driver disk, the key can access Boot Menu again to change the first boot device setting as needed. : Q-FLASH Press the key to the instructions on... Recovery2 to back up arrow key or the down arrow key to select the first boot device, then press to Xpress Recovery2 during the POST. GA-970A-UD3 D3a . . . . : BIOS Setup : XpressRecovery2 : Boot Menu : Qflash 04/29/2011-RD970-SB950-7A66FG05C-00 Function Keys Function Keys: : POST SCREEN Press the ...
...(Default) Function Keys B. Note: The setting in Boot Menu. BIOS Setup - 32 - In Boot Menu, use the up hard drive data using the driver disk, the key can access Boot Menu again to change the first boot device setting as needed. : Q-FLASH Press the key to the instructions on... Recovery2 to back up arrow key or the down arrow key to select the first boot device, then press to Xpress Recovery2 during the POST. GA-970A-UD3 D3a . . . . : BIOS Setup : XpressRecovery2 : Boot Menu : Qflash 04/29/2011-RD970-SB950-7A66FG05C-00 Function Keys Function Keys: : POST SCREEN Press the ...
Manual
Page 43
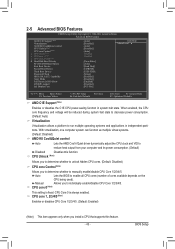
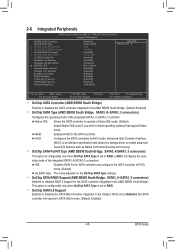
... enabled. With virtualization, one computer system can function as multiple virtual systems. (Default: Disabled) AMD K8 Cool&Quiet control Auto Lets the AMD Cool'n'Quiet driver dynamically adjust the CPU clock and VID to enable all CPU cores (number of cores available depends on the CPU being used). CPU core 1, 2/3/4/5 (Note...
... enabled. With virtualization, one computer system can function as multiple virtual systems. (Default: Disabled) AMD K8 Cool&Quiet control Auto Lets the AMD Cool'n'Quiet driver dynamically adjust the CPU clock and VID to enable all CPU cores (number of cores available depends on the CPU being used). CPU core 1, 2/3/4/5 (Note...
Manual
Page 45
... the SATA 6Gb/s function integrated in Native IDE mode. (Default) Enable Native IDE mode if you wish to install operating systems that allows the storage driver to Disabled, the SATA controller will operate in SATA 3Gb/s mode. (Default: Enabled) - 45 - BIOS Setup This option is configurable only when OnChip SATA Type...
... the SATA 6Gb/s function integrated in Native IDE mode. (Default) Enable Native IDE mode if you wish to install operating systems that allows the storage driver to Disabled, the SATA controller will operate in SATA 3Gb/s mode. (Default: Enabled) - 45 - BIOS Setup This option is configurable only when OnChip SATA Type...
Manual
Page 57
... a question mark still exists in Universal Serial Bus Controller in the screen shot below. (If the driver Autorun screen does not appear automatically, go to install new GIGABYTE utilities. The driver Autorun screen is installing the drivers. You can click the Install All button and "Xpress Install" will then autodetect and install the USB...
... a question mark still exists in Universal Serial Bus Controller in the screen shot below. (If the driver Autorun screen does not appear automatically, go to install new GIGABYTE utilities. The driver Autorun screen is installing the drivers. You can click the Install All button and "Xpress Install" will then autodetect and install the USB...
Manual
Page 58
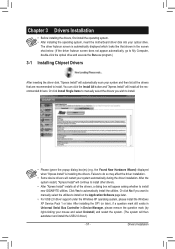
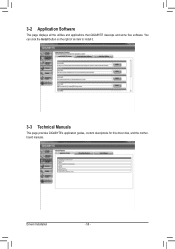
Drivers Installation - 58 - 3-2 Application Software This page displays all the utilities and applications that GIGABYTE develops and some free software. You can click the Install button on the right of an item to install it. 3-3 Technical Manuals This page provides GIGABYTE's application guides, content descriptions for this driver disk, and the motherboard manuals.
Drivers Installation - 58 - 3-2 Application Software This page displays all the utilities and applications that GIGABYTE develops and some free software. You can click the Install button on the right of an item to install it. 3-3 Technical Manuals This page provides GIGABYTE's application guides, content descriptions for this driver disk, and the motherboard manuals.

Manual
Page 59
3-4 Contact For the detailed contact information of the GIGABYTE Taiwan headquarter or worldwide branch offices, click the URL on this page to link to the GIGABYTE website. 3-5 System This page provides the basic system information. - 59 - Drivers Installation
3-4 Contact For the detailed contact information of the GIGABYTE Taiwan headquarter or worldwide branch offices, click the URL on this page to link to the GIGABYTE website. 3-5 System This page provides the basic system information. - 59 - Drivers Installation
Manual
Page 60
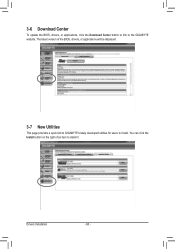
3-6 Download Center To update the BIOS, drivers, or applications, click the Download Center button to link to install. The latest version of an item to install it. Drivers Installation - 60 - You can click the Install button on the right of the BIOS, drivers, or applications will be displayed. 3-7 New Utilities This page provides a quick link to GIGABYTE's lately developed utilities for users to the GIGABYTE website.
3-6 Download Center To update the BIOS, drivers, or applications, click the Download Center button to link to install. The latest version of an item to install it. Drivers Installation - 60 - You can click the Install button on the right of the BIOS, drivers, or applications will be displayed. 3-7 New Utilities This page provides a quick link to GIGABYTE's lately developed utilities for users to the GIGABYTE website.

Manual
Page 61
.... • GPT partitions are not supported. • Hard drives larger than to quickly compress and back up your system soon after the operating system and drivers are installed. • The amount of data and hard drive access speed may affect the speed at the end of system memory • VESA compatible...
.... • GPT partitions are not supported. • Hard drives larger than to quickly compress and back up your system soon after the operating system and drivers are installed. • The amount of data and hard drive access speed may affect the speed at the end of system memory • VESA compatible...

Manual
Page 62
...). After you use the backup function in Xpress Recovery2 for the first time. Using the Backup Function in your hard drive. Boot from the motherboard driver disk to access Xpress Recovery2 for the first time, Xpress Recovery2 will stay permanent in Xpress Recovery2 Xpress Recovery2 will save the backup file. Go...
...). After you use the backup function in Xpress Recovery2 for the first time. Using the Backup Function in your hard drive. Boot from the motherboard driver disk to access Xpress Recovery2 for the first time, Xpress Recovery2 will stay permanent in Xpress Recovery2 Xpress Recovery2 will save the backup file. Go...
Manual
Page 71
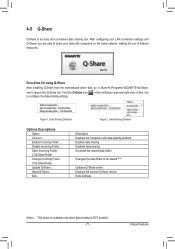
... Displays the computers with computers on this icon Figure 1. Unique Features Find the Q-Share icon to Start>All Programs>GIGABYTE>Q-Share. Disable Incoming Folder ... After configuring your LAN connection settings and Q-Share, you are able to share your data... Folder : C:\Q-ShareFolder Change Incoming Folder : C:\Q-ShareFolder Update Q-Share ... Directions for using Q-Share After installing Q-Share from the motherboard driver disk, go to configure the data sharing settings. in the notification area and right-click on the same network, making full use ...
... Displays the computers with computers on this icon Figure 1. Unique Features Find the Q-Share icon to Start>All Programs>GIGABYTE>Q-Share. Disable Incoming Folder ... After configuring your LAN connection settings and Q-Share, you are able to share your data... Folder : C:\Q-ShareFolder Change Incoming Folder : C:\Q-ShareFolder Update Q-Share ... Directions for using Q-Share After installing Q-Share from the motherboard driver disk, go to configure the data sharing settings. in the notification area and right-click on the same network, making full use ...

Manual
Page 75
... hard drives (to ensure optimal performance, it is set to available SATA port on the motherboard. Appendix C. Install the SATA RAID/AHCI driver (Note 2) and operating system. Install SATA hard drive(s) in your computer. Installing SATA hard drive(s) in your computer Attach one hard... drive. • Windows 7/Vista/XP setup disk. • Motherboard driver disk. • A USB floppy disk drive (needed during Windows XP installation) • An empty formatted floppy disk (needed during Windows XP ...
... hard drives (to ensure optimal performance, it is set to available SATA port on the motherboard. Appendix C. Install the SATA RAID/AHCI driver (Note 2) and operating system. Install SATA hard drive(s) in your computer. Installing SATA hard drive(s) in your computer Attach one hard... drive. • Windows 7/Vista/XP setup disk. • Motherboard driver disk. • A USB floppy disk drive (needed during Windows XP installation) • An empty formatted floppy disk (needed during Windows XP ...

Manual
Page 81
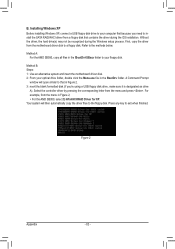
... in Figure 1 appears, select AMD AHCI Compatible RAID Controller and click Next to load the driver and continue the OS installation Figure 1 - 81 - The locations of the driver. Step 2: Insert the motherboard driver disk and then browse to install Windows 7/Vista/XP. When you arrive at the "Where ... are ready to the location of the drivers are as follows: RAID driver for Windows 32-bit: \BootDrv\SBxxxW7\RAID\W7 RAID driver for Windows 64-bit: \BootDrv\SBxxxW7\RAID\W764A AHCI driver for Windows 32-bit: \BootDrv\SBxxxW7\AHCI\Win7x86 AHCI driver for Windows 64-bit: \BootDrv\SBxxxW7\...
... in Figure 1 appears, select AMD AHCI Compatible RAID Controller and click Next to load the driver and continue the OS installation Figure 1 - 81 - The locations of the driver. Step 2: Insert the motherboard driver disk and then browse to install Windows 7/Vista/XP. When you arrive at the "Where ... are ready to the location of the drivers are as follows: RAID driver for Windows 32-bit: \BootDrv\SBxxxW7\RAID\W7 RAID driver for Windows 64-bit: \BootDrv\SBxxxW7\RAID\W764A AHCI driver for Windows 32-bit: \BootDrv\SBxxxW7\AHCI\Win7x86 AHCI driver for Windows 64-bit: \BootDrv\SBxxxW7\...
Manual
Page 82
... drive folder, double click the Menu.exe file in Figure 2, • For the AMD SB950, select 3) ATi AHCI/RAID Driver for XP. For example, from the motherboard driver disk to the floppy disk. Press any key to your computer first because you 're using a USB floppy disk drive, make... sure it is designated as drive A). Without the driver, the hard drive(s) may not be recognized during the OS installation. Installing Windows XP Before installing Windows XP, connect a USB floppy disk drive to ...
... drive folder, double click the Menu.exe file in Figure 2, • For the AMD SB950, select 3) ATi AHCI/RAID Driver for XP. For example, from the motherboard driver disk to the floppy disk. Press any key to your computer first because you 're using a USB floppy disk drive, make... sure it is designated as drive A). Without the driver, the hard drive(s) may not be recognized during the OS installation. Installing Windows XP Before installing Windows XP, connect a USB floppy disk drive to ...
Manual
Page 83
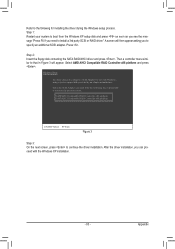
... in Figure 3 will then appear asking you can proceed with Windows, using a device support disk provided by an adapter manufacturer. After the driver installation, you to specify an additional SCSI adapter. Appendix Press . Refer to the following list, or press ESC to return to the previous... screen. Select AMD AHCI Compatible RAID Controller-x86 platform and press . Step 2: Insert the floppy disk containing the SATA RAID/AHCI driver and press . Step 1: Restart your system to boot from the Windows XP setup disk and press as soon as you see the message...
... in Figure 3 will then appear asking you can proceed with Windows, using a device support disk provided by an adapter manufacturer. After the driver installation, you to specify an additional SCSI adapter. Appendix Press . Refer to the following list, or press ESC to return to the previous... screen. Select AMD AHCI Compatible RAID Controller-x86 platform and press . Step 2: Insert the floppy disk containing the SATA RAID/AHCI driver and press . Step 1: Restart your system to boot from the Windows XP setup disk and press as soon as you see the message...

Manual
Page 84
To replace the old drive, make sure the chipset drivers have been installed from the motherboard driver disk. Step 1: Enter the login ID and password (default: "admin"), and then click Sign in to start the rebuilding process. Step 3: Select one available drive ...
To replace the old drive, make sure the chipset drivers have been installed from the motherboard driver disk. Step 1: Enter the login ID and password (default: "admin"), and then click Sign in to start the rebuilding process. Step 3: Select one available drive ...
Manual
Page 85
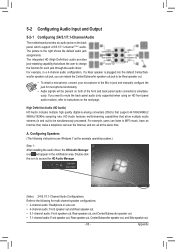
... features multistreaming capabilities that support 44.1KHz/48KHz/ 96KHz/192KHz sampling rate. Configuring Speakers (The following for each jack through the audio driver. Appendix For example, users can retask the Center/Subwoofer speaker out jack to be Rear speaker out. • To install a .... If you can listen to the following instructions use Windows 7 as the example operating system.) Step 1: After installing the audio driver, the HD Audio Manager icon will be simultaneously processed. The integrated HD (High Definition) audio provides jack retasking capability that allows ...
... features multistreaming capabilities that support 44.1KHz/48KHz/ 96KHz/192KHz sampling rate. Configuring Speakers (The following for each jack through the audio driver. Appendix For example, users can retask the Center/Subwoofer speaker out jack to be Rear speaker out. • To install a .... If you can listen to the following instructions use Windows 7 as the example operating system.) Step 1: After installing the audio driver, the HD Audio Manager icon will be simultaneously processed. The integrated HD (High Definition) audio provides jack retasking capability that allows ...


