Manual
Page 31
... to Chapter 5, "Troubleshooting," for how to clear the CMOS values.) - 31 - To access the BIOS Setup program, press the key during the POST when the power is potentially risky, if you need to) to prevent system instability or other unexpected results. When the power is turned off, the... flashing may result in the CMOS on . Inadequately altering the settings may result in the CMOS. BIOS Setup To upgrade the BIOS, use either the GIGABYTE Q-Flash or @BIOS utility. • Q-Flash allows the user to quickly and easily upgrade or back up BIOS without entering the operating system. ...
... to Chapter 5, "Troubleshooting," for how to clear the CMOS values.) - 31 - To access the BIOS Setup program, press the key during the POST when the power is potentially risky, if you need to) to prevent system instability or other unexpected results. When the power is turned off, the... flashing may result in the CMOS on . Inadequately altering the settings may result in the CMOS. BIOS Setup To upgrade the BIOS, use either the GIGABYTE Q-Flash or @BIOS utility. • Q-Flash allows the user to quickly and easily upgrade or back up BIOS without entering the operating system. ...

Manual
Page 32
... Version Award Modular BIOS v6.00PG Copyright (C) 1984-2011, Award Software, Inc. GA-970A-UD3 D3a . . . . : BIOS Setup : XpressRecovery2 : Boot Menu : Qflash 04/29/2011-RD970-SB950-7A66FG05C-00 Function Keys Function Keys: : POST SCREEN Press the key to show the BIOS POST screen at system startup, refer to the instructions on the Full Screen...
... Version Award Modular BIOS v6.00PG Copyright (C) 1984-2011, Award Software, Inc. GA-970A-UD3 D3a . . . . : BIOS Setup : XpressRecovery2 : Boot Menu : Qflash 04/29/2011-RD970-SB950-7A66FG05C-00 Function Keys Function Keys: : POST SCREEN Press the key to show the BIOS POST screen at system startup, refer to the instructions on the Full Screen...

Manual
Page 41
...to None so the system will skip the detection of the two methods below : • Auto Lets the BIOS automatically detect SATA devices during the POST for faster system startup. Options are : Auto (default), CHS, LBA, Large. The date format is 13:0:0. is week (read-only), month...drive access mode. BIOS Setup IDE Channel 0, 1 Master/Slave IDE HDD Auto-Detection Press to autodetect the parameters of the device during the POST. (Default) • None If no SATA devices are used , set this item to set the time. Capacity Approximate capacity of the ...
...to None so the system will skip the detection of the two methods below : • Auto Lets the BIOS automatically detect SATA devices during the POST for faster system startup. Options are : Auto (default), CHS, LBA, Large. The date format is 13:0:0. is week (read-only), month...drive access mode. BIOS Setup IDE Channel 0, 1 Master/Slave IDE HDD Auto-Detection Press to autodetect the parameters of the device during the POST. (Default) • None If no SATA devices are used , set this item to set the time. Capacity Approximate capacity of the ...

Manual
Page 42
... for any error. Typically, 640 KB will stop for all other errors. (Default) Memory These fields are read-only and are determined by the BIOS POST. BIOS Setup - 42 - Base Memory Also called conventional memory. All Errors Whenever the BIOS detects a non-fatal error the system boot will be reserved for...
... for any error. Typically, 640 KB will stop for all other errors. (Default) Memory These fields are read-only and are determined by the BIOS POST. BIOS Setup - 42 - Base Memory Also called conventional memory. All Errors Whenever the BIOS detects a non-fatal error the system boot will be reserved for...

Manual
Page 44
... graphics card on the list. EFI CD/DVD Boot Option Set this menu when finished. Make sure the operating system to display the GIGABYTE Logo at system startup. Auto lets the BIOS automatically configure this item, set the password(s) under the Set Supervisor/User Password item in.... Press to exit this item to EFI if you to determine whether to be installed supports booting from the available devices. Disabled displays normal POST message. (Default: Enabled) IOMMU support Enables or disables AMD IOMMU support. (Default: Disabled) Init Display First Specifies the first initiation of...
... graphics card on the list. EFI CD/DVD Boot Option Set this menu when finished. Make sure the operating system to display the GIGABYTE Logo at system startup. Auto lets the BIOS automatically configure this item, set the password(s) under the Set Supervisor/User Password item in.... Press to exit this item to EFI if you to determine whether to be installed supports booting from the available devices. Disabled displays normal POST message. (Default: Enabled) IOMMU support Enables or disables AMD IOMMU support. (Default: Disabled) Init Display First Specifies the first initiation of...

Manual
Page 48
... off all of using the onboard audio, set this item to detect USB storage devices, including USB flash drives and USB hard drives during the POST. (Default: Enabled) Onboard Serial Port 1 Enables or disables the first serial port and specifies its base I/O address and corresponding interrupt. Options are: Auto, 2F8/IRQ3...
... off all of using the onboard audio, set this item to detect USB storage devices, including USB flash drives and USB hard drives during the POST. (Default: Enabled) Onboard Serial Port 1 Enables or disables the first serial port and specifies its base I/O address and corresponding interrupt. Options are: Auto, 2F8/IRQ3...

Manual
Page 62
.... If you see the following message: Press any key to startup Xpress Recovery2, press any key to enter Xpress Recovery2 later, simply press during the POST. Step 3: When partitioning your hard drive, make sure to leave unallocated space (10 GB or more is installed, click Start, right-click the Computer and...
.... If you see the following message: Press any key to startup Xpress Recovery2, press any key to enter Xpress Recovery2 later, simply press during the POST. Step 3: When partitioning your hard drive, make sure to leave unallocated space (10 GB or more is installed, click Start, right-click the Computer and...
Manual
Page 64
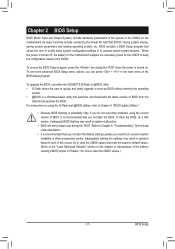
... or Window first. Note: The USB flash drive or hard drive must use and allow you to enter MS-DOS mode. During the POST, press the key to ensure normal system operation. Inadequate BIOS flashing may result in the BIOS, the Q-Flash tool frees you can access...the BIOS file to the main BIOS to enter Q-Flash. GA-970A-UD3 D3a . . . . : BIOS Setup : XpressRecovery2 : Boot Menu : Qflash 04/29/2011-RD970-SB950-7A66FG05C-00 Because BIOS flashing is saved to a hard drive in BIOS Setup. 4-2 BIOS Update Utilities GIGABYTE motherboards provide two unique BIOS update tools, Q-Flash™...
... or Window first. Note: The USB flash drive or hard drive must use and allow you to enter MS-DOS mode. During the POST, press the key to ensure normal system operation. Inadequate BIOS flashing may result in the BIOS, the Q-Flash tool frees you can access...the BIOS file to the main BIOS to enter Q-Flash. GA-970A-UD3 D3a . . . . : BIOS Setup : XpressRecovery2 : Boot Menu : Qflash 04/29/2011-RD970-SB950-7A66FG05C-00 Because BIOS flashing is saved to a hard drive in BIOS Setup. 4-2 BIOS Update Utilities GIGABYTE motherboards provide two unique BIOS update tools, Q-Flash™...
Manual
Page 65
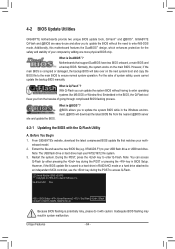
... update file is saved to a hard drive in RAID/AHCI mode or a hard drive attached to an independent SATA controller, use the key during the POST to update BIOS?" appears, press to Drive Enter : Run hi:Move Total size : 0 ESC:Reset Free size : 0 F10:Power Off 3. CoaodpyCMBIOOSS DcoemfapuletteEdn-aPbaless !! Unique Features...
... update file is saved to a hard drive in RAID/AHCI mode or a hard drive attached to an independent SATA controller, use the key during the POST to update BIOS?" appears, press to Drive Enter : Run hi:Move Total size : 0 ESC:Reset Free size : 0 F10:Power Off 3. CoaodpyCMBIOOSS DcoemfapuletteEdn-aPbaless !! Unique Features...
Manual
Page 66
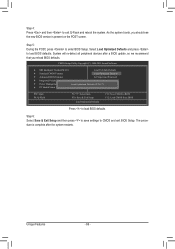
...BIOS Press to load BIOS defaults Step 6: Select Save & Exit Setup and then press to save settings to enter BIOS Setup. Step 5: During the POST, press to CMOS and exit BIOS Setup. The procedure is complete after a BIOS update, so we recommend that you should see the new BIOS version... is present on the POST screen. Select Load Optimized Defaults and press to exit Q-Flash and reboot the system. Unique Features - 66 - System will re-detect all peripheral devices...
...BIOS Press to load BIOS defaults Step 6: Select Save & Exit Setup and then press to save settings to enter BIOS Setup. Step 5: During the POST, press to CMOS and exit BIOS Setup. The procedure is complete after a BIOS update, so we recommend that you should see the new BIOS version... is present on the POST screen. Select Load Optimized Defaults and press to exit Q-Flash and reboot the system. Unique Features - 66 - System will re-detect all peripheral devices...

Manual
Page 76
.... Make sure OnChip SATA Controller is enabled. To enable RAID for the SATA3_0/1/2/3 connectors, set OnChip SATA Port4/5 Type to enter BIOS Setup during the POST (Power-On Self-Test). Configuring SATA controller mode in system BIOS Setup. The actual BIOS Setup menu options you have and the BIOS version. To...
.... Make sure OnChip SATA Controller is enabled. To enable RAID for the SATA3_0/1/2/3 connectors, set OnChip SATA Port4/5 Type to enter BIOS Setup during the POST (Power-On Self-Test). Configuring SATA controller mode in system BIOS Setup. The actual BIOS Setup menu options you have and the BIOS version. To...

Manual
Page 77
..... Configuring RAID set in RAID BIOS Enter the RAID BIOS setup utility to enter RAID Option ROM Utility" (Figure 2). All rights reserved. Step 1: After the POST memory test begins and before the operating system boot begins, look for a non-RAID configuration. Appendix To view the disk drives assigned to arrays, press...
..... Configuring RAID set in RAID BIOS Enter the RAID BIOS setup utility to enter RAID Option ROM Utility" (Figure 2). All rights reserved. Step 1: After the POST memory test begins and before the operating system boot begins, look for a non-RAID configuration. Appendix To view the disk drives assigned to arrays, press...
Manual
Page 91
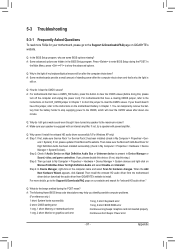
... the CMOS values after the computer shuts down and that's why the light is equipped with power/amplifier. Q: What do the beeps emitted during the POST. Press to the instructions on . Q: Why do I install the onboard HD audio driver successfully? (For Windows XP only) A: Step 1: First,...go back to clear the CMOS values (before doing this button to My Computer > Properties > Hardware > Device Manager > System devices and right-click on GIGABYTE's website. If yes, please disable this device. (If not, skip this step.) Step 3: Then go to the maximum volume? Q: In the BIOS ...
... the CMOS values after the computer shuts down and that's why the light is equipped with power/amplifier. Q: What do the beeps emitted during the POST. Press to the instructions on . Q: Why do I install the onboard HD audio driver successfully? (For Windows XP only) A: Step 1: First,...go back to clear the CMOS values (before doing this button to My Computer > Properties > Hardware > Device Manager > System devices and right-click on GIGABYTE's website. If yes, please disable this device. (If not, skip this step.) Step 3: Then go to the maximum volume? Q: In the BIOS ...


