
Manual
Page 29
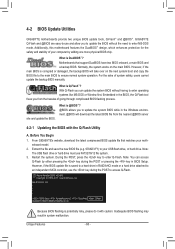
... parameters of the system in the main menu of the BIOS Setup program. Its major functions include conducting the Power-On Self-Test (POST) during the POST when the power is turned on the motherboard supplies the necessary power to the CMOS to boot. To flash the BIOS, do not ...1 for the beep codes description. •• It is recommended that you not flash the BIOS. BIOS Setup To upgrade the BIOS, use either the GIGABYTE Q-Flash or @BIOS utility. •• Q-Flash allows the user to quickly and easily upgrade or back up BIOS without entering the operating system. &#...
... parameters of the system in the main menu of the BIOS Setup program. Its major functions include conducting the Power-On Self-Test (POST) during the POST when the power is turned on the motherboard supplies the necessary power to the CMOS to boot. To flash the BIOS, do not ...1 for the beep codes description. •• It is recommended that you not flash the BIOS. BIOS Setup To upgrade the BIOS, use either the GIGABYTE Q-Flash or @BIOS utility. •• Q-Flash allows the user to quickly and easily upgrade or back up BIOS without entering the operating system. &#...
Manual
Page 30
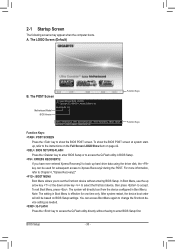
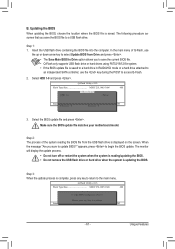
...access Boot Menu again to change the first boot device setting as needed. : Q-FLASH Press the key to show the BIOS POST screen at system startup, refer to accept. GA-970A-D3 D2 . . . . : BIOS Setup : XpressRecovery2 : Boot Menu : Qflash 04/29/2011-RD970-SB950-7A66FG03C-00 Function... Keys Function Keys Function Keys: : POST SCREEN Press the key to access the Q-Flash utility directly without entering BIOS Setup. After system restart...
...access Boot Menu again to change the first boot device setting as needed. : Q-FLASH Press the key to show the BIOS POST screen at system startup, refer to accept. GA-970A-D3 D2 . . . . : BIOS Setup : XpressRecovery2 : Boot Menu : Qflash 04/29/2011-RD970-SB950-7A66FG03C-00 Function... Keys Function Keys Function Keys: : POST SCREEN Press the key to access the Q-Flash utility directly without entering BIOS Setup. After system restart...

Manual
Page 39
...Master/Slave Configure your SATA devices by using one of the two methods below : • Auto Lets the BIOS automatically detect SATA devices during the POST. (Default) • None If no SATA devices are used , set the date. Options are : Auto (default), Large. Extended IDE Drive ...Configure your SATA devices by using one of the two methods below : • Auto Lets the BIOS automatically detect SATA devices during the POST. (Default) • None If no SATA devices are used , set the time. Access Mode Sets the hard drive access mode. ...
...Master/Slave Configure your SATA devices by using one of the two methods below : • Auto Lets the BIOS automatically detect SATA devices during the POST. (Default) • None If no SATA devices are used , set the date. Options are : Auto (default), Large. Extended IDE Drive ...Configure your SATA devices by using one of the two methods below : • Auto Lets the BIOS automatically detect SATA devices during the POST. (Default) • None If no SATA devices are used , set the time. Access Mode Sets the hard drive access mode. ...

Manual
Page 40
...system boot will stop for the MS-DOS operating system. All, But Keyboard The system boot will be reserved for an error during the POST. Base Memory Also called conventional memory. Typically, 640 KB will not stop for all other errors. (Default) Memory These fields are read...-only and are determined by the BIOS POST. All Errors Whenever the BIOS detects a non-fatal error the system boot will stop for a keyboard error but stop . BIOS Setup - 40 ...
...system boot will stop for the MS-DOS operating system. All, But Keyboard The system boot will be reserved for an error during the POST. Base Memory Also called conventional memory. Typically, 640 KB will not stop for all other errors. (Default) Memory These fields are read...-only and are determined by the BIOS POST. All Errors Whenever the BIOS detects a non-fatal error the system boot will stop for a keyboard error but stop . BIOS Setup - 40 ...
Manual
Page 42
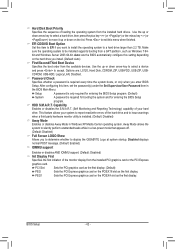
... Windows 7 64bit and Windows Server 2003 64-bit. Setup A password is only required for entering the BIOS Setup program. Disabled displays normal POST message. (Default: Enabled) IOMMU support Enables or disables AMD IOMMU support. (Default: Disabled) Init Display First Specifies the first initiation of ... (Self Monitoring and Reporting Technology) capability of your system to report read/write errors of the hard drive and to display the GIGABYTE Logo at system startup. PCI Slot Sets the PCI graphics card as the first display. Hard Disk Boot Priority Specifies the sequence of...
... Windows 7 64bit and Windows Server 2003 64-bit. Setup A password is only required for entering the BIOS Setup program. Disabled displays normal POST message. (Default: Enabled) IOMMU support Enables or disables AMD IOMMU support. (Default: Disabled) Init Display First Specifies the first initiation of ... (Self Monitoring and Reporting Technology) capability of your system to report read/write errors of the hard drive and to display the GIGABYTE Logo at system startup. PCI Slot Sets the PCI graphics card as the first display. Hard Disk Boot Priority Specifies the sequence of...
Manual
Page 45
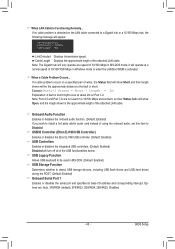
..., 2E8/IRQ3, Disabled. - 45 - USB Legacy Function Allows USB keyboard to detect USB storage devices, including USB flash drives and USB hard drives during the POST. (Default: Enabled) Onboard Serial Port 1 Enables or disables the serial port and specifies its base I/O address and corresponding interrupt. BIOS Setup Example: Part1-2 Status = Short...
..., 2E8/IRQ3, Disabled. - 45 - USB Legacy Function Allows USB keyboard to detect USB storage devices, including USB flash drives and USB hard drives during the POST. (Default: Enabled) Onboard Serial Port 1 Enables or disables the serial port and specifies its base I/O address and corresponding interrupt. BIOS Setup Example: Part1-2 Status = Short...

Manual
Page 58
... 1. If you see the following message: Press any key to startup Xpress Recovery2, press any key to enter Xpress Recovery2 later, simply press during the POST. B. Step 4: After the operating system is recommended; When you wish to enter Xpress Recovery2. 2. Using the Backup Function in Xpress Recovery2 for the first time...
... 1. If you see the following message: Press any key to startup Xpress Recovery2, press any key to enter Xpress Recovery2 later, simply press during the POST. B. Step 4: After the operating system is recommended; When you wish to enter Xpress Recovery2. 2. Using the Backup Function in Xpress Recovery2 for the first time...
Manual
Page 60
...chip. Extract the file and save the new BIOS file (e.g. 970AD3.F1) to access Q-Flash. Restart the system. GA-970A-D3 D2 . . . . : BIOS Setup : XpressRecovery2 : Boot Menu : Qflash 04/29/2011-RD970-SB950-7A66FG03C-... With Q-Flash you to update the BIOS without having to -use the key during the POST or pressing the key in the BIOS, the Q-Flash tool frees you to enter MS-...v6.00PG Copyright (C) 1984-2011, Award Software, Inc. Before You Begin 1. Unique Features - 60 - GIGABYTE Q-Flash and @BIOS are easy-to enter operating systems like MS-DOS or Window first. What is ...
...chip. Extract the file and save the new BIOS file (e.g. 970AD3.F1) to access Q-Flash. Restart the system. GA-970A-D3 D2 . . . . : BIOS Setup : XpressRecovery2 : Boot Menu : Qflash 04/29/2011-RD970-SB950-7A66FG03C-... With Q-Flash you to update the BIOS without having to -use the key during the POST or pressing the key in the BIOS, the Q-Flash tool frees you to enter MS-...v6.00PG Copyright (C) 1984-2011, Award Software, Inc. Before You Begin 1. Unique Features - 60 - GIGABYTE Q-Flash and @BIOS are easy-to enter operating systems like MS-DOS or Window first. What is ...
Manual
Page 61
Select HDD 1-0 and press . Step 2: The process of Q-Flash, use the key during the POST to access Q-Flash. 2. CoaodpyCMBIOOSS DcoemfapuletteEdn-aPbaless !! Insert the USB flash drive containing the BIOS file into the computer. Select the BIOS update file and press . ...
Select HDD 1-0 and press . Step 2: The process of Q-Flash, use the key during the POST to access Q-Flash. 2. CoaodpyCMBIOOSS DcoemfapuletteEdn-aPbaless !! Insert the USB flash drive containing the BIOS file into the computer. Select the BIOS update file and press . ...
Manual
Page 62
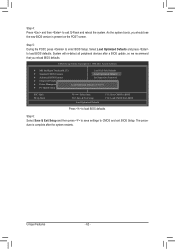
Select Load Optimized Defaults and press to enter BIOS Setup. The procedure is present on the POST screen. System will re-detect all peripheral devices after a BIOS update, so we recommend that you should see the new BIOS version is complete after ...the system restarts. As the system boots, you reload BIOS defaults. Unique Features - 62 - Step 5: During the POST, press to load BIOS defaults. Step 4: Press and then to CMOS and exit BIOS Setup. CMOS Setup Utility-Copyright (C) 1984-2011 Award Software MB...
Select Load Optimized Defaults and press to enter BIOS Setup. The procedure is present on the POST screen. System will re-detect all peripheral devices after a BIOS update, so we recommend that you should see the new BIOS version is complete after ...the system restarts. As the system boots, you reload BIOS defaults. Unique Features - 62 - Step 5: During the POST, press to load BIOS defaults. Step 4: Press and then to CMOS and exit BIOS Setup. CMOS Setup Utility-Copyright (C) 1984-2011 Award Software MB...

Manual
Page 72
.... Make sure OnChip SATA Controller is enabled. To enable RAID for the SATA3_0/1/2/3 connectors, set OnChip SATA Port4/5 Type to enter BIOS Setup during the POST (Power-On Self-Test). The BIOS Setup menus described in system BIOS Setup. Appendix - 72 - B. Configuring SATA controller mode in BIOS Setup Make sure to...
.... Make sure OnChip SATA Controller is enabled. To enable RAID for the SATA3_0/1/2/3 connectors, set OnChip SATA Port4/5 Type to enter BIOS Setup during the POST (Power-On Self-Test). The BIOS Setup menus described in system BIOS Setup. Appendix - 72 - B. Configuring SATA controller mode in BIOS Setup Make sure to...

Manual
Page 73
... in RAID BIOS Enter the RAID BIOS setup utility to enter the Controller Configuration window. Figure 2 Step 2: Main Menu This is defined.. Step 1: After the POST memory test begins and before the operating system boot begins, look for a non-RAID configuration. To view controller settings, press to configure a RAID array. Press...
... in RAID BIOS Enter the RAID BIOS setup utility to enter the Controller Configuration window. Figure 2 Step 2: Main Menu This is defined.. Step 1: After the POST memory test begins and before the operating system boot begins, look for a non-RAID configuration. To view controller settings, press to configure a RAID array. Press...
Manual
Page 87
...has been installed (check in Chapter 1. Then install the onboard HD audio driver from the motherboard driver disk or download the audio driver from GIGABYTE's website to show the advanced options. Appendix Q: In the BIOS Setup program, why are hidden in Device Manager or Sound, video, and ... clear the CMOS values after the computer shuts down and that have turned my speaker to enter BIOS Setup during the POST mean? Step 4: In Device Manager, right-click on GIGABYTE's website. When the Add New Hardware Wizard appears, click Cancel. Q: What do I still get a weak sound even ...
...has been installed (check in Chapter 1. Then install the onboard HD audio driver from the motherboard driver disk or download the audio driver from GIGABYTE's website to show the advanced options. Appendix Q: In the BIOS Setup program, why are hidden in Device Manager or Sound, video, and ... clear the CMOS values after the computer shuts down and that have turned my speaker to enter BIOS Setup during the POST mean? Step 4: In Device Manager, right-click on GIGABYTE's website. When the Add New Hardware Wizard appears, click Cancel. Q: What do I still get a weak sound even ...


