Manual
Page 23
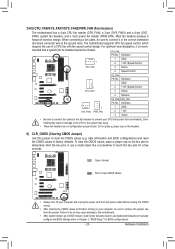
...turn off your computer and unplug the power cord from the power outlet before clearing the CMOS values. •• After clearing the CMOS values and before turning on the headers. 6) CLR_CMOS (Clearing CMOS Jumper) Use this jumper to touch the two pins for BIOS configurations). - 23 - ...cap from overheating. Overheating may result in the correct orientation (the black connector wire is recom- date information and BIOS configurations) and reset the CMOS values to Chapter 2, "BIOS Setup," for a few seconds. Hardware Installation Do not place a jumper cap on your CPU and system ...
...turn off your computer and unplug the power cord from the power outlet before clearing the CMOS values. •• After clearing the CMOS values and before turning on the headers. 6) CLR_CMOS (Clearing CMOS Jumper) Use this jumper to touch the two pins for BIOS configurations). - 23 - ...cap from overheating. Overheating may result in the correct orientation (the black connector wire is recom- date information and BIOS configurations) and reset the CMOS values to Chapter 2, "BIOS Setup," for a few seconds. Hardware Installation Do not place a jumper cap on your CPU and system ...

Manual
Page 29
.... When the power is recommended that searches and downloads the latest version of the BIOS Setup program. To upgrade the BIOS, use either the GIGABYTE Q-Flash or @BIOS utility. •• Q-Flash allows the user to quickly and easily upgrade or back up BIOS without entering the operating... and Output System) records hardware parameters of the system in the CMOS on the motherboard supplies the necessary power to the CMOS to keep the configuration values in the CMOS. If this occurs, try to clear the CMOS values and reset the board to default values. (Refer to the "Load Optimized ...
.... When the power is recommended that searches and downloads the latest version of the BIOS Setup program. To upgrade the BIOS, use either the GIGABYTE Q-Flash or @BIOS utility. •• Q-Flash allows the user to quickly and easily upgrade or back up BIOS without entering the operating... and Output System) records hardware parameters of the system in the CMOS on the motherboard supplies the necessary power to the CMOS to keep the configuration values in the CMOS. If this occurs, try to clear the CMOS values and reset the board to default values. (Refer to the "Load Optimized ...
Manual
Page 33
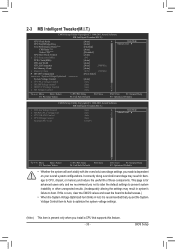
...the useful life of these components. This page is present only when you install a CPU that supports this occurs, clear the CMOS values and reset the board to default values.) •• When the System Voltage Optimized item blinks in red, it is recommended that you...: Select F5: Previous Values +/-/PU/PD: Value F10: Save F6: Fail-Safe Defaults ESC: Exit F1: General Help F7: Optimized Defaults CMOS Setup Utility-Copyright (C) 1984-2011 Award Software MB Intelligent Tweaker(M.I .T.) CPU Clock Ratio CPU NorthBridge Freq. BIOS Setup Incorrectly doing overclock/overvoltage may...
...the useful life of these components. This page is present only when you install a CPU that supports this occurs, clear the CMOS values and reset the board to default values.) •• When the System Voltage Optimized item blinks in red, it is recommended that you...: Select F5: Previous Values +/-/PU/PD: Value F10: Save F6: Fail-Safe Defaults ESC: Exit F1: General Help F7: Optimized Defaults CMOS Setup Utility-Copyright (C) 1984-2011 Award Software MB Intelligent Tweaker(M.I .T.) CPU Clock Ratio CPU NorthBridge Freq. BIOS Setup Incorrectly doing overclock/overvoltage may...
Manual
Page 34
... being installed. (Note) This item is dependent on the CPU being used . Allows you alter the ratio for automated system reboot, or clear the CMOS values to reset the board to alter the North Bridge controller frequency for the HT Link between the CPU and chipset. Manual allows the CPU Frequency (MHz...
... being installed. (Note) This item is dependent on the CPU being used . Allows you alter the ratio for automated system reboot, or clear the CMOS values to reset the board to alter the North Bridge controller frequency for the HT Link between the CPU and chipset. Manual allows the CPU Frequency (MHz...
Manual
Page 48
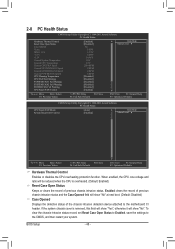
... chassis intrusion status. If the system chassis cover is overheated. (Default: Enabled) Reset Case Open Status Keeps or clears the record of the chassis intrusion detection device attached to the CMOS, and then restart your system. BIOS Setup - 48 - To clear the chassis... this field will show "Yes", otherwise it will show "No". 2-8 PC Health Status CMOS Setup Utility-Copyright (C) 1984-2011 Award Software PC Health Status Hardware Thermal Control Reset Case Open Status Case Opened Vcore DDR3 1.5V +3.3V +12V Current System Temperature Current CPU...
... chassis intrusion status. If the system chassis cover is overheated. (Default: Enabled) Reset Case Open Status Keeps or clears the record of the chassis intrusion detection device attached to the CMOS, and then restart your system. BIOS Setup - 48 - To clear the chassis... this field will show "Yes", otherwise it will show "No". 2-8 PC Health Status CMOS Setup Utility-Copyright (C) 1984-2011 Award Software PC Health Status Hardware Thermal Control Reset Case Open Status Case Opened Vcore DDR3 1.5V +3.3V +12V Current System Temperature Current CPU...
Manual
Page 61
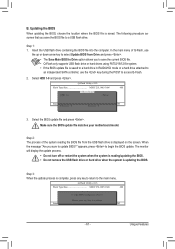
... The Save Main BIOS to Drive option allows you to save the BIOS file to Drive Enter : Run hi:Move Total size : 0 ESC:Reset Free size : 0 F10:Power Off 3. Update BIOS from Drive Save BIOS to a USB flash drive. Insert the USB flash drive containing the...Utility v2.23 Flash Type/Size MXIC 25L1605/1606 4M Keep0 DfilMe(Is)DfaotuandEnable HDD 1-0 Loa d CMO S Default Enable Update BIOS from Drive Please SparevsesBaInOySketoy Dtoricvoentinue Enter : Run hi:Move ESC:Reset F10:Power Off - 61 - Make sure the BIOS update file matches your motherboard model. When the...
... The Save Main BIOS to Drive option allows you to save the BIOS file to Drive Enter : Run hi:Move Total size : 0 ESC:Reset Free size : 0 F10:Power Off 3. Update BIOS from Drive Save BIOS to a USB flash drive. Insert the USB flash drive containing the...Utility v2.23 Flash Type/Size MXIC 25L1605/1606 4M Keep0 DfilMe(Is)DfaotuandEnable HDD 1-0 Loa d CMO S Default Enable Update BIOS from Drive Please SparevsesBaInOySketoy Dtoricvoentinue Enter : Run hi:Move ESC:Reset F10:Power Off - 61 - Make sure the BIOS update file matches your motherboard model. When the...


