Manual
Page 10
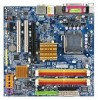
... FDD device - 4 SATA 3Gb/s connectors (SATAII0,1, 2, 3), allowing connection of 4 SATA 3Gb/s devices Š Onboard GIGABYTE SATA2 chip - 1 IDE connector (ATA-33/66/100/133), allowing connection of 2 IDE devices - 2 SATA 3Gb/s ...SATA 3Gb/s devices - English 1-2 Feature Summary CPU Š LGA775 for Serial ATA O.S Support Š Microsoft Windows 2000/XP Memory Š 4 DDRII DIMM memory slots (supports up to 8 GB memory) Š Supports... connector Š 1 power LED connector "*" Only the GA-965GM-DS2 adopts All-Solid Capacitor design. GA-965GM-(D)S2 Motherboard - 10 -
... FDD device - 4 SATA 3Gb/s connectors (SATAII0,1, 2, 3), allowing connection of 4 SATA 3Gb/s devices Š Onboard GIGABYTE SATA2 chip - 1 IDE connector (ATA-33/66/100/133), allowing connection of 2 IDE devices - 2 SATA 3Gb/s ...SATA 3Gb/s devices - English 1-2 Feature Summary CPU Š LGA775 for Serial ATA O.S Support Š Microsoft Windows 2000/XP Memory Š 4 DDRII DIMM memory slots (supports up to 8 GB memory) Š Supports... connector Š 1 power LED connector "*" Only the GA-965GM-DS2 adopts All-Solid Capacitor design. GA-965GM-(D)S2 Motherboard - 10 -
Manual
Page 29
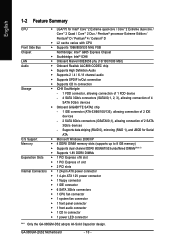
...quickly and easily update or backup BIOS without entering the operating system. @BIOS is a Windows-based utility that may result in the CMOS SRAM of the screen. If you to a new BIOS, either Gigabyte's Q-Flash or @BIOS utility can enter the BIOS setup screen by pressing "Ctrl + ...When the power is displayed at the bottom of the motherboard. CONTROL KEYS Enter> Move to activate certain system features. To exit the Help Window press . English Chapter 2 BIOS Setup BIOS (Basic Input and Output System) includes a CMOS SETUP utility which allows user to configure required ...
...quickly and easily update or backup BIOS without entering the operating system. @BIOS is a Windows-based utility that may result in the CMOS SRAM of the screen. If you to a new BIOS, either Gigabyte's Q-Flash or @BIOS utility can enter the BIOS setup screen by pressing "Ctrl + ...When the power is displayed at the bottom of the motherboard. CONTROL KEYS Enter> Move to activate certain system features. To exit the Help Window press . English Chapter 2 BIOS Setup BIOS (Basic Input and Output System) includes a CMOS SETUP utility which allows user to configure required ...

Manual
Page 35
...-chip frame buffer size to 1MB. 8MB Set on-chip frame buffer size to issue warnings when thirdparty hardware monitor utility is only working for windows XP. (Default value) No-Execute Memory Protect (Note) Enabled Disabled Enable No-Execute Memory Protect function. (Default value) Disable No-Execute Memory Protect function. CPU...
...-chip frame buffer size to 1MB. 8MB Set on-chip frame buffer size to issue warnings when thirdparty hardware monitor utility is only working for windows XP. (Default value) No-Execute Memory Protect (Note) Enabled Disabled Enable No-Execute Memory Protect function. (Default value) Disable No-Execute Memory Protect function. CPU...

Manual
Page 47
...other drivers. Install Drivers English Chapter 3 Install Drivers Pictures below are shown in "Universal Serial Bus controller" under Windows XP operating system, please use Windows Service Pack. After restarting your system automatically. Some device drivers will restart your system the "Xpress Install" will... reboot automatically after install the drivers, afterward you want and press "install" followed the item; After install Windows Service Pack, it will auto-detect the right USB2.0 driver). - 47 - Please remove the question mark and restart the system ...
...other drivers. Install Drivers English Chapter 3 Install Drivers Pictures below are shown in "Universal Serial Bus controller" under Windows XP operating system, please use Windows Service Pack. After restarting your system automatically. Some device drivers will restart your system the "Xpress Install" will... reboot automatically after install the drivers, afterward you want and press "install" followed the item; After install Windows Service Pack, it will auto-detect the right USB2.0 driver). - 47 - Please remove the question mark and restart the system ...

Manual
Page 51
...Display panel of both CPU cooling fan and North-Bridge Chipset cooling fan, 4) PC health for enhancing system performance, 2) C.I.A. GIGABYTE Logo Log on different motherboards. - 51 - GO Confirmation and Execution button 6. Appendix English Chapter 4 Appendix 4-1 Unique Software ...support these Unique Software Utilities, please check your MB features.) 4-1-1 EasyTune 5 Introduction EasyTune 5 presents the most convenient Windows based system performance enhancement and manageability utility. Help button Display EasyTuneTM 5 Help file 11. Exit or Minimize button Quit ...
...Display panel of both CPU cooling fan and North-Bridge Chipset cooling fan, 4) PC health for enhancing system performance, 2) C.I.A. GIGABYTE Logo Log on different motherboards. - 51 - GO Confirmation and Execution button 6. Appendix English Chapter 4 Appendix 4-1 Unique Software ...support these Unique Software Utilities, please check your MB features.) 4-1-1 EasyTune 5 Introduction EasyTune 5 presents the most convenient Windows based system performance enhancement and manageability utility. Help button Display EasyTuneTM 5 Help file 11. Exit or Minimize button Quit ...

Manual
Page 52
...permanent in the future. 2. System requirements: 1. Intel G965 BIOS for the first time, it will affect the data backup speed. 3. GA-965GM-(D)S2 Motherboard - 52 - Boot from CD-ROM. Press any key to startup XpressRecovery2..... English 4-1-2 Xpress Recovery2 Introduction Xpress Recovery2 is able ...Ally Copyright (C) 1984-2006, Award Software, Inc. Save the settings and exit the BIOS Setup. Supporting Microsoft operating systems including Windows XP/2000/NT/98/Me and DOS, and file systems including FAT16, FAT32, and NTFS, Xpress Recovery2 is designed to enter...
...permanent in the future. 2. System requirements: 1. Intel G965 BIOS for the first time, it will affect the data backup speed. 3. GA-965GM-(D)S2 Motherboard - 52 - Boot from CD-ROM. Press any key to startup XpressRecovery2..... English 4-1-2 Xpress Recovery2 Introduction Xpress Recovery2 is able ...Ally Copyright (C) 1984-2006, Award Software, Inc. Save the settings and exit the BIOS Setup. Supporting Microsoft operating systems including Windows XP/2000/NT/98/Me and DOS, and file systems including FAT16, FAT32, and NTFS, Xpress Recovery2 is designed to enter...

Manual
Page 53
...1 d. Not compatible to your motherboard manufacturer. - 53 - Hard disks detection sequence is normal that data backup takes longer time than 128G under Windows 2000, be reserved. 3. REBOOT: Exit the main screen and restart the system. PATA IDE primary channel b. Please contact your hard disk. (...This button will not appear if there is compliant with Windows operating systems including DOS and Windows XP/2000/NT/9x/Me. 5. Does not support RAID/AHCI (class code 0104/0106) hard disks. 7. USB hard...
...1 d. Not compatible to your motherboard manufacturer. - 53 - Hard disks detection sequence is normal that data backup takes longer time than 128G under Windows 2000, be reserved. 3. REBOOT: Exit the main screen and restart the system. PATA IDE primary channel b. Please contact your hard disk. (...This button will not appear if there is compliant with Windows operating systems including DOS and Windows XP/2000/NT/9x/Me. 5. Does not support RAID/AHCI (class code 0104/0106) hard disks. 7. USB hard...

Manual
Page 54
...BIOS menu. Using Q-FlashTM indicating no more fooling around with any utility in the BIOS menu when they want to stay in DOS or Windows. If your PC and press Del to Fba. In the BIOS menu of the motherboards supporting Q-Flash and Dual BIOS, the Q-Flash utility.... Reboot your motherboard has single-BIOS, please refer to flash BIOS from Gigabyte's website. 2. If your motherboard from an older version to enter SETUP / Dual BIOS / Q-Flash / F9 For Xpress Recovery 08/07/2003-i875P-6A79BG03C-00 GA-965GM-(D)S2 Motherboard - 54 - For example, from end-users. The BIOS file ...
...BIOS menu. Using Q-FlashTM indicating no more fooling around with any utility in the BIOS menu when they want to stay in DOS or Windows. If your PC and press Del to Fba. In the BIOS menu of the motherboards supporting Q-Flash and Dual BIOS, the Q-Flash utility.... Reboot your motherboard has single-BIOS, please refer to flash BIOS from Gigabyte's website. 2. If your motherboard from an older version to enter SETUP / Dual BIOS / Q-Flash / F9 For Xpress Recovery 08/07/2003-i875P-6A79BG03C-00 GA-965GM-(D)S2 Motherboard - 54 - For example, from end-users. The BIOS file ...

Manual
Page 61
... to download the latest version of BIOS. Methods and steps: I. Fig 1. Installation Complete and Run @BIOS Select @BIOS item than click Install Click Start/ Programs/ GIGABYTE/@BIOS Fig 3. Complete update process following the instruction. - 61 - Select the desired @BIOS server 1. Update BIOS through Internet: a. Click "Update New BIOS" c. System will automatically...
... to download the latest version of BIOS. Methods and steps: I. Fig 1. Installation Complete and Run @BIOS Select @BIOS item than click Install Click Start/ Programs/ GIGABYTE/@BIOS Fig 3. Complete update process following the instruction. - 61 - Select the desired @BIOS server 1. Update BIOS through Internet: a. Click "Update New BIOS" c. System will automatically...

Manual
Page 63
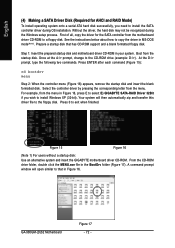
...Required when the SATA controller is recommended that you do not want to create RAID array on the GA-965GM-DS2 motherboard, the GSATAII0 and GSATAII1 connectors are supported by the GIGABYTE SATA2 controller. Appendix If your power supply to the hard drive. (Note 1) Skip this step ... RAID, you may prepare only one hard drive. (b) An empty formatted floppy disk. (c) Windows XP/2000 setup disk. (d) Driver CD for the connector. English 4-1-4 Configuring SATA Hard Drive(s) (Controller: GIGABYTE SATA2) To configure SATA hard drive(s), follow the steps below: (1) Install SATA hard drive(s)...
...Required when the SATA controller is recommended that you do not want to create RAID array on the GA-965GM-DS2 motherboard, the GSATAII0 and GSATAII1 connectors are supported by the GIGABYTE SATA2 controller. Appendix If your power supply to the hard drive. (Note 1) Skip this step ... RAID, you may prepare only one hard drive. (b) An empty formatted floppy disk. (c) Windows XP/2000 setup disk. (d) Driver CD for the connector. English 4-1-4 Configuring SATA Hard Drive(s) (Controller: GIGABYTE SATA2) To configure SATA hard drive(s), follow the steps below: (1) Install SATA hard drive(s)...

Manual
Page 65
to CDROM (Figure 2). Appendix English Step 2: To boot from Windows installation CD-ROM disk, set First Boot Device under the Advanced BIOS Features menu to 3 No-Execute Memory Protect CPU Enhanced Halt (C1E) CPU Thermal ...
to CDROM (Figure 2). Appendix English Step 2: To boot from Windows installation CD-ROM disk, set First Boot Device under the Advanced BIOS Features menu to 3 No-Execute Memory Protect CPU Enhanced Halt (C1E) CPU Thermal ...
Manual
Page 66
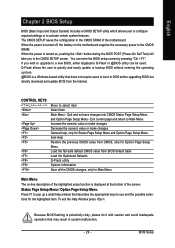
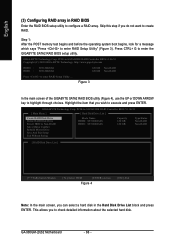
...message which says "Press to highlight through choices. Figure 3 In the main screen of the GIGABYTE SATA2 RAID BIOS utility (Figure 4), use the UP or DOWN ARROW key to enter RAID Setup Utility" (Figure 3). GA-965GM-(D)S2 Motherboard - 66 - Skip this step if you can select a hard disk in RAID ...Mode Name HDD0: ST3120026AS HDD1: ST3120026AS Capacity 120 GB 120 GB Type/Status Non-RAID Non-RAID [ RAID Disk Drive List ] [ TAB]-Switch Window [ ]-Select ITEM [ENTER]-Action Figure 4 [ESC]-Exit Note: In the main screen, you do not want to check detailed information about the ...
...message which says "Press to highlight through choices. Figure 3 In the main screen of the GIGABYTE SATA2 RAID BIOS utility (Figure 4), use the UP or DOWN ARROW key to enter RAID Setup Utility" (Figure 3). GA-965GM-(D)S2 Motherboard - 66 - Skip this step if you can select a hard disk in RAID ...Mode Name HDD0: ST3120026AS HDD1: ST3120026AS Capacity 120 GB 120 GB Type/Status Non-RAID Non-RAID [ RAID Disk Drive List ] [ TAB]-Switch Window [ ]-Select ITEM [ENTER]-Action Figure 4 [ESC]-Exit Note: In the main screen, you do not want to check detailed information about the ...

Manual
Page 69
... 120 GB RAID Inside [ RAID Disk Drive List ] Model Name RDD0: JRAID RAID Level 0-Stripe Capacity Status 240 GB Normal Members(HDDx) 01 [ TAB]-Switch Window [ ]-Select RAID [ENTER]-Action Figure 10 [ESC]-Exit - 69 - PCIE-to-SATAII/IDE RAID Controller BIOS V1.06.53 [ Main Menu ] [ Hard Disk Drive List...
... 120 GB RAID Inside [ RAID Disk Drive List ] Model Name RDD0: JRAID RAID Level 0-Stripe Capacity Status 240 GB Normal Members(HDDx) 01 [ TAB]-Switch Window [ ]-Select RAID [ENTER]-Action Figure 10 [ESC]-Exit - 69 - PCIE-to-SATAII/IDE RAID Controller BIOS V1.06.53 [ Main Menu ] [ Hard Disk Drive List...

Manual
Page 70
...: JRAID RAID LevMelembers: HDDC0a1pacity Status 0-Stripe Status: Norma2l40 GB Normal Members(HDDx) 01 [ TAB]-Switch Window [ ]-Select RAID [ENTER]-Detail Figure 11 [ESC]-Exit After configuring the RAID array, select the Save... if you wish to exit the RAID BIOS utility, then press Y (Figure 12). A small window displaying the array information will appear in the center of the screen (Figure 11). GIGA-BYTE Technology...0-Stripe Capacity Status 240 GB Normal Members(HDDx) 01 [ TAB]-Switch Window [ ]-Select ITEM [ENTER]-Action Figure 12 [ESC]-Exit GA-965GM-(D)S2 Motherboard - 70 -
...: JRAID RAID LevMelembers: HDDC0a1pacity Status 0-Stripe Status: Norma2l40 GB Normal Members(HDDx) 01 [ TAB]-Switch Window [ ]-Select RAID [ENTER]-Detail Figure 11 [ESC]-Exit After configuring the RAID array, select the Save... if you wish to exit the RAID BIOS utility, then press Y (Figure 12). A small window displaying the array information will appear in the center of the screen (Figure 11). GIGA-BYTE Technology...0-Stripe Capacity Status 240 GB Normal Members(HDDx) 01 [ TAB]-Switch Window [ ]-Select ITEM [ENTER]-Action Figure 12 [ESC]-Exit GA-965GM-(D)S2 Motherboard - 70 -
Manual
Page 72
...17). Figure 15 Figure 16 (Note 1) For users without a startup disk: Use an alternative system and insert the GIGABYTE motherboard driver CD-ROM. A command prompt window will then automatically zip and transfer this driver file to the floppy disk. Prepare a startup disk that in Figure ...E to select E) GIGABYTE SATA-RAID Driver 32Bit if you need to exit when finished. Press ENTER after each command (Figure 15): cd bootdrv menu Step 2: When the controller menu (Figure 16) appears, remove the startup disk and insert the blank formatted disk. GA-965GM-(D)S2 Motherboard Figure 17 -...
...17). Figure 15 Figure 16 (Note 1) For users without a startup disk: Use an alternative system and insert the GIGABYTE motherboard driver CD-ROM. A command prompt window will then automatically zip and transfer this driver file to the floppy disk. Prepare a startup disk that in Figure ...E to select E) GIGABYTE SATA-RAID Driver 32Bit if you need to exit when finished. Press ENTER after each command (Figure 15): cd bootdrv menu Step 2: When the controller menu (Figure 16) appears, remove the startup disk and insert the blank formatted disk. GA-965GM-(D)S2 Motherboard Figure 17 -...
Manual
Page 73
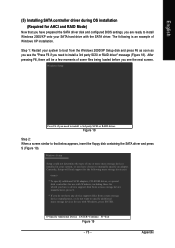
..." message (Figure 18). The following mass storage devices(s) * To specify additional SCSI adapters, CD-ROM drives, or special disk controllers for use with Windows, including those for the following is an example of some files being loaded before you see the "Press F6 if you are ready to manually... which you have a device support disk from a mass storage device manufacturer, press S. * If you do not have any device support disks from the Windows 2000/XP Setup disk and press F6 as soon as you have prepared the SATA driver disk and configured BIOS settings, you need to specify...
..." message (Figure 18). The following mass storage devices(s) * To specify additional SCSI adapters, CD-ROM drives, or special disk controllers for use with Windows, including those for the following is an example of some files being loaded before you see the "Press F6 if you are ready to manually... which you have a device support disk from a mass storage device manufacturer, press S. * If you do not have any device support disks from the Windows 2000/XP Setup disk and press F6 as soon as you have prepared the SATA driver disk and configured BIOS settings, you need to specify...
Manual
Page 74
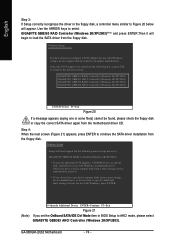
... from the motherboard driver CD. GA-965GM-(D)S2 Motherboard - 74 - English Step 3: If Setup correctly recognizes the driver in BIOS Setup to select GIGABYTE GBB363 RAID Controller (Windows 2K/XP/2003)(Note) and press ENTER.Then it will appear. Windows Setup Setup will load support for... the following mass storage device(s): GIGABYTE GBB36X RAID Controller(Windows 2K/XP/2003) * To specify additional...
... from the motherboard driver CD. GA-965GM-(D)S2 Motherboard - 74 - English Step 3: If Setup correctly recognizes the driver in BIOS Setup to select GIGABYTE GBB363 RAID Controller (Windows 2K/XP/2003)(Note) and press ENTER.Then it will appear. Windows Setup Setup will load support for... the following mass storage device(s): GIGABYTE GBB36X RAID Controller(Windows 2K/XP/2003) * To specify additional...
Manual
Page 75
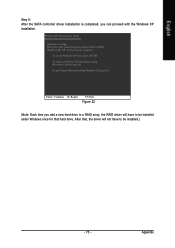
... now, press ENTER. WindowsXP Professional Setup Welcome to run on your computer. To quit Setup without installing Windows XP, press F3. This port of the Setup program prepares Microsoft(R) Windows (R) XP to Setup. English Step 5: After the SATA controller driver installation is completed, you add a ...new hard drive to a RAID array, the RAID driver will have to be installed under Windows once for that , the driver will not have to be installed.) - 75 - After that hard drive. Appendix Enter= Continue R=Repair F3=...
... now, press ENTER. WindowsXP Professional Setup Welcome to run on your computer. To quit Setup without installing Windows XP, press F3. This port of the Setup program prepares Microsoft(R) Windows (R) XP to Setup. English Step 5: After the SATA controller driver installation is completed, you add a ...new hard drive to a RAID array, the RAID driver will have to be installed under Windows once for that , the driver will not have to be installed.) - 75 - After that hard drive. Appendix Enter= Continue R=Repair F3=...

Manual
Page 76
... call over the Internet, and etc. The jack retasking capability supported by the audio software provided. HD Audio With multiple built-in Windows XP) Center/Subwoofer Speaker Out Rear Speaker Out Side Speaker Out Line In Line Out (Front Speaker Out) Mic In Note that ...applications, HD Audio is applied. STEP 1 : After installation of the audio driver, you use the speaker with amplifier to the right. GA-965GM-(D)S2 Motherboard - 76 - Stereo Speakers Connection and Settings: We recommend that you should find the icon in and out) simultaneously. English 4-1-5 2- / 4- / 6-...
... call over the Internet, and etc. The jack retasking capability supported by the audio software provided. HD Audio With multiple built-in Windows XP) Center/Subwoofer Speaker Out Rear Speaker Out Side Speaker Out Line In Line Out (Front Speaker Out) Mic In Note that ...applications, HD Audio is applied. STEP 1 : After installation of the audio driver, you use the speaker with amplifier to the right. GA-965GM-(D)S2 Motherboard - 76 - Stereo Speakers Connection and Settings: We recommend that you should find the icon in and out) simultaneously. English 4-1-5 2- / 4- / 6-...

Manual
Page 77
... or Line Out depending on the device connected and click OK. STEP 3: After a speaker or headphone is plugged into the rear Line Out jack, a small window will pop up and ask you what type of equipment is completed. 4 Channel Audio Setup STEP 1 : After installation of the audio driver, you should find...
... or Line Out depending on the device connected and click OK. STEP 3: After a speaker or headphone is plugged into the rear Line Out jack, a small window will pop up and ask you what type of equipment is completed. 4 Channel Audio Setup STEP 1 : After installation of the audio driver, you should find...


